Just a reminder…….hurry over and submit your applications for the 2016 ‘Make It and Love It’ CREATIVE TEAM! We’d love to have you! :)
. . . . .
Today’s contributor is Sara from The Aqua House. All posts written by Sara for Make It and Love It can be found HERE.
. . . . .
Hi Again! It’s Sara from The Aqua House and I’m here with a fun follow up on a project that I made for ‘Make It and Love It’ last year.
Do you remember back to when I made the Faux Fireplace Mantle? Well, YOU, the readers gave me some suggestions and I listened! While the Faux Fireplace Mantle was a super easy way to get that mantle space and feel into my home, it still left me wanting more. Like, a full fireplace more! My husband and I have looked into adding a real fireplace into our living room and, ouch, we just don’t have that much extra money hanging around right before Christmas. The solution? A FAUX fireplace! It still gives us the same look and feel of a fireplace but at a fraction of the cost! Now I’ll finally have a place to hang those little stockings up on Christmas Eve! And, with how this is built, we can eventually come in and put a real fireplace in…double bonus!
I don’t know about you, but a fireplace for the holidays just makes it that much more cozy!
This fireplace is made to be move-able so if you decide you are done with it, you can move it to storage until next winter. Or, if you are like me and want to make it a more permanent fixture in your home, I’ll show you how to anchor it to the wall so your little ones can’t climb up on it and tip it over. That’s kind of a big consideration in my home with four little boys!
I’ve seen lots of faux mantles and not many have a hearth piece. I wanted a hearth piece with mine and I’ll show you how easy it is to build it. It’s a great place to put extra decor…or some logs to complete that fireplace look! Plus it adds lots of stability to the fireplace (but I’d always recommend anchoring it to the wall to avoid tipping!).
Are you ready to add some warmth and coziness to your home this holiday season?
For this project you will need:
PART ONE: FRAMING
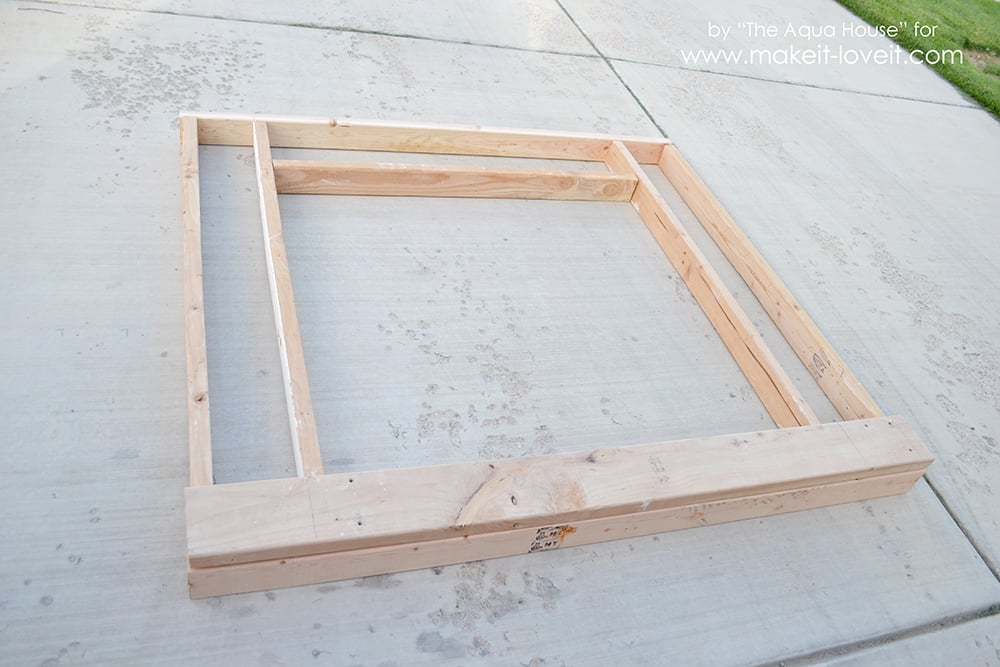
To start out, we are going to create the frame for this mantle. It’s kind of like when you frame a house…we’ll be using some good old 2 x 4’s to create the “bones” of this structure. There are three different parts to the frame: the back, front, and hearth.
CUTTING
We are going to start by cutting out the very back of the fireplace, this is the part that will go against your wall. You will start by cutting the top and bottom pieces at 63 inches. Then cut the four side pieces at 54 inches and the support piece (pictured on the bottom) at 42 inches.
Next we will cut out the front piece of the fireplace. For this you will need to (again) cut one top and one bottom piece at 63 inches long, 4 side pieces at 54 inches long, a crosspiece at 44 inches, and the mantle front piece (out of a 2×6) at 63 inches.
Then we will cut out the hearth piece. Cut the top and bottom to 63 inches and the four cross pieces at 7 3/4 inches.
ASSEMBLY
For the 2×4 framing structure we will be screwing everything together and using the 3 inch grabber screws and wood glue for extra durability. Make sure to counter sink all screws so they will sit flush.
We will start by assembling the hearth piece. Lay one of your 63 inch 2×4’s flat and attaching two of the crosspieces flush with each end. Then measure in from the end 15 1/8 inches and mark a line. Line a crosspiece up on the inside of this line (nearest to the center) and attach. Repeat on the other side and then attach the top piece.
Now we are going to build the back piece. Start by attaching two of the 54 inch side pieces to the edges of the bottom piece. From the outside edge of the bottom piece, measure in 8 inches and mark a line. Line one of the side pieces up on the inside of the line (nearest to the center) and attach. Repeat on the other side and then attach the top piece.

Your back piece should now look like this.
Now we are going to add the support piece to the top piece. Center the support piece flush against one side using a clamp. Then attach with screws.
Now we will build the front of the fireplace. Lay out two of the 54 inch side pieces on end and sandwich the 44 inch crosspiece in between, with the crosspiece laying flat. On the side pieces, measure down 9 1/2 inches and mark a line. Set the crosspiece above these lines and attach to the side pieces.
On one of the 63 inch top/bottom pieces, measure in 8 inches and mark a line. On the inside of this line attach the side piece/crosspiece section you just built.
Attach the other 63 inch board using the same method.
We will now attach the other two outside pieces.
On the end opposite of where you attached the crosspiece, you will add the 63 inch 2×6 mantle front.

CONNECTING
You should now have the three separate pieces built. We will now put them together. From a 2×4 cut 6- 12 inch pieces and 1- 5 1/2 inch piece. Also (not pictured) cut out a 44 inch 2×6. These are the connector pieces and will hold the three frames together.
Take the front and back fireplace pieces and lay them down on the ground with the front piece on top. Take the 5 1/2 inch connector piece and attach it between the mantle front and the support piece on the back frame. Center it and attach with screws, screwing in from the top.
Stand up the now connected front and back fireplace pieces. On the bottom sides, attach a 12 inch piece with screws.
Repeat on the other side. Take the 44 inch 2×6 and attach to the backside of the crosspiece on the front of the mantle. Add additional screws through the side pieces.
Now take the hearth piece and attach it to the side connector piece so it is flush with the front of the connector piece.
Add the other two 12 inch connector pieces on the sides so it is flush with the top of the hearth piece.
Take the last two 12 inch connector pieces and wedge them between the hearth piece and the front piece. Attach by screwing from the side and back.
The frame for the fireplace is now complete! Give yourself a high five for getting this far!
PART TWO: SHEETING
Now it is time to sheet the frame we have built. To start out, cut the following dimensions from a sheet of MDF. These are most of the side and mantle pieces.

Now we will cut the hearth top. This will also be cut from one of the MDF sheets you bought. We chose to cut ours out of Cabinet Grade Plywood to make sure that it was extra durable. If you want you can also purchase a sheet of this, but it isn’t the most cost effective way! Cut this to 14 x 70 inches.
Once you cut it to size, you will need to cut it to fit around the columns. To do this, follow the dimensions pictured below.
From the MDF cut 6- 1 x 7 1/2 inch pieces (two are pictured here, two are pictured below, and two aren’t pictured oops!) and 1- 1x 66 inch piece.
Cut a piece to 8 1/2 x 43 inches. This will be the mantle bottom.
Cut the mantle face to 67 x 11 inches and the mantle top to 10 1/2 x 70 inches.
Cut 2- 8 1/2 x 11 inch pieces.
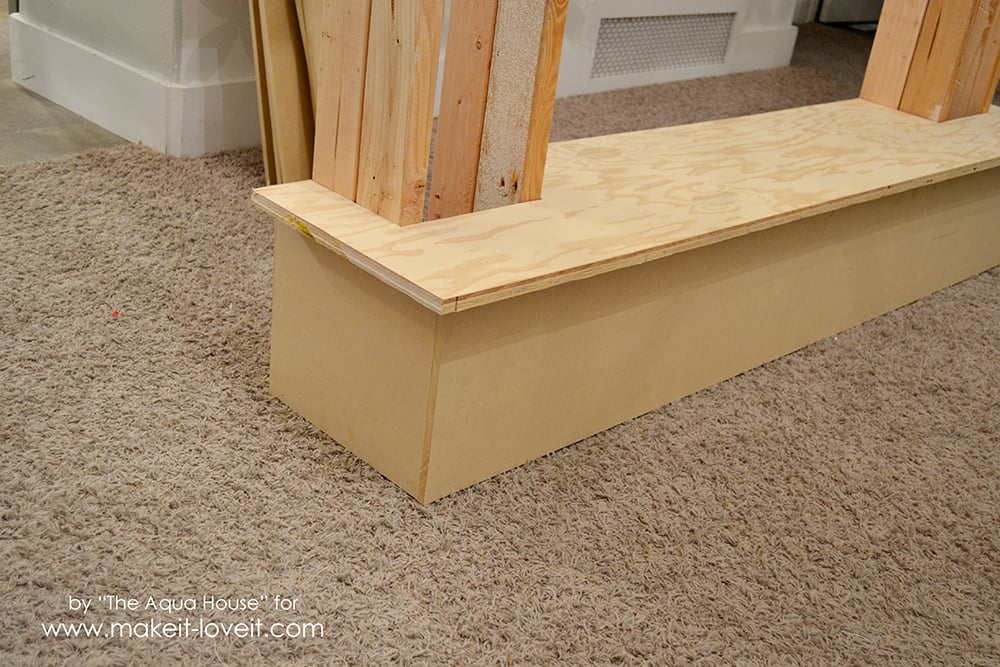
We will start by attaching the hearth top. Slide the notches around the columns and using a finish nailer attach it to the frame.
Next, take the 2- 11 1/4 x 12 inch pieces and attach them to the sides of the hearth. Then take the 11 1/4 x 67 inch piece and attach it to the front of the hearth.
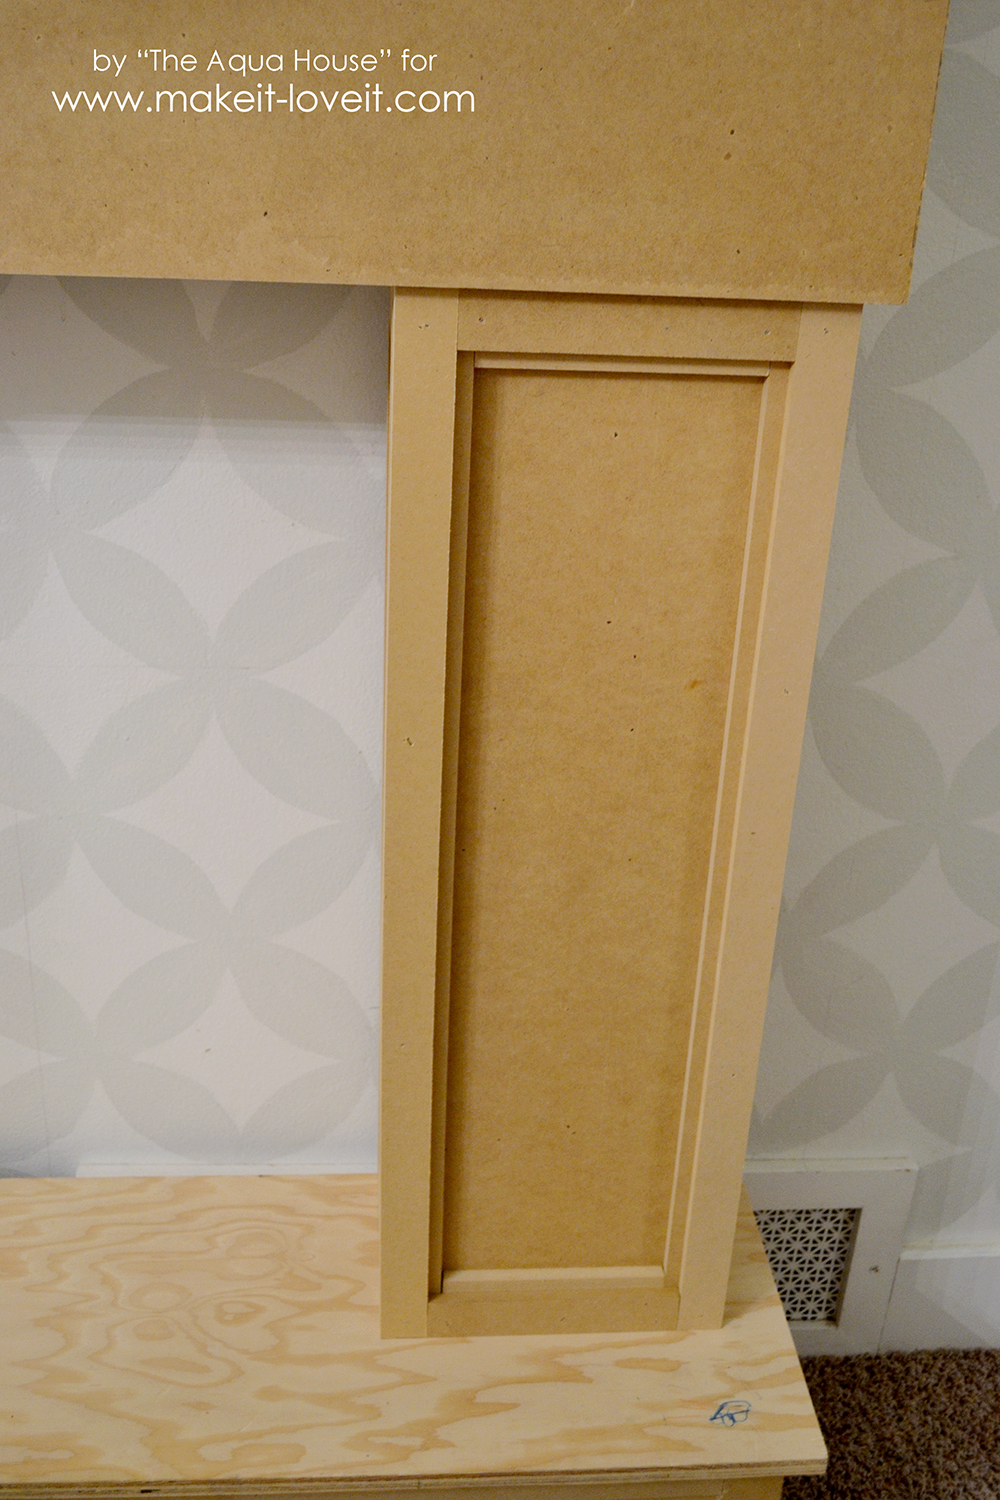
Now we will sheet the columns. We will start on the outside of the column and attach the 7 x 45 1/4 inch piece. Next, we will sheet the inside of the column using the 7 x 39 inch piece. Finally sheet the front of the column using the 10 1/2 x 39 inch piece. Repeat on the other side.
Your fireplace should now look like this!
Next we are going to work on the mantle. To make the mantle have some depth, we will add the 1 inch pieces to help bring it out. From the top of the fireplace, measure down 10 1/2 inches and mark a line. Below this line attach two of the 1 x 7 1/2 inch pieces to the sides of the column so the board sticks out 1 inch. Then take the 1 x 66 inch piece and attach it to the front so it overlaps the side pieces.
Now we will use the other two 1 x 7 1/2 inch pieces and the 8 1/2 x 43 inch mantle bottom. 1/2 inch above the front 1 inch piece, nail the other 1 x 7 1/2 inch piece to the inside of the column. Repeat on other side. Slide the mantle bottom between the front 1 inch piece and the new side support piece. Nail the mantle bottom into the side pieces.
Now we will add the mantle face
Take those last two 1 x 7 1/2 inch pieces and attach them to the top of the column like this.
Then apply the 8 1/2 x 11 inch pieces to each side.
Last, you will attach the 10 1/2 x 70 inch mantle top piece by setting the back flush with the mantle and centering the top so the overhang matches on both sides.
The sheeting should now be all done! Yay!
PART THREE: TRIM AND FINISH WORK
Now that the fireplace is sheeted its time to add some trim and detail to it. This part it totally optional and totally up to you as to how you want to trim your fireplace. The following directions are for how I trimmed out mine.
To trim your fireplace like mine, you will need to cut:
4- 2 x 10 3/4 inch, 4- 2 x 15 5/8 inch, 2- 2 x 28 1/2 inch. These are the trim for the front of the hearth.
4- 2 x 9 inch, 2- 2 x 10 3/4 inch, 2- 1 1/2 x 10 3/4. These are the trim for the hearth sides.
4- 1 1/2 x 34 1/2 inch, 8- 2 x 34 1/2 inch, 4- 2 x 7 1/2 inch, 8- 2 x 4 inch. These are the trim pieces for the columns (pictured is only one of each size)
4- 1 1/2 x 8 1/2 inch, 4- 1 1/2 x 34 1/2 inch. These are additional column pop out pieces
20- 3 x 7 1/2 plank pieces cut from the underlayment.
Cut the 3/4 inch square dowel on a 45 degree angle. From long point to long point your long piece should measure 68 3/4 inches and the two shorter pieces should measure 9 3/4 inches. This will be additional trim around the mantle ledge.
Cut 2- 2 x 68 inch pieces, 6- 2 x 6 1/4 inch, 4- 2 x 9 inch, and 2- 1 1/2 x 6 1/4 inch. These are the mantle trim pieces (pictured are only one of each).
Cut the 1/2 round shoe on a 45 degree angle. From long point to long point the long piece should measure 70 inches. The two short pieces will measure 10 1/2 inches. The two short pieces should have a 45 degree cut on one side and a 90 degree cut on the other side.
Cut the faux brick panel to 48 x 36 3/4 inches. If you are like me and don’t want your brick to be the standard red color that it comes in, you can paint it! To paint your brick how I did, follow this tutorial here.
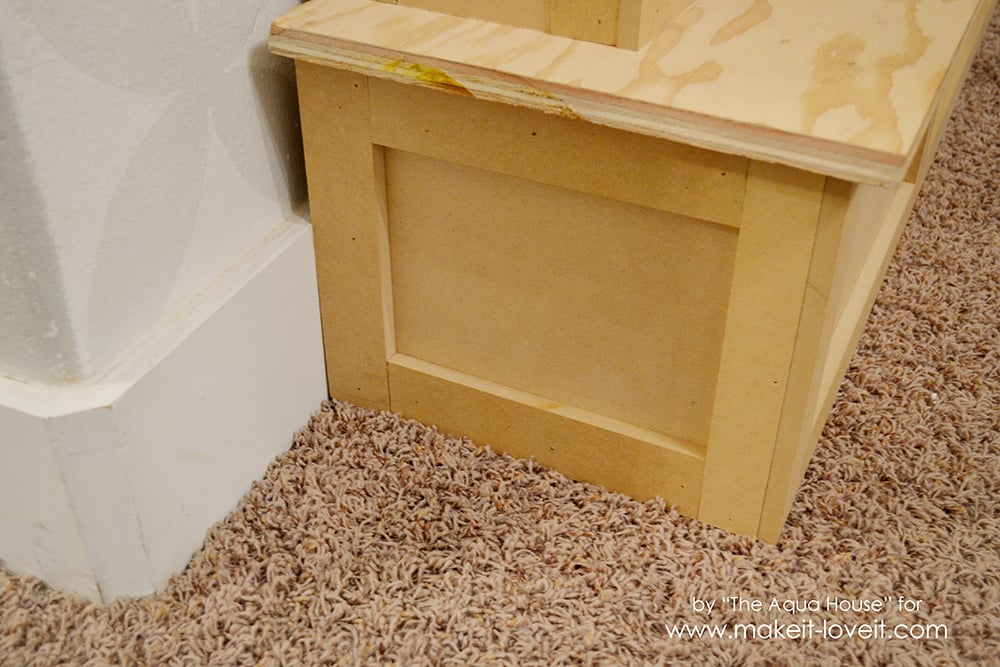
Now that you are done cutting lets begin trimming this thing out! We will start with the hearth front. On each end you will lay a 2 x 10 3/4 inch piece, overlapping it off the edge by 1/2 inch. This is so you can later butt the side trim up to it. Nail into place. Working your way across the hearth front from left to right, lay two 2 x 15 5/8 pieces perpendicular to the first 2 x 10 3/4 piece. Then put a vertical 2 x 10 3/4 inch piece, followed by two horizontal 2 x 28 1/2 inch pieces, another 2 x 10 3/4 vertical piece, then the last two 2 x 15 5/8 pieces. Then finish with your last 2 x 10 3/4 piece.
Now we will work on the hearth side. Take a 1 1/2 x 10 3/4 piece and nail it to the front of the hearth side so it butts up next to the piece that we overlapped. Nail the 2 x 9 inch pieces horizontally and finish the box off with another 2 x 10 3/4 piece. Repeat this for the other side of the hearth.
Now we will trim the columns. Start by nailing on the vertical 2 x 34 1/2 pieces on the front side of the column. Just like on the hearth, overlap each side by 1/2 inch so your side trim will butt up against it. Add the horizontal 2 x 7 1/2 inch pieces on the top and bottom of the front of the column. To trim out the sides, start by taking the 1 1/2 x 34 1/2 inch pieces and butting them up to the front trim that is overlapped. Add the horizontal 2 x 4 inch pieces and finish the box by adding 2 x 34 1/2 inch pieces. Repeat this process on both the inside and outside of the columns.
We will now add the additional column pop out pieces. Nail on the vertical 1 1/2 x 34 1/2 inch pieces making it flush with the side column trim. Then add the 1 1/2 x 8 1/2 inch horizontal pieces.
Now to plank the inside of the column you will need to grab the 20- 3 x 7 1/2 inch plank pieces. Starting at either the top or bottom start nailing them in. I used 2 nickels for a spacer between the plank pieces. You may have to trim down the last piece to fit in.
It should look like this once its all planked.

Now it’s on to trimming out the mantle. Take the 3/4 square dowel and attach it right below the mantle top. Then attach the 2 x 68 inch piece directly under it. It should have a 1/2 inch overhang on each side. Next, take four of the 2 x 6 1/4 inch pieces and attach them vertically. Start on one end with a 1/2 inch overhang (it will be flush against the 68 inch piece) and nail. Measure over 10 1/2 inches and attach another 2 x 6 1/4 piece. Do this on each side. Then attach the second 2 x 68 inch piece to the bottom.
Next we need to trim the sides of the mantle by taking a 2 x 9 piece and attaching it horizontally under the 3/4 inch dowel. Butt up the 1 1/2 x 6 1/4 inch piece to the front of the mantle trim. Add on the second 2 x 9 piece to the bottom and finish out the box by adding the last 2 x 6 1/4 inch piece. Repeat on other side. To finish out the trim add the 1/2 inch round shoe on top of the 3/4 inch dowel. It should be flush with the top of the mantle giving it the appearance of being thicker.
Once all of the trim is on, putty and fill all nail holes and sand off the excess. Then its time to paint the fireplace!
Once all the paint is dry attach the faux brick panel to the back using the 1 inch grabber screws.
Caulk any gaps that you want to fill.
PART FOUR: THE BRACKET
While building this fireplace you may have noticed two things about it: one–that it is quite heavy and two–that it is fairly stable. Just because it is stable doesn’t mean that you shouldn’t take the extra precaution of anchoring it to your wall. There are many ways that you could attach this to the wall including buying earthquake straps for furniture from the store. I chose to make a custom bracket out scrap lumber. Here is how I did it.
Cut 1- 1 x 1 1/2 inch piece and 1- 2 x 42 inch piece.
You will put these two piece together in an “L” formation with the 2 x 42 inch piece being upright. I screwed these together.
Using a stud finder, attach it to studs with the 1 x 42 inch side being screwed into the wall. The height you set it at will vary whether your fireplace is on carpet or a hard surface. The bracket needs to come in just above the mantle bottom piece. For my fireplace that was at 47 1/4 inches from the floor.
Once your fireplace is over the bracket, screw the fireplace to the bracket coming in from the mantle bottom. You can paint to cover the screws.
Now you are done! Go decorate that new fireplace!
Throw some logs on the hearth or deck it out with your favorite decor!
And most importantly, enjoy all that hard work!
Hope you enjoy!
-Sara
Check out Sara’s blog HERE, her Facebook page HERE, her Instagram account HERE, and her Pinterest Boards HERE.

Hi, I’m Ashley—the DIY-enthusiast behind this crazy blog!