We are so thrilled to welcome Terra, from Mama Says Sew, who will be sharing some darling fabric creations — just like today’s precious Collared Romper Tutorial. Oh my………SO darn cute! And that Terra has so many clever creations, just you wait and see! So happy to have you Terra — WELCOME!
-Ashley
. . . . .
Hi, I’m Terra from Mama Says Sew and I’m excited to share the tutorial for this adorable collared romper with you today.
The elastic straps make it easy to slip on and off.
It’s a bubble romper that’s perfect for hot summer days and showing off cute little chubby baby legs.
You can dress it up or down depending on the fabric you choose.
This version has a cute little lace collar that gives it a more dressy, girly feel, which I love. It also goes great with her little lace bonnet.
To make your own, you can either download the pattern (it’s about a size 12 month or maybe 18 month) or draft your own. Either way, I recommend making a test version using inexpensive fabric so you can make any changes necessary before cutting into your nice fabric! Also, it’s hand drawn, so there will probably be some human error and things might not line up exactly.
First, here’s how to draft your own.
Draw a rectangle using your baby’s measurements. Top to bottom will be the neck to crotch measurement, and width will be chest measurement plus 3 (or whatever fitting ease you would like) divided by 4 (because you will cut two pieces on the fold). Don’t forget to add seam allowances on top and bottom!
Now draft your neckline. I drafted the collar and the arm curve, then added the line for the back piece. You can use your child’s measurements, or find a tank top to help you. Don’t forget seam allowances. The back will need to be a little higher than the front so there is room to make the casing for the elastic in the back. Mine is 1/2 inch higher (for a 1/4 inch casing), but you can adjust that if you want.
Using the neckline and underarm curves you’ve drafted, make a facing piece and a collar piece. I drafted the collar to be cut on the fold, but you could do a left and right collar piece if you prefer. The facing should match the curve of the upper edge, then come down a couple of inches.
Now that the collar and facing pieces are drafted, add some width so that the romper will bubble, and more importantly, make dressing easier. All you need to do is tape some paper to the side that the fold is on, and add about 1.5 inches all the way down the fold.
Now draft the leg openings. The front is the larger curve and the back is the straight line. Make sure there is plenty of room for the leg to fit through, and remember the back needs to give more coverage than the front.
Phew. Now that the drafting is over, it’s time to sew!
Cut out a front piece, a back piece (in the downloadable pattern, cut on the solid lines for the front piece and the dashed lines for the back piece), a facing piece, two collars, plus an interfacing for the collar, and two strap pieces. My strap pieces measured 1.5 inches by 14 inches. You’ll also need some bias tape (either make your own or buy some) and some 1/8 inch elastic. If you want to make a lace collar, cut out a collar piece of lace, baste that to one of your collar pieces, and then treat like one piece of fabric.
First, fuse a piece of interfacing to one of the collar pieces.
With right sides together sew collar pieces together along the outer curve. Clip and notch curves, turn collar right side out and press.
Finish the bottom edge of your facing piece. You can either use a serger or zig zag stitch, or do a narrow hem for a neater finish.
To create the straps, fold them in half wrong sides together and press. Open up the fold and fold the raw edges into the center and press. Fold in half along the first press line and press again. They should look like a strip of bias tape. Alternatively, you could use bias tape if you have some that matches.
Sew the straps along the folded edges to make a tube. Insert a length of elastic into the tube and sew both ends to secure the elastic. I used a piece of elastic about half the length of my strap, but that is something you can play around with to get the look you want. Alternatively, you could use a strap without elastic, but that might make dressing a little more tricky.
Gather the front neckline to fit the collar and facing neckline. Baste the collar to the right side of the front neckline. Line up the straps with the center of the shoulder on top of the collar.
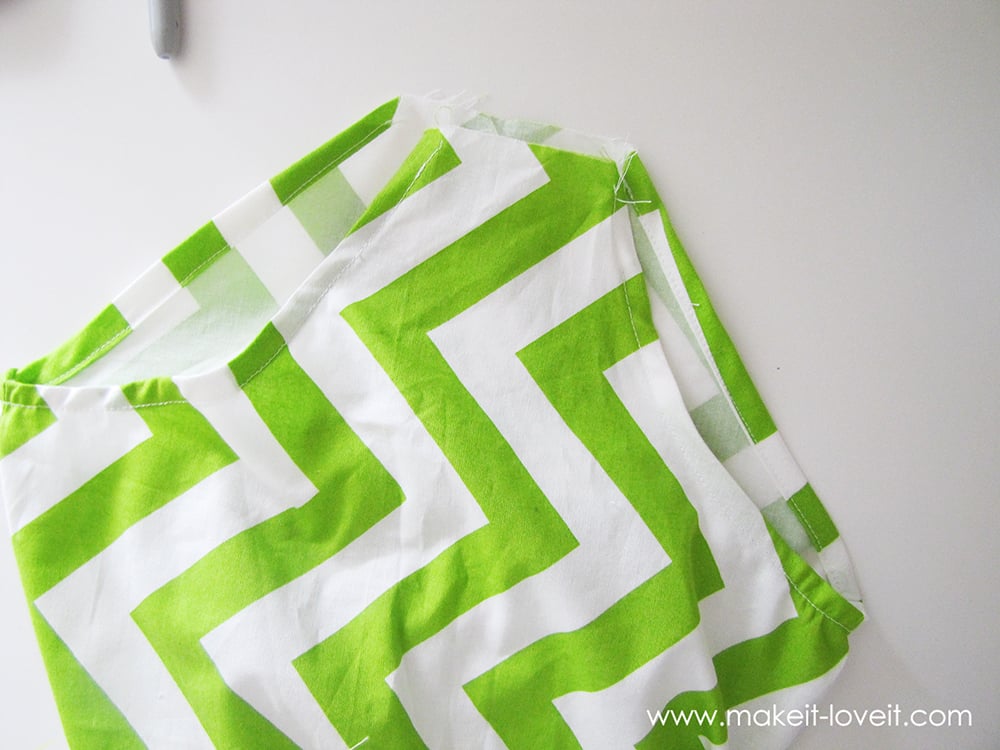
Match the facing piece to the front piece right sides together, sandwiching the collar and strap in between. Stitch all along the top edge, starting at one underarm curve, going across the shoulder, around the neckline, across the other shoulder and down the other underarm curve. Clip/notch curves, turn right side out and press.
You’ll have several layers, so you may want to grade your seam allowances.
You should now have something like this.
To keep the collar from rolling, topstitch close to the seam underneath the collar.
Form a casing on the back piece by folding down 1/4 inch, pressing, then folding down another 1/4 inch, and pressing again. Stitch close to the first fold line.
Insert a piece of elastic into the casing and stitch both ends to secure the elastic. The length of the elastic should be a little shorter than half of the child’s chest measurement.
Match the front and back pieces together and stitch the side seams. Press the seam allowance to the back and stitch along the top of the back casing to keep the seam allowance in place.
Sew casings along the leg openings and insert elastic, again stitching at both ends to keep the elastic in place.
Cut or make a piece of bias tape an inch longer than the crotch seam. Fold the raw ends in one half inch, as shown.
Cover the raw crotch edge with the bias tape and sew around all sides. Repeat for the other crotch edge, and add snaps. Alternatively, you could just sew the crotch seam if you don’t mind taking the whole thing off for diaper changes.
Sew the straps in place. You can either have them meet in the middle or cross in the back.
Enjoy your cute new collared romper!
-Terra
Visit Terra at her blog, Mama Says Sew or on instagram @mamasayssewblog for more fun projects!
. . . . .
If you’ve got a baby boy in your house, why not dress him up with this Faux Vest Onesie? I mean… just….come on. How cute is this?
I
Or, if you’re looking for a bubble romper with a long pant leg, check out this fun tutorial:


Hi, I’m Ashley—the DIY-enthusiast behind this crazy blog!