I know, I know…where have I been?!?! Well, finishing up house projects. Lots and lots of them. We have put off finishing the last bits of the house for long enough. And now they are DONE. And wow, it feels good!!! Thanks to a new year and a goal to have them all completely finished.
Remember how I shared our Stained/Painted Banister last week? Well, I mentioned to some in the comment section that we were working on staining our bathroom cabinets (which were the last thing in the house that still had that gorgeous orange oak color……ha, I kid) — and now they’re done too! Both upstairs bathrooms are stained, top coat applied, dried, and beautiful!
Which is funny that all it took was a little stain (that can be purchased online HERE) to make these bathrooms look so much better. Because when we moved into the house almost 2 years ago, our plan was to tear out the cabinets and install new ones. We also wanted to install a different shower and possibly change out the tile too. But, the budget never allowed it (and we always found other things to spend any extra cash on). We finally decided that even though the tile wasn’t our first choice, it really wasn’t all that bad……and that staining the cabinets would be good enough for now. And now that it’s done, we’re so MAD we didn’t do it earlier. We actually love the clean dark look of this Java stain….and it gives a great pop to the bathroom! And the best part — it was CHEAP and super FAST to do!
When I dug through all of the “before” pictures that I took before moving into our house…..I realized I didn’t have any that captured the old color and look of the cabinets very well. Ooops. But the picture below gives you a pretty good idea.
Because it’s stain, you still get to see the wood grain. Even with this really dark brown Java stain. And let me tell you, applying this gel stain is SO much easier than painting. You don’t have to worry about paint lines and/or your paint getting too thick and clumpy, etc. It really is SO much easier to apply. And nope, not a single need to sand any of that wood before applying the stain. Can I get a HALLELUJAH?!!
All we stained were the doors and the front facing section of the cabinets. Just like cabinets that you’d buy at the store (or have installed by a cabinetry company), the inside box of the cabinet were left alone.
Oh, and let’s talk about hardware. If you want to take your plain cabinetry up 327 notches, add hardware. Please, oh please add hardware!! The pops of metal add SO MUCH to the look of your cabinetry…..and yeah, they also help open your drawers and doors too! ;) So for $2-3 for very basic knobs, please don’t skip the hardware!
We also changed out the light fixtures above both sets of cabinetry, which made a huge difference.
Oh, and one of my very favorite transformations that we’ve done throughout the whole house, is trimming the windows and doors (<—yes, that’s a link, go check out that tutorial too!). So, you better believe we trimmed out the 2 windows here in our bathroom too. And oh yes, I’m in love!
Such a beautiful transformation, for such little time and very few dollars. Perfect.
I know some of you must have some oak cabinets that you’ve been wanting to change. Well, now you know, it totally works!!!
And because I already shared all of the info for staining oak over on my Staining/Painting an OAK Banister post, take a peek over there first to see how to best stain your oak cabinets.
(Here’s a peek in case you missed that post ———v)
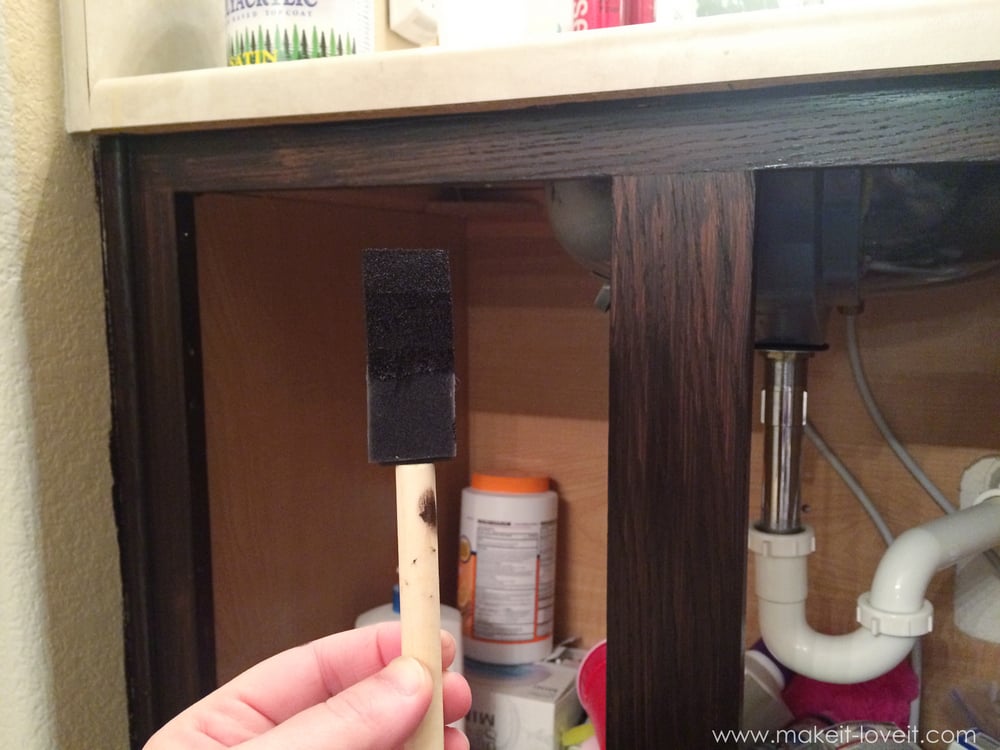
The only additional info you may need (than the banister post linked above) is that you must take each of your doors and drawer fronts off and remove all hinges, knobs, etc. Sand down any bumps or nicks in the wood. Then apply your stain with a sponge brush. (Yep, we used the same Java Gel Stain as the banister…worked awesome!) If you keep it light and really even, you may not even need to wipe any excess off (which is what I was aiming for, to save time and mess). But if you have any clumps of stain, you can wipe that away with a soft lint-free cloth. Let your first coat dry completely and then add another coat or two if needed. (I only needed 2 coats for these cabinets because the color soaked in really well.)
Here’s a cell phone picture of the stain I applied to the cabinet fronts. This is after one coat. Just be sure to not get too sloppy and let any of the stain get onto the inside of the cabinet. However, you can see that my stain got a little messy along the side where it touches the wall. And that’s okay because I knew I could go back later and paint over that when I painted the walls.
To paint the doors, we put them out in the garage on top of these little plastic Pyramid Stands (we found them here on Amazon). They made a huge difference to keep the doors off the ground, so that we could stain both sides even if one side was still a bit tacky.
Buuuuuuut, we ran out of the little pyramids. So, we used the nail gun and shot a whole bunch of nails through an old piece of wood so that the doors could balance on something similar to the pyramids. Worked GREAT!
And that’s about it. The rest of the process was identical to the Staining an Oak Banister tutorial. Including applying the polyurethane Top Coat, which really helps seal in the stain and protect from normal wear and tear.
Now go on, don’t worry about staining your cabinets any longer……it will turn out beautifully!!
A weekend DIY project to refinish oak bathroom vanities using a dark brown Java gel stain. Learn how to make your cabinets darker without sanding. Easy and budget-friendly.

Refinish Bathroom Vanity DIY Project: How to Stain (Dark) Oak Cabinets without Sanding
Yield:
Beautiful Dark Oak Bathroom Cabinets
4.4 Stars (10 Reviews)
Materials
Tools
Instructions
Here's the before and after: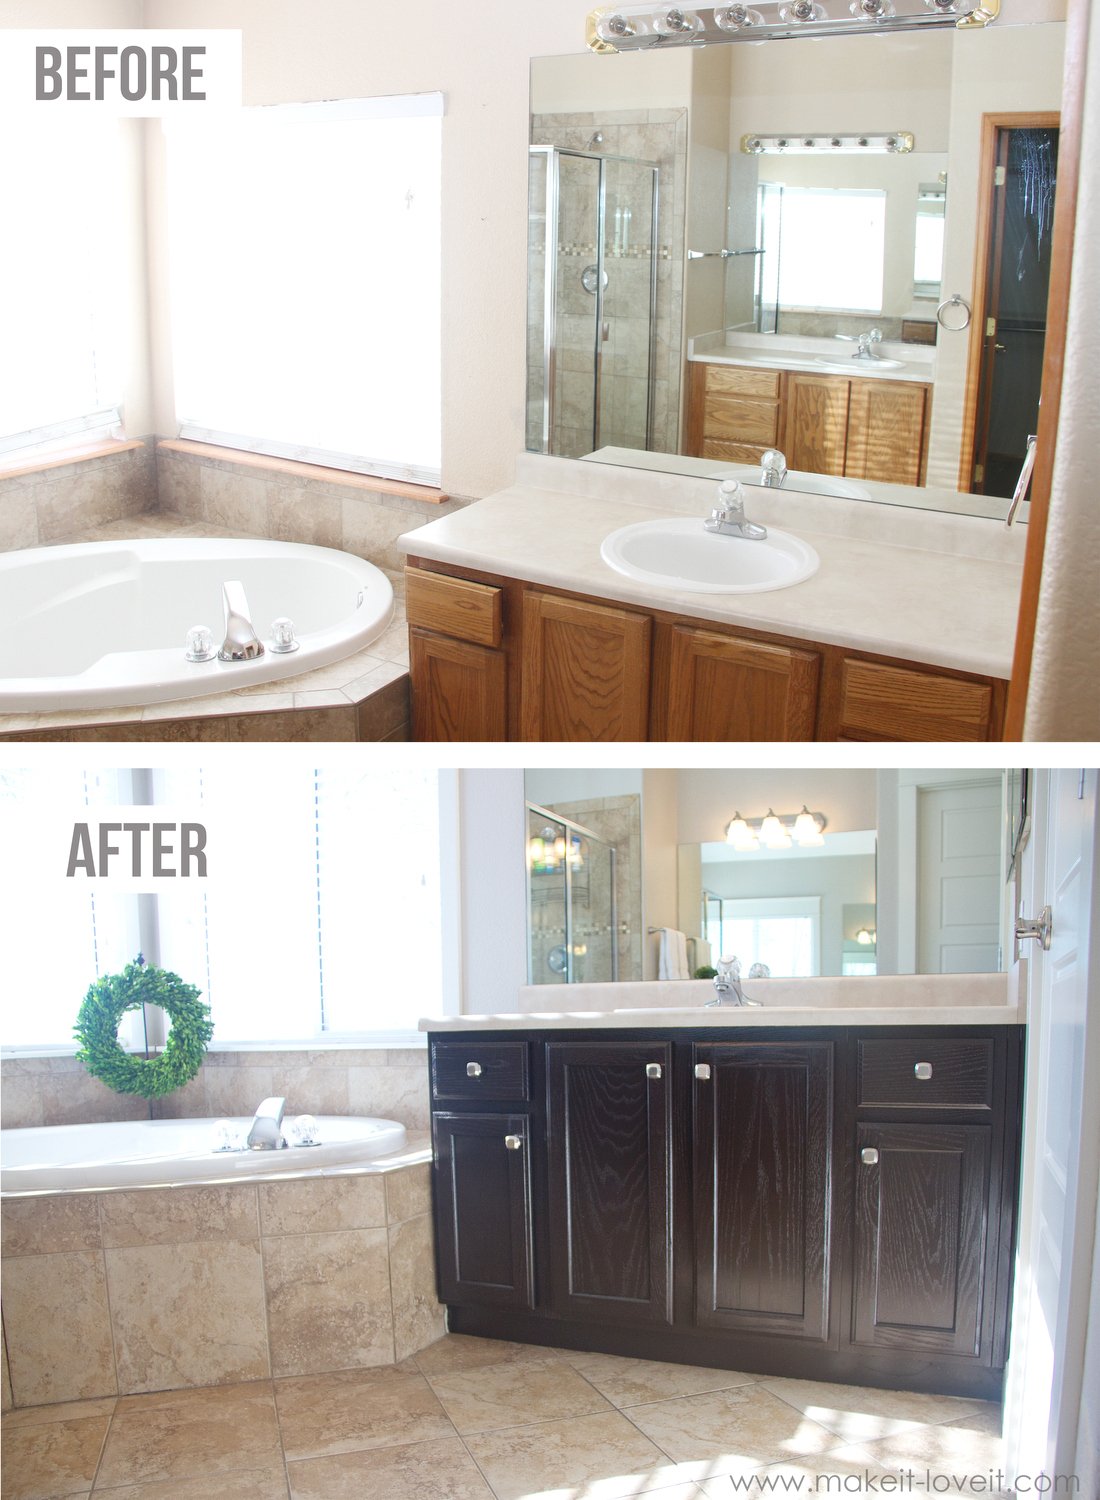
Notes
-Ashley
. . . . .
Looking for more home DIY projects??
Installing a door (the EASY way) and Trimming It Out
Turn A Coat Closet into a Mudroom

Hi, I’m Ashley—the DIY-enthusiast behind this crazy blog!