We listen to music all the time in this house. Most of our music is on our phones, so we can easily turn on something to listen to driving in the car, while doing dishes, when we’re outside playing, while showering and getting ready, etc. However, even though the sound on our phones is pretty good……it can only get so loud. We have a bluetooth speaker in the kitchen that works great — but sometimes it’s a pain to haul around to different rooms, the garage, outside, etc.
And instead of buying a bluetooth speaker for every location in our entire house……we made a really inexpensive alternative, that also blends in with your decor.
A Wooden Phone Amplifier/Speaker……and nope, no cords or batteries needed.
All it is, is a few pieces of wood glued together and then stained…..to pretty it up a bit!
And how does it work?? Well, have you ever set the speaker end of your phone into a bowl, to increase the volume and to help it resonate? Same concept here. There’s a hole at the very bottom of the cell phone slot, that then leads to the “speaker” openings.
It’s hard to see from the outside because everything is glued together……but the sound channels down through that opening and is forced to the right or the left, where there are openings where the sound can swirl around and then amplify…..coming out both of those circle openings.
Pretty cool, right?!?! Well, it’s actually much cooler when you hear it for yourself. Because it’s pretty amazing how much the sound improves, with no actual speaker wiring or electricity.
Maybe actually hearing for yourself will help you hear the difference…..so here’s a quick video. :)
I know….crazy! I can hear the sound this produces from so much further away than just laying my phone on the counter.
In fact, I have this speaker sitting right next to me as I’m typing this up, and I just turned it down because it was too loud. Ha!
And no more unplugging our bluetooth speaker and re-setting the functions each time I want to switch rooms in the house. Now, I can either grab this and take it with me, or create a few more. Because, it sure is a lot prettier to have sitting on a counter or shelf than the ugly black speaker and cord.
Okay, let’s get started!!
**This speaker was made to custom fit my IPHONE 5S with its bulky Otter Box case. (My phone is constantly dropped and gets water spilled on it all the time. So even though it’s not the prettiest, that Otter Box has saved me a TON of money. :)) However, if you have a different size phone, you’ll have to tweak these measurements to fit your phone just right. Your speaker may also be in a different place (depending on your phone brand) and you want to be sure the the opening is placed right where your speaker sits. SO, use this as a guide…..because once you see how this works, it will be simple to adjust. :)
SUPPLIES:
First of all, cut your 24 inch long wood plank into two 12-inch long pieces. (One of the pieces will be labeled as #1 down below and the other will be labeled as #3). Then, cut your dowel(s) into the appropriate pieces shown below.
Here are the measurements for the above wood pieces:
#1:
#2:
#3:
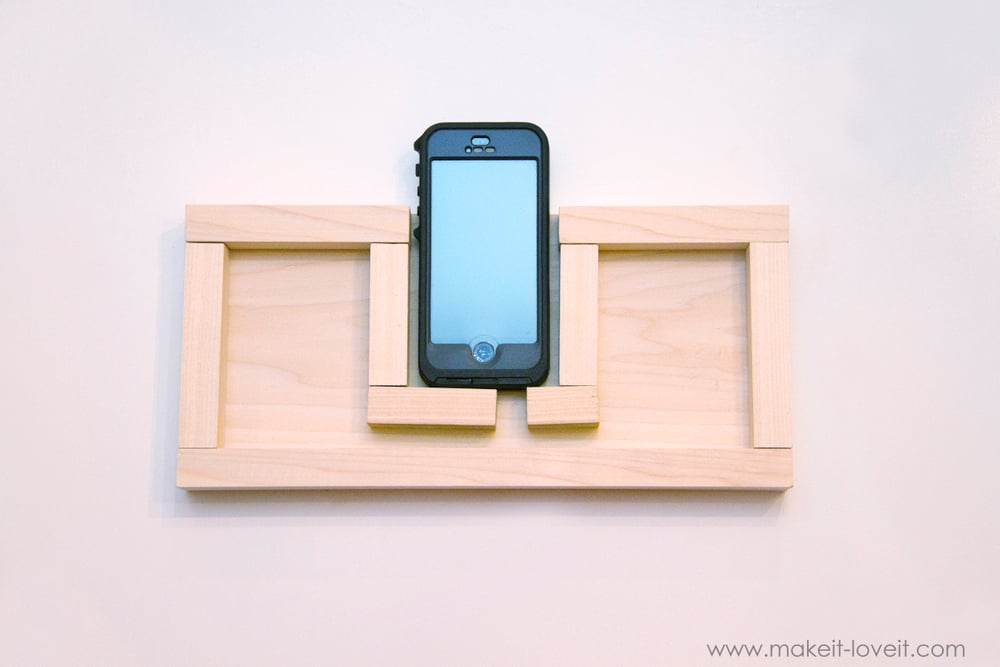
Now, arrange your wood pieces from #2 on top of wood piece #3 and make sure that everything fits correctly. Now, the little opening for the speaker should be just wide enough for the speaker holes. Check yours to be sure it lines up.
Even better, slide your phone carefully onto the slot and check to be sure it fits and that the speaker is above the opening.
**Also, it’s important to note (if you’re changing the measurements for your phone), the small channel that carries the sound to the right or the left, is only 1/2 inch wide. Keeping it narrow like this will help keep the sound condensed until it reaches the larger areas to swirl around and resonate out the circle openings.
Next, grab your #1 piece and find the exact center of the two ends and use a Hole Saw to cut a 2 1/8 inch hole into each side. (You can also use a jig saw with a fine blade.)
This is optional….but made it look kinda cool. Use a router to round the edgez of the hole opening. Place this piece on top of the others to be sure everything lines up correctly.
Now, glue the #2 pieces on top of the #3 piece, using wood glue.
Then place a layer of glue on top of the #2 pieces and spread it thin with your finger.
Place the #1 piece right on top and make sure all edges are even. Clamp all your pieces together and let dry completely. (If you don’t have any clamps, try placing heavy books on top or some other type of heavy object.)
Once the glue has dried, sand all of the edges and wipe off any dust with a damp cloth. Then, you can either paint, varnish, or stain your wood. It’s up to you! (I used a mixture of brown and black acrylic paint and watered it down with water. Worked great….because I didn’t have actual stain on hand.)
If you want, use sand paper to rough up the edges and give the wood some texture. Then add a layer of varnish to finish it off. (I used a glossy varnish that I bought right next to the acrylic paint bottles, that was less than $1.)
And that’s it!
Time to slide your phone right inside and play your favorite tunes!!
-Ashley

Hi, I’m Ashley—the DIY-enthusiast behind this crazy blog!