Home » DIY Tutorials » DIY Sewing » Make-a-Cake Series: Baby Clothes –Part 2
Make-a-Cake Series: Baby Clothes –Part 2
July 2, 2010 - By Ashley Johnston 11 Comments
. Looking for the Maggie Moo’s Mom giveaway? Scroll down or click here.
And Bonita Boutique is having a 15% off sale for all tutu onesies, through the month of July. Hurry on over!
. . . . . . . . . . . . . . . . . . . . . . . .
I hope you are excited for the second half of our “Baby Clothes” cake. I know I am.
(Did you miss Part 1 of this series? Click here to see it.)
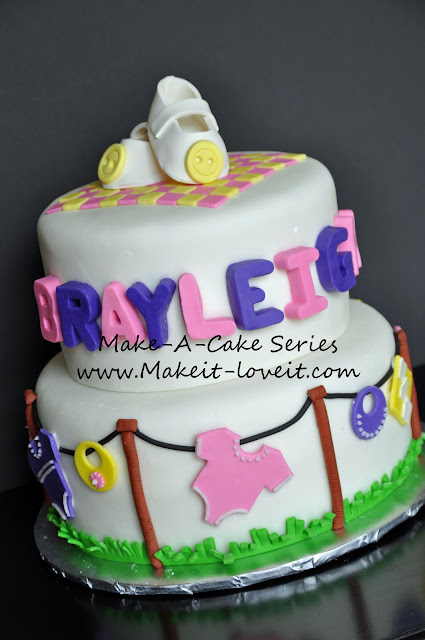
These little edible shoes are one of my favorite things to make.
It’s a cute factor…..and I can’t get enough of them!
Again, here is the cake where I used these little shoes.
Supplies:
1. Water and paint brush
2. Corn Starch
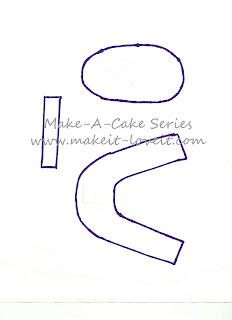
3. Baby shoe pattern (below)–cut out
4.Saran wrap
5. Rolling pin
6. Sharp knife or exacto knife
7. White Gumpaste — not pictured
Enlarge and cut out the pattern.
My shoe was 3.5 inches long. If you want a bigger shoe, adjust your pattern.
Roll out your gumpaste 0.25 inch thick on a lightly greased and corn starched surface.
Lightly dust the top of the gumpaste with corn starch, place you pattern pieces on top, and then cut them out with a sharp knife.
Paint water on the outside rim of the sole of the shoe.
Hold the top of the shoe up and use your hands to form the rough shape of a shoe.
Place the top of the shoe on the table. Paint the back seam with water and close the seam.
Place the shoe top on top of the shoe sole and match it up with the watered edge.
Work the gumpaste with your fingers until the edges meet.
(If you have some hanging off you can trim it with kitchen scissors.)
Ball up your piece of saran wrap and place it in the toe of the shoe to create the shape of a shoe toe.
Leave the saran wrap in place for 10 minutes. Then remove.
Paint water on the ends of the strap piece of gumpaste and set into place.
Now you can make an embellishment for the top of your shoes.
Buttons like this pair were made with circle cookie cutters.
Click here to see another pair I did with a flower detail. (Be creative. Anything would look darling on these little shoes.)
Here are a few details on how I made the rest of the baby cake:
Grass–I cut a strip of green fondant 1 inch wide, placed it along the bottom of the cake, and then cut the blades with kitchen scissors.
Clothes line–I used an
extruder with brown fondant for the poles and black fondant for the wire.
Blanket— I cut small squares and placed them all together to give the quilt look on top.
Happy Decorating!
And let me know how it goes, if you give it a try…


