Today’s contributor is Jill from Snugglebug University. All posts written by Jill for Make It and Love It can be found HERE.
. . . . .
Hi, it’s Jill from Snugglebug University! I’m super excited to show you how to make a Zippered Pouch Rocket Ship today!

It’s not very often that my fairy-loving, frilly daughters come to me requesting me to make them a spaceship! Being the clever little kids they are though, they didn’t ask me to make them a TOY. Oh no, they phrased it as, “Hey Mommy, would you please make us a rocket ship to store all of our space alien toys?”
Oh yes…STORAGE…they know how much I love things to be nicely organized. Smart kids. I couldn’t resist making a cool rocket ship to store their toys in.
They tricked me, though. The rocket ship was barely finished before they had squeezed their stuffed astronaut monkey into the spaceship and it was zooming around the room.

So much for storing those little toys that were scattered all over the floor! They got me! But not for long. By the end of the night astronaut monkey was tucked into bed and the new rocket ship held all those toys it was supposed to…well, at least until the next morning!

The space ship has a zippered closure:

And it’s fully lined inside too!


The coolest thing though is that it GLOWS! That’s right! Thanks to a little glow in the dark fabric paint, when the lights go out…

…the spaceship looks like this!

This is such a fun project! I can’t wait to show you how it comes together.
Alright! Are you ready to get started?
I think it’s always a bit challenging to think about how to sew a complicated 3D structure, mainly because it can be hard to see how the individual pieces come together. I’m going to show you, though, that this rocket is made of just a few simple shapes.
My spaceship is around 14 inches tall and about 5.5 inches wide (not including the wings). For simplicity, I’m going to tell you the sizes of all of the pieces that I used, but you can easily adapt the sizes of the pieces to make a spaceship with other dimensions. (Hmmm, wouldn’t a rocket ship pencil case be cool??) I used a 1/4 inch seam allowance to make my ship, so if you’d like a different seam allowance just subtract the seam allowance out that I used and add your own.
Here are the measurements of the pieces for my rocket ship (including seam allowances):

Supplies:
I’d recommend using a heavier weight fabric for the outside of the rocket so that the rocket will hold it’s shape better. Home decorating fabrics, upholstery fabrics, and duck cloth all work well for this. The blue fabric on my rocket is just quilting weight fabric, which is why I used the Peltex stabilizer in order to make the wings more stable. If you use a thick fabric for the wings you may omit the stabilizer.
***As always, if you need a bit of help with the basic sewing skills used in this tutorial, don’t hesitate to check out the Sewing 101 post for more help.
You’ll notice that there are few accent pieces on the rocket. There are a few white stripes for the base of the rocket, and the top is actually made of one large white piece with a smaller half circle attached on the top of it. Here are all the pieces cut out:

Ok, let’s get started.
First we’re going to attach the accent pieces to the main body pieces of the rocket using fusible interfacing. (Don’t know much about fusible interfacing? Check out this post for more information.) Cut out pieces of fusible interfacing the same size as your accent pieces.
Iron the fusible interfacing to accent pieces and remove the paper backing.

Then iron the pieces (adhesive side down) to the main body pieces of the rocket.

Sew along the edges with a top stitch to make sure that the the accent pieces are well attached.

Continue with the rest of the accent pieces until all of the accent pieces are attached as shown.


Turn right side out, using a dowel or pencil as needed to push the point out. Iron your pieces to fuse the Peltex to the other side of the wing. Sew lines along the wing to better secure the top to the back and give it a quilted look.

Placing the “right” sides of the main part of the space ship together, with the wings in between, sew up the side seams. Make sure you position the wing a little bit up so that it will not get attached in the bottom seam.


Repeat with the other side and wing. Then, fold the entire body of the spaceship in half, right sides together. You are going to make a tube, sewn only at the ends, with an about 7″ opening for the 7″ zipper. Make sure that you don’t accidentally sew your wings into your seam!
Here you can see how I’ve sewn the two ends of the main piece of the rocket together, leaving room for the zipper.

Press open the zipper opening as much as possible.

Next we’re going to attach the main body piece of the rocket ship to the base of the ship.

Make small cuts around both sides, making sure not to cut all the way through to where your seam is going to be.

Pin the rocket base onto the side of the rocket that has the wings.

With the circle on the bottom and the tube on the top, sew all around. You’ll need to sew slowly and smooth out the fabric as you go around the circle.

Now it’s time to attach the spaceship top.

Fold the top of the rocket in half, sew.


After you’ve turned your piece right side out, place it INSIDE of the rocket, attaching just as you attached the base.


The outside of the spaceship is done now, and it’s time to turn to the lining.

The lining is easier to put together than the outside because the main part of the ship is made of one piece instead of three.
Otherwise, all the steps are the same. Sew up the main piece, leaving room for the zipper, and then sew up the top half circle as you did with the main piece.

Attach the top and bottom, making sure that rights sides are together.


Insert the lining (wrong side out) into the outside (right side out). Make sure that the opening lines up between the two pieces.

Open up the zipper and place it between the two layers. Make sure that the raw edges are folded to the inside, between the two layers.

Baste around the edges by hand to hold everything in place. Turn inside out.

Use a zipper foot to sew all around the edges to attach the zipper. When you are done, remove the basting stitches.


I stuffed the shuttle with some kitchen towels (to make it firm) and then added some glow in the dark paint, and let it dry overnight.


Did you like this project?
I’d love it if you stop by my blog to see what else I’ve been working on, like this zippered car pouch!
Thank you so much for having me here on Make It and Love It!
–Jill
You can follow Jill on her blog (snugglebuguniversity.com), on instagram, on pinterest, and on facebook.
. . . . .
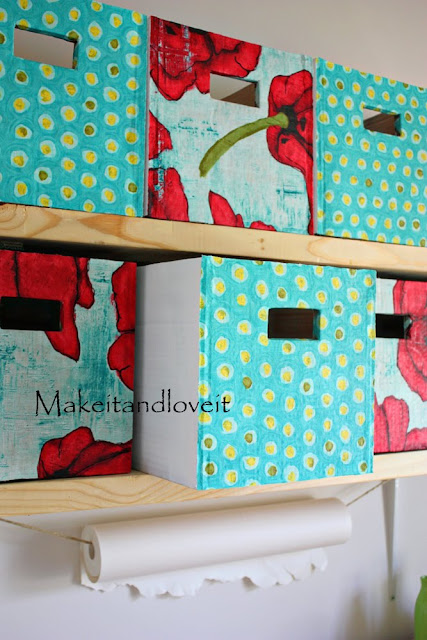
If you are short on storage – check out a few of these other great ideas:
Fabric Covered Boxes (made from old cardboard):

Hi, I’m Ashley—the DIY-enthusiast behind this crazy blog!


