Make It and Love It

Free and Inspirational Do-It-Yourself Crafting/Sewing Tutorials

  • Home
  • Tutorials
    • Clothing
    • Home Decor
    • Children
    • Baby
    • Re-purposing
    • Accessory
    • Sewing Tips
    • Kid Craft
    • Holiday
    • Home Improvement
    • Gift Ideas
    • No Sew
    • Misc.
    • Round Ups
    • Make-A-Cake
    • Top Tutorials
  • Shop
  • Recipes
    • Appetizers
    • Beef
    • Beverages
    • Breakfast and Brunch
    • Chicken and Turkey
    • Desserts
    • Dinner
    • Eggs
    • Gluten Free
    • Pasta
    • Pork
    • Salad
    • Sandwiches and Burgers
    • Seafood
    • Side Dishes
    • Soups and Stews
    • Vegetables
  • My Book
  • FAQS
  • Archives
  • Contact
    • General
    • Advertise
    • Orders
    • HOI Friends
      • Ashley Johnston
      • Kim Byers
      • Lindi Haws
      • Mandy Beyeler
      • Mariah Leeson
      • Michelle Stewart
      • Randi Dukes
      • Tammy Mitchell
      • Tauni Everett
      • Toni Roberts
      • House of Ideas
  • About
Home » Crafts, Sewing, & Home Decor » Children » Crayon Roll

Crayon Roll

January 17, 2009 by Ashley

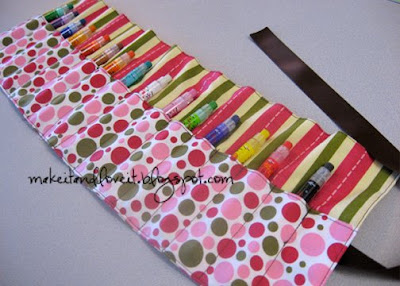
I have been looking for a crayon roll/holder tutorial but can’t seem to find one. I have found plenty of these little holders for sale but no directions. So here is my version. And if anyone finds/has other instructions, let me know and we can link them.


**These instructions were created for my daughter’s long erasable crayons that are almost twice as long as a standard crayon. It will also fit pencils, pens and colored pencils. If you want one for regular crayons, keep in mind that you’ll need to make the height measurements a bit smaller.


You’ll Need:


  • 2 pieces of fabric – 14 x 21 and 8 x 21 (inches)
  • 1 piece of ribbon – 20 inches long, give or take.
  • Matching thread
 
**All seams are to be made at 1/2 inch.


First, cut out your pieces of fabric…


And then fold them in half, lengthwise. Iron them flat.


Then on the smaller piece of fabric, make a seam right along the fold, close to the edge.


Then open up the larger piece of fabric and lay the smaller one on top, matching the two raw edges of the smaller one with the one raw edge of the bigger piece. Sew along that long (21 inch) edge.


Then fold the other half of the larger piece over the smaller piece that you just attached…… and pin it along the long edge and the 2 sides. (You’ll be folding it temporarily in half right where you previously ironed the fold on the big piece, but the opposite way.) So now you have 4 raw edges pinned all together.


Sew along all 3 sides (not the fold) leaving a 4 inch gap at the bottom, so that you can turn it right side out.


Trim all 4 corners before you turn it right side out.


Turn it right side out and iron it flat. Now sew around the entire thing, very close to the edge.


Now you’ll need to pin or mark where you’ll be sewing lines for each crayon compartment. Measure the length of the crayon roll and divide it by how many compartments you’ll need. I wanted 16 slots (15 seams), so I measured and pinned accordingly. You might have to adjust the marks after you have them all in…….if you’re anything like me. Definitely wasn’t perfect the first time. :o)


Sew each line just until the edge of the top piece.

(***Now, after I finished…..I realized some people might not want to see all of those lines on the back, after it’s all rolled up. I don’t mind them at all but if you don’t like them………sew all of your compartment lines before sewing up all the 3 edges together and turning it right side out. Make sense?)


Lastly, turn the crayon roll over and pin the ribbon to the back. Line it up to be sewn with the seam of the last compartment. Don’t sew in the middle of a compartment…….or you won’t be able to slide your crayon in there.


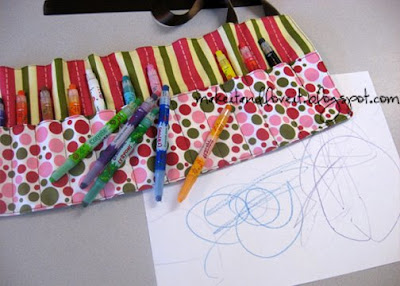
Stick your crayons in and roll it up.


Now let your little one have at it. Half the fun for toddlers is sliding the crayons in and out. Hey, whatever works. Keeps them busy.


Share108
Pin2K
Tweet
Email
2K Shares

Related Posts

  • Pin Cushion

    Warning: Speedy Project     You'll Need:   Mini Candle Holder (This one is for tea lights. It measures 2 x 2 x 2.5 inches)…

  • Gift Card Cozy

    . Today's tutorial will also be posted on Ucreate, as part of an inexpensive gift idea series that Kari has put together.  I can't wait…

  • Miscellaneous Sewing Projects

    Click on any of the images below........and you will be directed to the full tutorial.(Tutorials are listed from the most current, down to the very…

  • Quilted Card

      I made some quilted cards this morning. Quick? Pretty much......unless you have to re-cut things a billion times because you can't cut a straight…

Filed Under: Children, Gift Ideas, Miscellaneous, Sewing Tagged With: child gift idea, crayon rolls

« Child’s Belt
Quilted Card »

House of Ideas

Check out Ashley’s featured Disney Costume tutorials, baby costumes, DIY halloween crafts.

Comments

  1. Eric, Cori and Q says

    January 17, 2009 at 8:50 pm

    super cute! I think I am going to make this tonight to have for church tomorrow!

  2. Team Chilton says

    January 18, 2009 at 11:31 pm

    I’m a somewhat new follower to your blog and I LOVE IT! I found directions a while ago for this on skiptomylou.org (great blog, you’d love it). I made one of these out of felt too. Not quite as cute as the printed fabrics, but way fast and easy.

  3. A Bunch of Paynes says

    January 19, 2009 at 8:49 pm

    I just happened upon a tutorial for a crayon roll on this site: http://www.skiptomylou.org. Random! Thanks for the motivation to make something fun!

  4. A Bunch of Paynes says

    January 19, 2009 at 8:50 pm

    And then I read the comment above mine and saw that she already told you! It’s like speaking before you think, just an online version! Oh well!

  5. Ashley says

    January 20, 2009 at 7:48 pm

    Haha…..Keri, too funny!

    Thanks for the link, both of you!

  6. tara.and.ben says

    January 23, 2009 at 4:17 am

    Ah! that is awesome! I’m totally making this. And maybe i’ll actually be finished with it by the time Harmony can use crayons!! ;)

  7. Laura says

    January 26, 2009 at 9:13 pm

    Love the crayone roll I bought (for way too much!) and so searched for a how to make one – found a tutorial here: http://www.skiptomylou.org/2007/04/25/on-a-roll/

  8. Shannon says

    April 9, 2009 at 5:46 pm

    I also saw a tutorial on chocolate on my cranium dot blogspot….I think it’s very similar to skip to my lou’s. Cute stuff!

  9. The Hughes Family says

    April 14, 2009 at 10:50 pm

    Hey Ashley~
    I wanted to tell you I made two of the crayon rolls…I think you would be proud…Im just learnig to sew and so I am using a lot of your projects to teach me…I wish I knew how to post a pic but I dont…bum deal!!!
    ~Lacey

  10. The Hughes Family says

    April 15, 2009 at 5:48 am

    Hey again…I was looking at your blog thing and I saw that it said you lived in Idaho…what part? I live in Idaho too.
    lacey

  11. Kelly says

    May 18, 2009 at 9:59 pm

    Love this item! I made one for my husband’s nephew and soon will make one for my son. Thank you for sharing. http://kandidkelly917.blogspot.com/2009/05/crafty-kelly.html
    Your website is very inspiring.

  12. keepingmycents says

    September 12, 2009 at 9:24 pm

    Thanks for the tutorial. I love all the pictures. I am a visual learner so it helps ALOT! Here's a link to the one I made

    http://keepingmycents.blogspot.com/2009/09/crayon-roll.html

    Love your site and thanks again.

    Lisa

  13. The Hughes Family says

    December 13, 2009 at 6:13 am

    Hey Ashley~
    I was going to tell you that i am using your crayon roll to make tool belts for my boys to hold their new tools in. I thought it was the perfect shape. Just going to sew pockets on the front and a hammer ring on the side. Im either going to make the straps that go around or I will use ribbon…it just depends on if I have ribbon and if its its the right color. Thought you might want to know:)
    Lacey

  14. Persianlass says

    February 18, 2010 at 8:06 pm

    I've been looking for clear directions for a while now! I'm no dummy, but I couldn't for the life of me figure out the directions on any of the other blogs out there.
    Thank you! Beautifully done!

  15. Katy Rose says

    February 23, 2010 at 5:12 am

    Hi, I found this tutorial yesterday and made a crayon roll for my niece. Check it out on my blog if you like.
    http://fenixfoxx.blogspot.com/2010/02/crayon-roll.html
    I made a few adjustments to it to fit my needs. I didn't fold the bigger piece of fabric due the print that I decided to use. Didn't want it to be upside down. I also used interfacing to reinforce it a little bit. I hope you like my handiwork.
    Katy Rose

  16. I♥thesecrazykids says

    April 20, 2010 at 4:05 am

    Just made one of these. I made it for regular sized crayons. I was kind of in a hurry so I didn't measure out the slots. Instead I just stuck a crayon in and sewed the line. It ended up fitting 16 crayons (exactly how many I needed) perfectly. I love how it turned out. Thanks for posting this project.

  17. Larry and Pam says

    April 30, 2010 at 5:38 pm

    I've seen these online, but never gave much thought to them until my niece whipped one out of her diaper bag for her 2 year old in a restaurant last week. He enjoyed putting them back into the carrier as much as he loved having his own crayons in his frog wrapper! I was amazed and intrigued! I shall use your tutorial to create them for all the toddlers on my gift lists!! Thank you so much!

  18. cathy bryant says

    May 3, 2010 at 11:57 am

    I may try to adapt this for crochet hooks or knitting needles!

  19. Anonymous says

    September 5, 2010 at 2:42 am

    i dont have a sewing machine…:(. Can u please help me out to see how else i can make one…

  20. jaynee says

    September 27, 2010 at 9:30 pm

    I just made the crayon roll, the directions were awesome! I just made homemade bias tape as I didn't have ribbon and was in a mood to be frugal. I also didn't pin for each crayon slot, but rather used my ruler and a washable fabric marker…much easier to be accurate.

  21. Quilting in My Pyjamas says

    October 30, 2010 at 6:24 am

    Thanks so much for this fantastic tutorial. It's by far the qucikest and easiest one of these I've seen. You saved my bacon! I just knocked up three of these in about 90 minutes.

    Thanks again. You're aa legend. I'll be making heaps of things from your blog !

  22. Erin says

    November 21, 2010 at 12:42 am

    I just made the crayon roll, and it was so easy! I don't sew well, but it turned out so cute, better than I expected with my limited sewing skills. Thanks a bunch!

  23. AKutarna says

    December 2, 2010 at 6:50 pm

    thank you so much for this tutorial! Your instructions were very clear and I made this in about 20 mins!!! Thanks again!

  24. Daphne says

    December 5, 2010 at 2:55 am

    Thanks! I just made my first of 5 for the kiddos on my Christmas list! I'm measuring my fabric 18" wide and that's pretty much perfect for 16 1" slots for crayons. Also using disappearing fabric pen for the slots. I have to admit, it's taking me quite a bit longer than everyone else! Maybe I'm overthinking it!

    Thanks again!

  25. Mom to B and E says

    December 18, 2010 at 6:45 am

    I am VERY new at the sewing game, but I attempted this tonight and it was supposed to be for paint brushes for hubby, then he had the brilliant idea to make it into a tool belt for our son, so a tool belt it became! For my very first sewing project I was very happy with how it turned out as not perfect as it was!! :)

  26. Erin says

    September 23, 2011 at 6:55 pm

    I’m going to make one for all my nieces and nephews and kids for Christmas! Thanks for all the great tutorials!

  27. Cara says

    November 7, 2011 at 1:26 pm

    Can you use flannel fabric or is that too thick?

  28. Serrenity says

    June 21, 2012 at 3:40 pm

    Great tutorial! Thank you so much for sharing!

    This can also be used to make a toy car (i.e. Hotwheels, Matchbox, etc) carry-holder. Use the same concept except measure larger pockets for the cars.

    The larger portion of fabric for the backing can be embroidered too before sewing it to the pocket section.

  29. EDNA says

    October 29, 2012 at 11:32 am

    hi- bought a few of these on ETSY to study & give away. (Crayons can be free at most restaurants!). As a gramma, they are perfect altho I have no little grands.
    your tutorial is easy to follow and i have SO much fabric, I better stop writing and get a kickin’!
    Good job!

  30. Dawn says

    March 17, 2015 at 4:29 pm

    I have been looking for a pattern for this. I make bobbin lace and wanted to make a roll up case for my wound bobbins. I have a case that I bought years ago, but as I’m not good at sewing, I couldn’t reverse engineer it! I’m so excited to find your tutorial. After I make a few for my bobbins, then I can make one for my crochet hooks!!

Subscribe

Sponsors

House of Ideas

Find more great DIY handmade and personalized gift ideas for family, friends, and neighbors on House of Ideas.

House of Ideas

Find more great DIY craft ideas and project tutorials as well as DIY Costumes on House of Ideas.

Copyright © 2019 · Privacy & Terms