I mentioned earlier this week that I’ve been on a real organizing kick. We’ve been here in Oklahoma for almost a year and I’m still digging through stashed piles that I’ve pretended didn’t exist for way too long. Ha! And something that has always collected stuff and hasn’t quite functioned how I wanted it to, is the laundry room. It’s a laundry room that’s a through-way from the garage and those are my least favorite types of laundry rooms. Uggggh.
But instead of just muttering how much I hate our laundry room while walking through it to get to the garage every single day, Steve (my husband) and I decided to make it more functional. And a little easier on the eye. It was time to get the laundry baskets up off the floor and out of the stinkin’ way….because I can’t tell you how many times I’ve tripped over baskets while trying to herd kids out through the garage door to school. Oh my.
This may be one of my favorite DIY projects to date…..because ahhhhhhhhh, it’s like a whole lot of mess was just deleted from my life when we put together this Laundry Basket Organizer! And we built it right in, like it has been there the whole time! SO no more complaining about our laundry room…because now there’s so much more room and it functions like a dream!
Now we can fit 6 baskets in the laundry room, all at the same time…..yahoo! And each has their own little space inside of this upright unit.
We kept things simple and instead of making complete shelves, just made little ledges for the edge of the baskets to rest on…
…and easy as that, they slide in and out.
The most commonly soiled items are on the bottom of the organizer…
…and the rest are up top.
I used white vinyl to label each of those little black wooden tags but you could easily use a white paint marker and write it on there. Each of the labels are looped through the holes in the baskets and tied with knots at the front. Easy.
Now, it may look like this tower of baskets is super tall and intimidating but Steve and I can both reach to the very tippy top. But you know, even if I couldn’t reach the top and had to grab a little stool that I stashed on the side of the washing machine or something, I would do it if it meant all of the baskets and laundry was up off the floor. Ahhhhhhhh…
And because the most commonly soiled baskets are on the bottom, our smallest laundry helper Chloe can even reach all 3 of the bottom baskets. Because yes, all of our children are little Cinderella’s (and Cinderboys?) in the making. :)
Our tallest Elli (and even Connor) can reach the 4th basket, which is for towels….so they’ll be using that one too.
You can absolutely make this organizing unit and just place it up against the wall like a piece of furniture in a bedroom, down a hallway, or wherever……but we really liked the idea of making it permanent. So, we secured it to the wall and then added some trim along the top/bottom/sides, to really make it beautiful!
And anytime a basket fills up with dirty laundry, it’s right here next to the washing machine/dryer, ready to be tossed in. So perfect!
Now my tiny little laundry room seems so much bigger and open, without anything on the ground anymore. Hallelujah! Okay…..excuse me, I have to go switch over the laundry…. ;)
SUPPLIES:
First of all, your organizer might be a different size, depending on the space you have, how many baskets you need, the size of your baskets, etc. But I will show you exactly how I made mine, to accommodate an 8 foot ceiling and Sterilite baskets….so make any adjustments as needed. (My finished unit is 96 inches tall, 20 3/4 inches wide, and 21 inches deep.)
And another thing…..we must have been excited to get cutting and assembling because I forgot to take pictures are first. But, here’s a picture of the assembled pieces, which is pretty basic and straight forward, but I’ll use this to explain the sizes you need.
You’ll need 2 main pieces to create the left and right sides of the structure. Both of those are 96 inches long and 21 inches wide. And then 3 pieces that are 21 x 19 1/4 inches. (But ignore that it’s already all put together in the pictures below.)
Just to clarify, the dimensions for the 3 smaller pieces are 21 inches deep and 19 1/4 inches wide.
And again, these pictures have been constructed beyond what I’m actually talking about……so ignore the fact that it’s already all put together. But, take a look at the finished construction of the wood pieces, just to be clear how you’ll line up the wood pieces and attach them together. Because what you’ll be doing is creating a tall rectangle shape structure with the two large pieces on the outer most edge of the structure and the smaller horizontal pieces fit between. But don’t attach them together quite yet…..
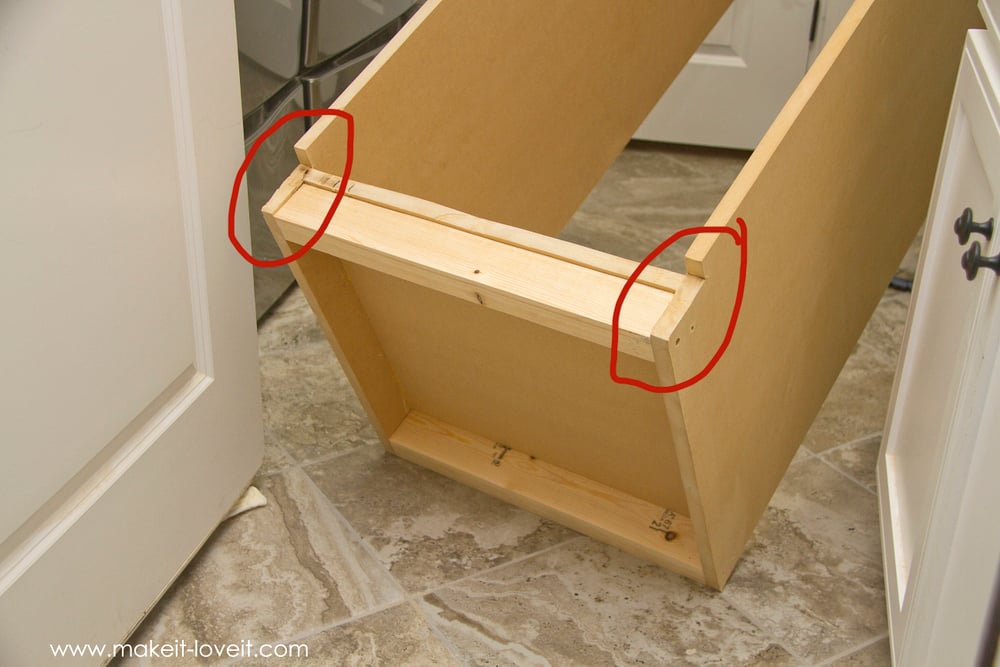
Because I need to show you that we created a lift at the very bottom of the structure by adding a 2×4 along the front and the back, attached at the sides. And this is because we were trying to clear the baseboards in the laundry room. But since we didn’t need the full width of the 2×4 (and we were trying to conserve inches for the main space for the baskets), we cut a 2×4 down to 3 inches wide and then two 19 1/4 inch long pieces. Then we placed one of them on its side and stood the two walls up and screwed them together.
However, we cut out sections of the MDF in the back (about 3/4 inch deep and 3 inches tall), to make room for the baseboard along the laundry room floor. So as you can see, the 2×4 (that was cut down to 3 inches wide), is set back a bit, but is attached the same way as the one along the front. Once both of those 2×4’s (cut down to 3 inches wide) are attached, it created a good platform to attach the bottom horizontal piece…..so went ahead and nailed the bottom platform in place.
Now, before adding the next two platforms, we found it really helpful to have 2 small strips of wood clamped onto the side walls, right below where the platform needed to be attached, to serve as a temporary shelf and to help keep things from shifting at all while you nail it in. Be sure and add the top platform first to create a complete rectangle….and then measure the height of the opening and place the 3rd platform exactly in the middle of the open space. (We also used wood glue along the inner edges, just for extra support on the middle and upper platform pieces.)
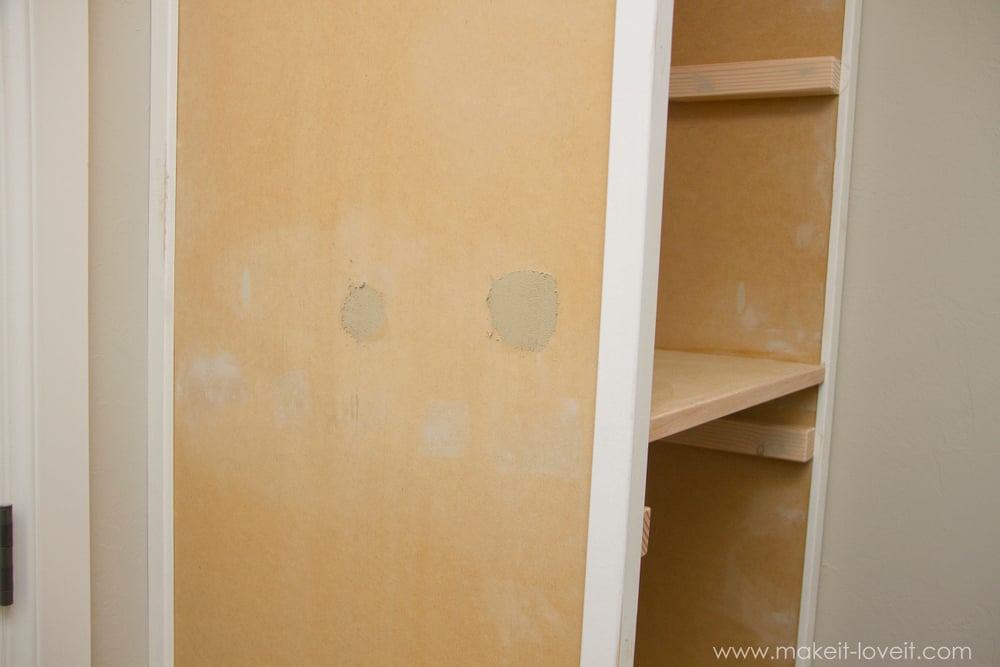
Now, maybe you noticed in the last picture some strange lines and drill holes in the middle of the side pieces. Yeah, WE MESSED UP! We put the shelf together out in the garage and then duh, realized that this structure we were building reached the ceiling so when we tried to carry it in on its side and to then try and stand it up……dang it, a big fail! And since we had used wood glue and secured everything in place so tightly, we knew it would ruin the wood to try and take it apart the same way. So, instead we cut the whole structure in half in 2 very straight lines and then drilled some pocket holes with a Kreg Jig and re-assembled it inside the laundry room. So, PLEASE LEARN FROM US and try and put your shelf system together inside the room you’ll be installing it!!
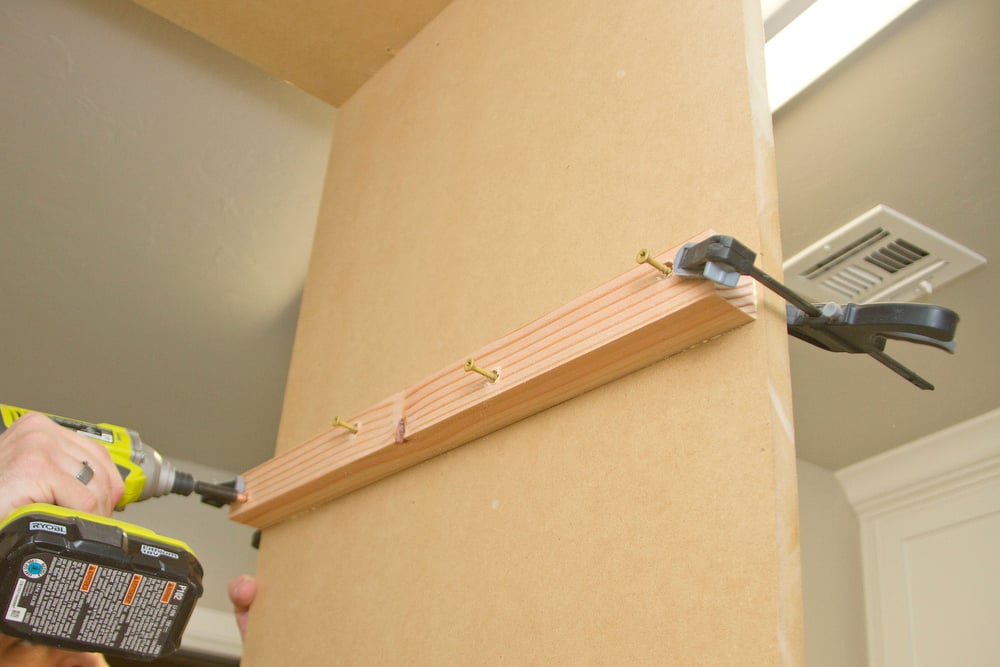
Okay, now it’s time to add these little strips of wood, that will act as the ledges to hold each basket. Each of those strips of wood are 1 1/4 inch wide and 1 1/2 inches tall. (Cutting them 1 1/4 inch wide makes them the perfect width to still allow the baskets to fit in between but also provide enough of a lip for the edge of the baskets to sit on.)
The easiest way we found to attach them, was to pre-drill some pilot holes, then drill in the screws just before it poked out the other side.
Then, attach a bit of wood glue to the inner edge, place the wood along the inner wall of the structure, use some clamps to hold the strip of wood in place…..and then screw in the rest of the way. (Just be sure you have pre-determined where you will place each of these strips to fit each of your baskets.)
Then, cut a piece of thin backing that completely covers the back of your shelving structure and attach to the back. Then add 2 pieces of a 2×6 near the top and then about halfway down….screwing them into some of the strips that are along the inside of the unit. (And that’s because screwing into those little shelf pieces of wood is sturdier than screwing into the side of a piece of MDF.) The reason for attaching these pieces is because now, when you put your shelf into place, you can pre-determine where you wall studs are and screw these support pieces right into the beams in the wall.
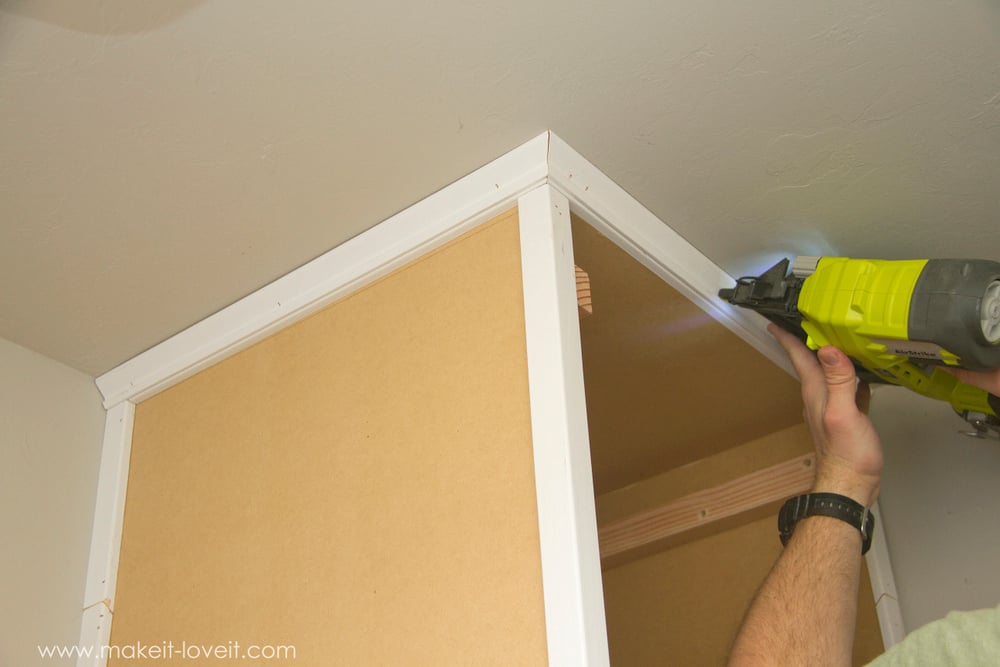
Go ahead and place your shelving unit right where you want it, screw it into the wall…..and then determine how you want to finish it off. I ended up placing a L-shaped trim piece along the front left side (because the right side was against the wall and it wouldn’t fit) and then similar width flat pieces along the side touching the wall and then along the top to kind cover all gaps and inconsistencies. (Which is completely normal…..because more than likely, your wall is crooked. And maybe your ceiling too! ;) )
Then I found some 1 1/2 inch tall faux-crown pieces that we cut down to about 1 1/4 (because that’s how much room we had to cover the top piece of MDF, plus the space between the shelf and ceiling) and we attached them along the top, because we didn’t have room for taller crown. (Around the bottom, we just used baseboard that matched the existing baseboards in the laundry room, so that it looked more built in. Refer to some of the images at the top of the post if needed.)
Now, fill all of your nail and screw holes with wood filler, let dry, and then sand down until smooth.
Oh…and along the middle shelf piece, we added an oak trim piece to cover the raw edge of the MDF, so that it wouldn’t ever swell or get nicked in the future.
Now, add caulk to all of your cracks and open edges (and ahem, minor mistakes…ha!) and let dry completely. I love how caulk just ties it all together and makes it look so clean and perfect! (Need more help with caulking??? Check out my Trimming a Window post for more info.)
Once the caulk is dry, it’s time to paint. Apply 2 coats (or more if needed) and then let completely dry (I’d say for at least a day or two) so that the paint is completely dry before sliding in your baskets.
Enjoy your newly organized laundry system!!!
-Ashley

Hi, I’m Ashley—the DIY-enthusiast behind this crazy blog!