Quick Reminder: don’t forget to grab a kit for you and your family before coupon expires on Saturday (11/21/15). Every year they sell out so fast…..more info HERE!
. . . . .
Today’s contributor is Kim from The Sew Spot. All posts written by Kim for Make It and Love It can be found HERE.
. . . . .
Hi! It’s Kim, from The Sew Spot. I’m glad to be back sharing this repurposing idea with you!
It seems like not too long ago I was wrapping my infant up in receiving blankets. Now that she’s growing up, those cute cuddly receiving blankets that once kept her cozy and warm, no longer get used. So why do I still have them? I guess I thought I could make them into something else for her. After holding onto those receiving blankets, for probably a little too long, I finally decided to turn them into something she could use and would wear. Making a girl’s nightgown from receiving blankets seemed like a good solution.
I used the serged edges of the receiving blankets to my advantage. Not having to hem or serge all of the edges helps the nightgown come together pretty quick.
Not only is it comfortable to sleep in, but it’s also fun to wear while jumping on the bed.
The top ruffle goes over the shoulders, to complete the arm openings, without having to make sleeves. I’ll show you how you can keep the nightgown very simple or make it a little more fancy.
Ready to make a little girl’s nightgown from receiving blankets?
Here is what you’ll use….
***I made this nightgown for a 2 1/2 year old. The exact size of the receiving blankets you use may vary. If you are making a girl’s nightgown for an older child, you may need to use more receiving blankets: 1 blanket for the main fabric front, 1 for the main fabric back, and 1 for the accent fabric ruffles.
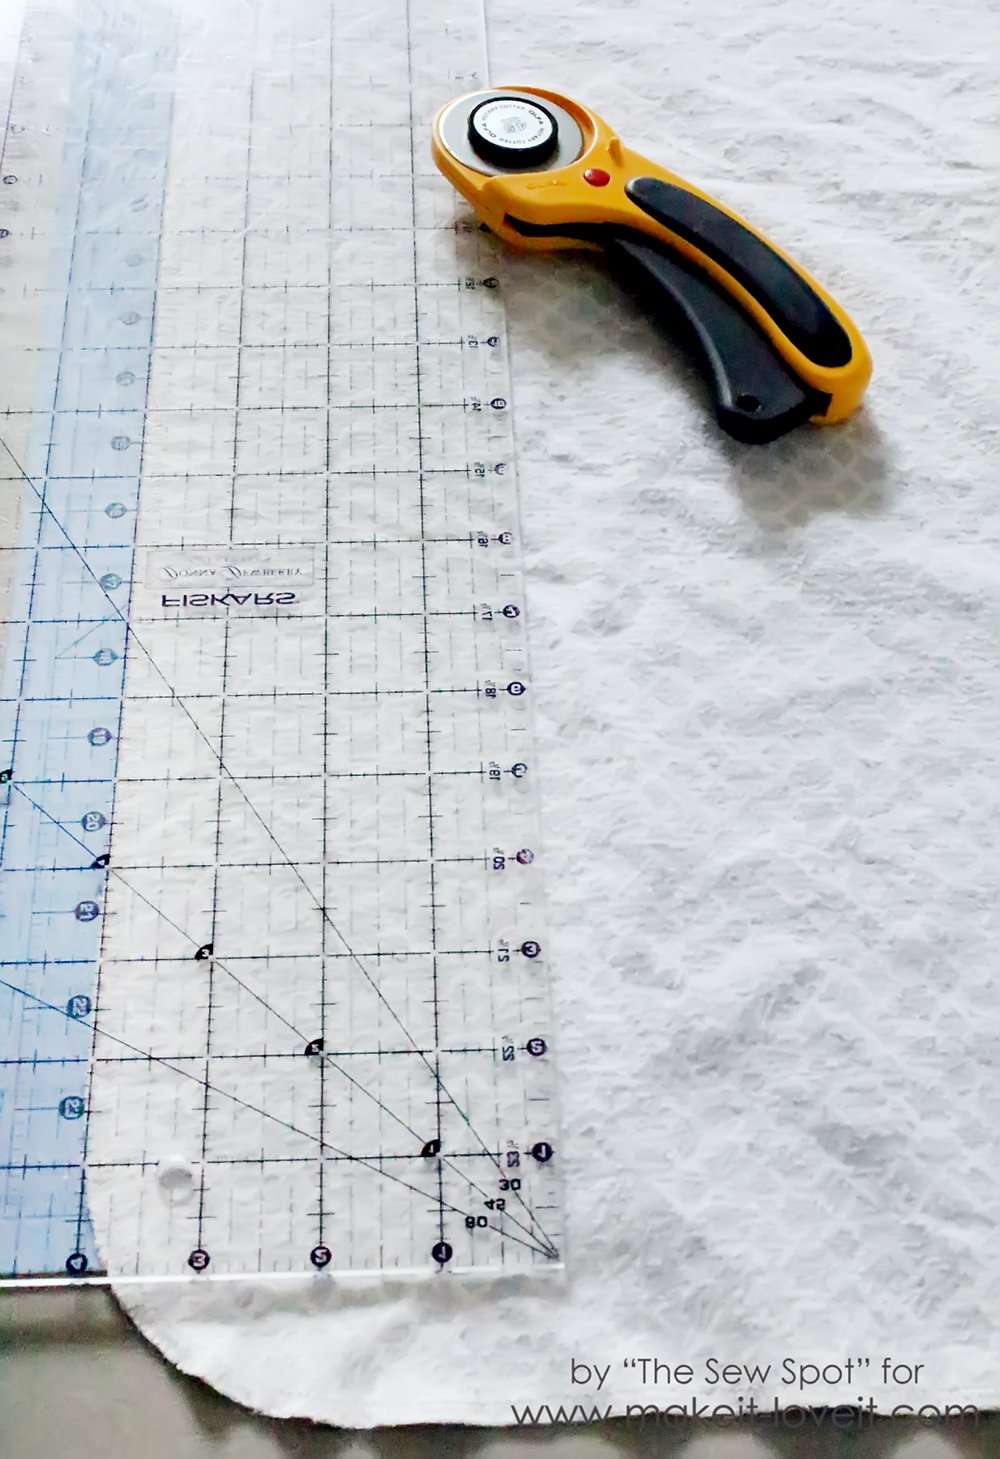
Start with a shirt that fits the child well. Draw around the shirt leaving 1/2″ seam allowance on each side plus 1″ or 2″ depending on how loose fitting you want the nightgown to be. Extend the lines down at an angle to your desired length (measure from the chest to just below the knees). Use the serged edge as the bottom of the nightgown. Cut out 2 pieces, a front and a back. I had just enough space to cut out 2 pieces, on opposite sides, of one blanket. For this reason, it is best to use a blanket with patterns that can go in either direction.
Place the two main pieces of fabric, just cut, right sides together and pin along the side edges. Sew along the edges with 1/2″ seam allowance from the bottom-up leaving a space open for the arms. You can measure the arm opening of the shirt you used to determine how much space should be left open. (I did not sew the top 3 1/2″ on each edge.)
{You may also notice that the bottom edges are curved. This is because I really wanted to use the pink blanket as my main fabric, but I had to cut into the curved edge of the receiving blanket in order to get the dimensions I wanted. Had I used the slightly larger grey blanket as the main fabric, there would have been enough space to eliminate the curved edges from the cut. I actually like the curved edges, though. It’s very simply to scrunch the straight edges up to meet the curved edges.}
Next, I turned the fabric right side out and finished the arm openings with 1/2″ bias tape, made from a scrap piece of the blanket. You only have to make a small piece of bias tape for each arm, so it’s really quick to do. (Here are more details on bias tape.) Alternatively, you could serge or zigzag stitch around the arm openings.
Now, to make the upper ruffle, measure across the top. I then added 3″ and a 1/2″ seam allowance to each side. [10″ (top measurement) + 6″ (3″ on each side) + 1″ (1/2″ seam each side) = 17″ across for each accent fabric to make the ruffle.]
I used that number and cut 2 rectangles from the accent fabric to the dimensions of 17″ long x 4″ wide. Although, the rectangle size can be adjusted to any size you desire. You can make the ruffle wider or thinner or longer or shorter.
The serged edge should be on the bottom of each rectangle.
Pin and sew the rectangles right sides together on the short edges.
Turn the accent fabric right side out and insert it between the layers of the main fabric. The right side of the accent fabric should face the wrong side of the main fabric. Pin the raw edges together.
Sew along the pinned area, with 1/2″ seam allowance, to connect the accent fabric to the main fabric.
Fold the accent fabric up. See how it automatically folds 1/2″ around the shoulder area, where the accent fabric is not attached to the main fabric? This will be the first part of the fold to make the elastic casing.
Fold the fabric down leaving enough space to make the elastic casing. (Don’t fold all of the way down to the main fabric.) I made the casing 3/4″ wide to fit the 1/4″ elastic. Sew along the bottom edge, as indicated by the dashed line, leaving an opening to insert the elastic.
Measure around the neckline where you want the nightgown to lay. This will be the length of your elastic. (I used a 15″ long piece of elastic.) Feed the elastic through the casing. Yay! The nightgown has some shape and a ruffle.
Overlap the elastic 1/2″ and sew it together with a zigzag stitch. Then sew the opening of the casing closed with a straight stitch.
You can simply leave it like this, or add more to it.
Here is a nightgown, made from a different set of receiving blankets, to show you it’s still kinda cute if left at this point, even without the bottom ruffle.
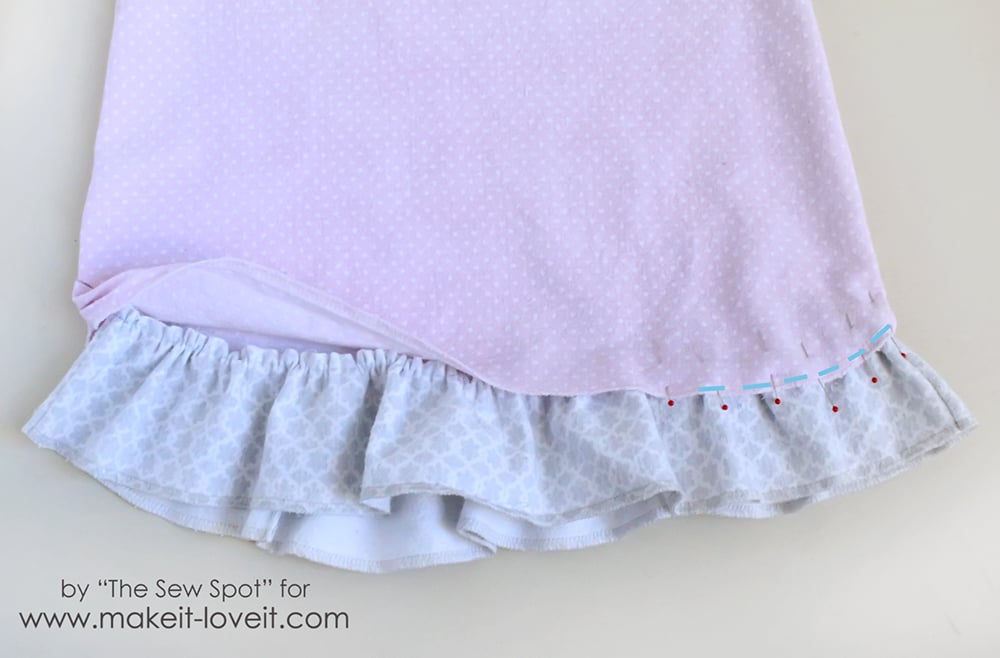
If you want to make the nightgown a little more frilly, or add a little length, make a ruffle for the bottom. I cut all of the extra edges from the accent fabric 3″ wide and sewed them together to make one long tube. The total length of this fabric, with all of the edges sewn together, is double the length around the bottom edge of the nightgown. Next, sew a basting stitch across the top. (Basting stitch instructions can be found here.)
Gather the fabric to make the ruffle the same size as the bottom edge. Pin the ruffle to the bottom. Sew a straight stitch over the serged edge of the nightgown securing the ruffle to the nightgown.
***You will have extra accent fabric available to use, although it won’t have serged edges. I had just enough of the serged edge from the accent fabric to complete this nightgown. If you decide to use the extra accent fabric to add more ruffles to the bottom, make a larger size, or increase the length, you can serge or hem those edges.
Add any embellishments to give the nightgown a personal touch. I used the leftover receiving blanket scraps to make this rosette. I braided 3 strips of the main fabric and hot glued the braid into a circle. I hot glued two leaves, with scraps from the accent fabric, to the backside and 3 rhinestones to the center. The flower is sewn on by hand. You can attach it anywhere you’d like.
The receiving blankets that kept her warm and snug as an infant will keep her stylish and comfortable as a toddler.
I hope you enjoyed transforming receiving blankets into a girl’s nightgown with me today!
-Kim
Make bedtime extra special with some of these other fun tutorials:

Hi, I’m Ashley—the DIY-enthusiast behind this crazy blog!