In case you didn’t see yesterday’s post, I shared my version of a Dorothy Costume. And yes, Chloe is in ABSOLUTE LOVE! (And takes her role very seriously…)
All the kiddos decided they wanted to be a character from Wizard of Oz. Well, except for Oliver. 3 month old babies don’t really object to much, so we’re saying he voted YES! ;) I think Oliver’s is my very favorite though….mostly because it cracks me up! :)
But Elli’s costume (she’s my 7 year old), needs a little something to make the dress nice and poofy. (I’m sure that pretty much gives it away, unless you’ve never seen Wizard of Oz, but I won’t be sharing it until Monday. Ooooh, it’s a pretty one! :) ) To puff that dress right out, I made her an “old school” Hoop Skirt.
Why a hoop skirt and not a pettiskirt? Or a tulle skirt? Well, first of all, a hoop skirt isn’t as hot or stuffy. Also, it doesn’t require as much fabric or supplies……so it ends up being a bit cheaper. Also, when you want a skirt that goes all the way down to the floor, a pettiskirt doesn’t round out and tends to only fluff out the bottom of the skirt. A pettiskirt and tulle also flatten out over time…..and lose a lot of their fluff. However, you can make a hoop skirt really large and beautifully rounded and it keeps its same shape forever. It’s also comfortable to wear, unlike tulle, which is pretty itchy and needs another slip beneath it to keep it from scratching. And, besides, didn’t you always want a hoop skirt as a little girl?? Oh, I totally did…..I dreamed of dressing like a Southern Belle, complete with a very rounded hoop skirt. SO this is kinda fulfilling that dream. ;)
And instead of waiting until Monday to share this hoop skirt with Elli’s actual costume, I figured I better share it separately. Not only because it would make Monday’s tutorial too long, but also for those of you who may be making a full dress and need to puff your dress out as well. A hoop skirt is a fairly inexpensive to make, especially if you use some tubing from the hardware store like I did. This thing is super sturdy and will last for years!
Just remember, a hoop skirt will help turn a pretty dress into a beautiful one! Oh, the whimsy!
In case you’re worried about how you’re going to store that thing, it collapses flat. Problem solved.
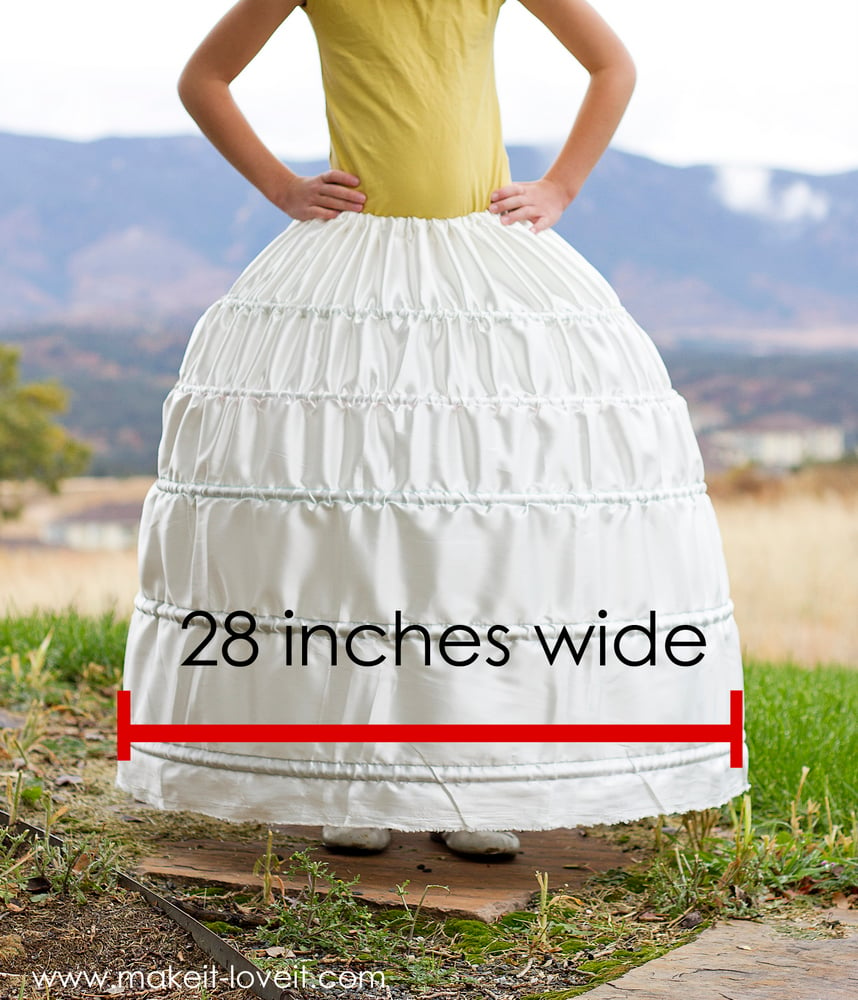
And just so you can see what a full dress looks like with and without a hoop skirt, let me show you. And no, I’m not going to demonstrate with Elli’s actual costume just yet (did you really think I’d give you that much of a sneak peek?!?!) So, I had Elli put on her Rapunzel Costume from last year….even though it’s a little short on her and reveals the hoop skirt. But you get the idea of what it can do for a dress! :)
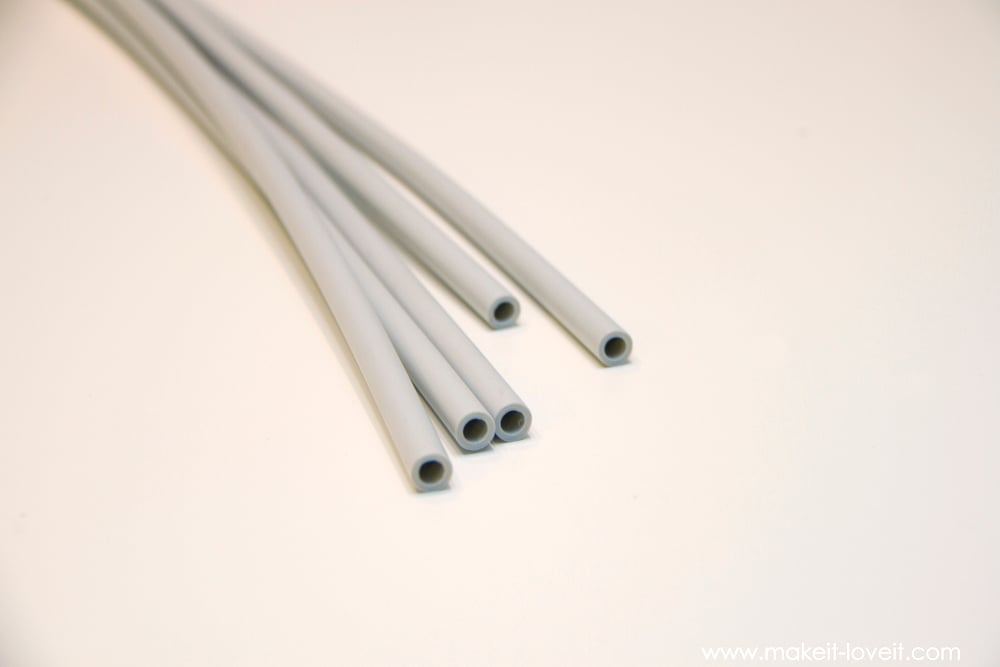
You may be figuring that I used standard boning from the fabric store to make each hoop…….but nope, I kept finding that the boning would collapse and was too weak. I then searched for Hoop Skirt boning (which is made from steel and is sturdier) but found that it was too pricey. So instead, I found some skinny yet sturdy tubing (for plumbing) at the hardware store and created really lightweight hoops that I fed through ribbon casings. And wow is it STURDY…..but also really lightweight! (Side note: the ribbons on the inside of the skirt are all different colors because I was just using what I had in my ribbon stash. It stays hidden though, no biggee!)
And yes, Elli fits through the doorways. Barely. Haha. But really, it’s not a big deal to pull up on the skirt a bit to fit into tight spaces. (The hoops also bend slightly and then spring back, in case you’re wondering.) Besides, this girl feels like royalty with this thing on and glides around the floor with some serious elegance. Watching her kinda makes it worth every single stitch! :)
Ready to make your own Hoop Skirt? I know you want to… :)
Supplies:
Now, before you go and buy your supplies, you need to decide how much of everything to buy. First, you need to decide how wide you want the very bottom of the hoop skirt to be. I went with 28.5 inches wide because one of our doorways was that wide and I figured she’d want to be able to walk through doors without an issue. (However, the hoops are still a tiny bit flexible and can be squeezed through a door if needed. Or, you can pick up one side of the skirt and hold it at a diagonal as you walk through a door.)
It’s math time now, so brace yourself! ;) With the number you decided on above, you’re going to multiply by pi (or 3.14) and that will give you the circumference of the circle…….which will tell you how much fabric you need to go all the way around the skirt. So, 28.5 x 3.14 = 89.49…..but I rounded up to 90. So 90 inches is my magic number for the width of the skirt fabric.
Then, decide how tall you want your skirt. This is a little harder to figure out the exact measurement because the fabric will curve out from the waist and then down, so you can’t just measure from your waist down to how long you want it. A little more math is required to figure that out…..and well, it’s been years since I’ve taken math. :) So, we’re going to fake it a bit and measure from your subject’s waist (or wherever your subject will wear the skirt), down to how long the actual dress will be. Then, after the skirt is made and it curves, it will sit a few inches higher than the hem of the dress, but not equal to the length of the dress. But that’s okay because this will allow the actual dress to fall around and past the hoop skirt, hiding it from view. Make sense?? Okay, so I measured Elli from her waist (actually I measure from right below her waist because that’s where she wears things) down to the floor (since the dress I’m making her will be floor length) and that number was 31 inches. (And then remember, the hoop skirt after it’s made will actually hang a little higher than 31 inches from her waist.) So 31 inches is my magic number for the height of the skirt fabric.
Okay, so you have the width and length for your hoop skirt fabric. Check. Now we need to add on a little for some seam allowances and for the casing for the waistband (shown in the picture below)……so you can determine how much fabric to buy. As shown below, I cut a piece of fabric that was 33 x 91 inches.
Now, how much ribbon do you need? Well, I think spacing each of your hoops between 4-5 inches is a good spacing. If you space them too far apart, the skirt won’t have a very good shape but if they’re too close, you’re going to weigh down the skirt….and/or possibly waste supplies. So you’ll need to determine how many hoops will fit on your skirt with a 4-5 inch spacing, making sure that you leave 1-2 inches free at the bottom (to keep the bottom hoop off the floor). It’s also very important to leave enough space at the top for the waist to be cinched in and fit snug around your subject’s waist. If the top hoop is too close to the top and is too big around, there won’t be enough fabric to reach the waist and the skirt will fall off. Or if the top hoop is too close to the waist, you just won’t be able to make the top hoop as big. I also think it helps to put your hoops at the top a little closer together, since they’re getting smaller faster, near the top. Here’s how I spaced my hoops, to give you an idea.
**This spacing does not include the seam allowances at the top and bottom…..so if you add up all these numbers, you get 31 inches, not 33.
And then how much tubing do you need? Well, the skirt hoops will get gradually smaller as they go up. So, you’ll need the full circumference for the bottom hoop (so I needed my bottom hoop to be 90 inches) and then gradually smaller as they go up. I bought 8 pieces of tubing that were 60 inches (5 feet long) each and needed them all (but had little bits left over). You could always buy extra and then return the ones you don’t use, if you’re unsure how many to buy.
But just as a reference, here’s how long each of my hoops were, starting from the bottom going up:
1st hoop – 90 inches
2nd hoop – 85 inches
3rd hoop – 77 inches
4th hoop – 72 inches
5th hoop – 56 inches
And finally, how much ribbon do you need? Well, once you decide how many hoops you’ll need, you multiply that number by how wide your fabric is. SO, I wanted 5 hoops and my fabric is 90 inches wide……so I needed 450 inches of ribbon. And usually ribbon is purchased by the foot, so that would be 37.5 feet of ribbon. Or sometimes by the yard, so that would be 12.5 yards of ribbon. Make sense??
Okay, now it’s time to get started putting your skirt together…
First, cut your fabric to height and width that you determined up above. It will be a large rectangle that is wider than it is tall (just like the grey box image above). Then, fold your fabric in half width-wise (with right sides together) and match up the two shorter ends (the height of your rectangle) and sew them together using a 1/2 inch seam allowance. Now you should have a circle or “tube” of fabric. Next, hem the bottom edge of the fabric by folding it under 1/2 inch, another 1/2 inch, and then sew it in place. (I skipped sewing the hem by just using the selvage [[the finished manufactured edge of the fabric]] as my bottom edge.)
Then, mark your fabric where each line of ribbon needs to be attached to the fabric so that your hoops will be spaced correctly (just like my image up above) and then sew the ribbon in place (to the wrong side of the skirt), sewing nice and close to the outer edge of both sides of the ribbon.
Sew the ribbon completely down at one end and then let the other end overlap a bit but leave a 1-2 inch opening, free from any sewing stitches. (You’ll need some room to feed your tube through.)
For the top hem, I was trying to eliminate as much bulk as possible, so I serged the top edge (you could also zig-zag) and then folded it down 1 inch and sewed it in place, as close to the serged edge as possible. You could also fold under 1/4 inch, then another 3/4 inch, and then sew in place.
Just be sure to leave a 2 inch opening so that you can feed your elastic through later on.
Okay, now gather your pieces of tubing….and don’t worry if you don’t have one single piece long enough to go all the way around your bottom rows of casing.
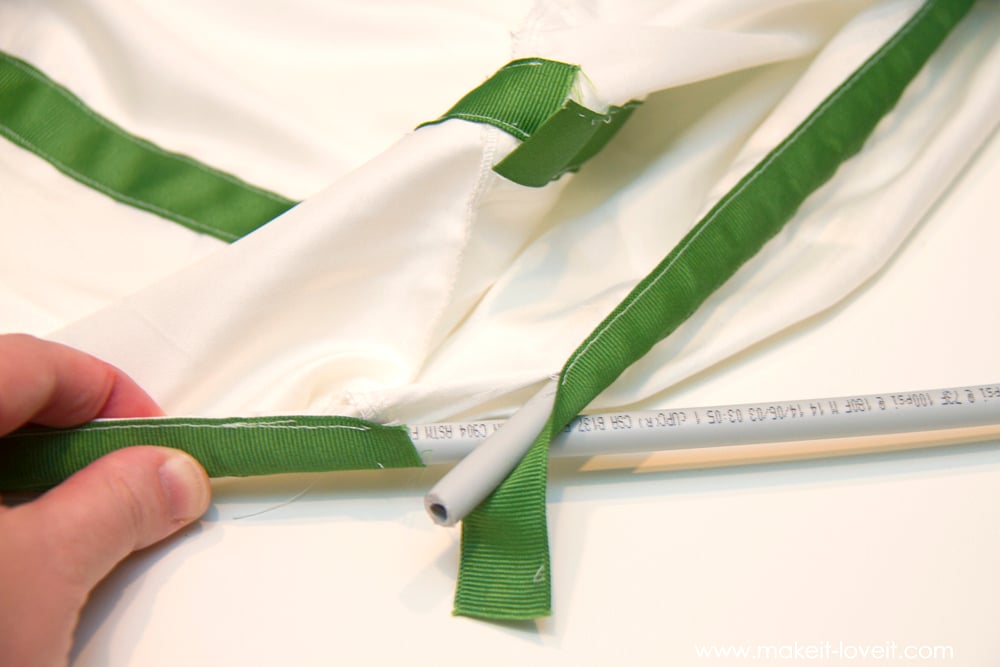
You will be joining the ends with these threaded rods. I bought these at Home Depot and they are like a long screw without the head, and without a point at either end. They kind of dig into the inside of the tubing and keep the two ends you are joining together from coming apart. I had my husband cut them down into 3 inch pieces with his hack saw.
Begin threading your tubing through the very bottom casing first…..
…..and if your tubing doesn’t make it all the way around, stick a piece of the threaded rod halfway into the end of your tubing.
And then stick another piece of your tubing onto the other end and push together tightly. (If your rod doesn’t fit inside the tubing nice and snug, you may want to add some glue inside of the tubing to keep the ends from coming apart.)
Continue pushing the tubing through the casing until it comes out the other end.
Trim off the excess tubing with a utility knife (cut carefully….and use a cutting board).
Grab another rod and fit into both ends, nice and tight.
Then, thread a piece of elastic through the casing at the top of the skirt and put the skirt on your subject (or use a mannequin). The rest of the rows are easier if the skirt is hanging in place.
Now, add your next row of tubing to the casing that’s 2nd from the bottom. This tubing will be slightly shorter so that the skirt will get slightly smaller.
Continue on up the skirt, adding your tubing one row at a time, until you have the desired shape to your skirt. (I actually didn’t cut off the excess tubing for the top 3 rows until they were all in place and I could get a better idea of how big I wanted each row to be. I just eyeballed it but also wanted to be sure I didn’t make the top row of tubing too large so that it pulled the skirt too far away from from daughter’s waist….and would fall off.) At this point, you’ll probably need to tighten the elastic around the waist so that it’s nice and snug.
Next, take the skirt off your subject, and while keeping the elastic at the proper length, pull the elastic away from the fabric and sew the two ends in place.
Trim off the excess elastic, wiggle it inside the casing, and then sew the casing closed.

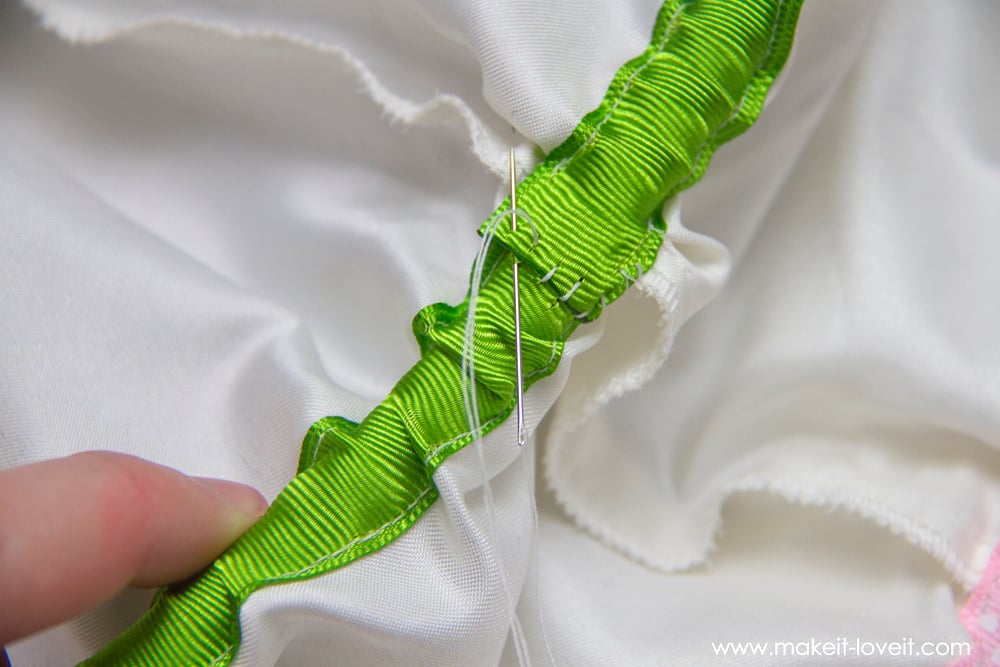
Now, trim the ends of your ribbon down until they are overlapping each other by about 1 inch. Then heat seal the ends so they don’t fray.
Then stitch the ribbon closed with a needle and thread.
And that’s it. A great little hoop skirt to fluff out your dress or skirt!!!
Good luck!
-Ashley

Hi, I’m Ashley—the DIY-enthusiast behind this crazy blog!