Home » DIY Tutorials » DIY Crafting » Crafting: Miscellaneous » Quilt -Like Tablecloth

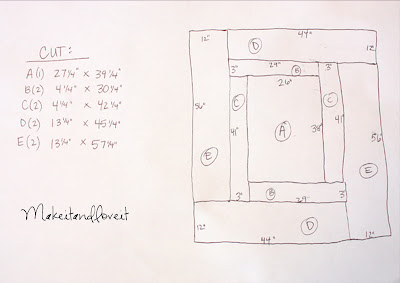
Instead of trying to write the directions for this tablecloth, I decided to take a picture of the diagram that I made and used while putting mine together.
Save
(Click on the picture to enlarge it)
As you can see, I wrote the dimensions of each section, right there in each rectangle. Then off to the left, I wrote how many of each I needed to cut and the exact measurement, including a 5/8″ seam allowance on every side.
As a point of reference, my table is 3 feet by 4 feet. I wanted the tablecloth to hang off the edge about 10 inches. So the finished product is 56 inches by 68 inches. Also, in case you are altering these directions to fit your table………I wanted there to be about 2 inches of the patterned beige color on the outer ring of the tablecloth, if looking from the top. I didn’t want that brown color to go all the way to the edge. If you want it the same way, make sure to consider that before cutting.
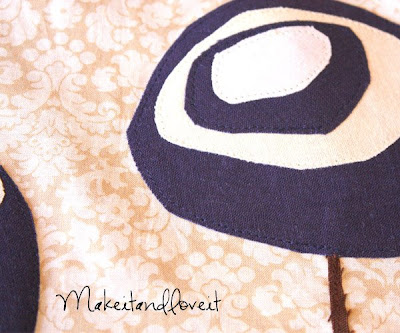
To finish off the center of the tablecloth, I appliqued some flower pieces/stems to the top and stitched them in place. Do whatever looks good to you. Or use the flower idea. Hmmm… or just leave it plain.
Save
And of course, I threw some vinyl over the top, to protect all of that hard work from small sticky fingers.
Save
By the way……..don’t have enough fabric to finish the project? OR did you, like me, mess up while cutting and have to improvise? Yup, I had to piece some scraps together to make it all fit together. After having done that, I decided that I really liked the charm of it. Added to the whole quilted look. (At least that’s what I’m telling myself, to feel better.)
Save
(Just remember…if you’d really like to go with the quilted look but don’t like my design, try quilting some squares together, or some strips. Think of what might look nice on your table.)Anyway, what a project.
It just turned out to be a fun way to add some texture to our table.

Share via:
