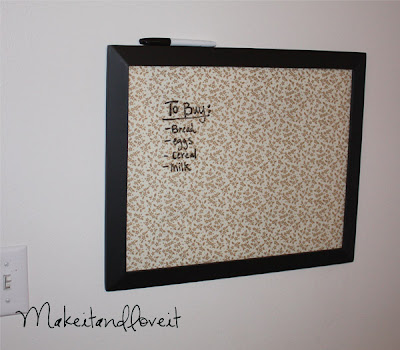
But I had to make this project for one reason. My husband. He has been bugged by our little mini dry erase board for months and months. Maybe even years. I have avoided getting a big ‘ol white board because I didn’t want the big thing plastered on my wall. And yes, he wanted a huge biggy one. So once I saw this project on someone’s blog, (it was a little different……only using the glass, not the frame I think) I thought it was perfect. Not so offensive to the eye. So thank you to whoever thought this up. It’s quite a nice compromise for me and my husband.
All I did was hot glue some fabric around the inside mat of a 14 x 18 inch frame, put the glass back in, set the fabric covered mat back inside the frame, return the back section to its spot, and then hang.
**You are actually writing on the glass that you put back in the frame. It wipes off just the same as a dry erase board. So nice.
So thank you for the idea whoever you are. And please, write me a comment if this is your idea. I love it.
Happy weekend everyone.
Hope it’s a sunny one.
(I need me some sun. And some blooming tulips. Is anyone else in love with tulips?)
(Edited on 3/9/2009:
im confused did you use a white board for this? how do you get it to erase?
I’ll go add more instructions. Sorry about that. :o)
Did you see it on the Proter’s website? I have seen these in the store, did it come from them? Just a thought. I love this idea. Now I have something to do next week! Se you soon.
No, I don’t think it was their site. It was someone I don’t know personally. hmmmm…. I guess my ‘ol brain is faulty (Almost 28 will do it to ya.)
Waaaaay better than that ugly messy one we had in the kitchen growing up! Very clever idea even if you did steal it from someone else hee hee hee! just joshin ya ash pash
I love it – will definitely have to make one for my office. I am in love with tulips too! I planted over 100 bulbs in my front yard this past fall, so I’m excited to see them in bloom this spring. Darn the snow today – one step backwards.
I love it, such an easy and cute way!! You go girl!!
I like that and pretty easy
Shannon’s comment got me thinking. Growing up we had patterns on the walls and a white board in a frame. You’ve come up with a pattern in a frame hanging on a white wall. Hmmmm. Inverse decorating, I’d say.
what a great idea! I fell upon your blog not too long ago and love, love, love all your ideas! I’m a wanna be crafter who can’t think up my own ideas, and looking at your blog I realize that projects don’t have to be complicated! I always thought crafting and creating had to be a big, expensive ordeal. You’ve helped me realize it doesn’t. Who would’ve thought?! Can I steal your idea?
There you go again! Making something that is now going to distract me from all my other projects! ;) I love it. Thanks for sharing your stolen creation. j/k!!! :D
Oooh! This looks fun and easy. Marc is at clinicals in IF tonight and tomorrow and I won’t see him until Sun. sometime :o( because he sleeps during the day at his moms -So this would be a fun surprise for him when he gets home. Lets just see if the kiddo’s will cooperate!
I just found your blog, from…somewhere (you know how you just click links and can’t remember where you’ve been) I love all the great ideas you have! I will definitely be checking back to see all the fun stuff you do!
I LOVE this idea! I think I’m going to put ribbons across half of it so I can put cards/papers on it too.
Actually, my friend super creative friend, Maren, posted a tutorial on The Secret Stitch Club blog:
https://secretstitchclub.blogspot.com/2009/01/make-your-own-project-board-tutorial.html
I’m not sure if that’s where you saw it, but it looks pretty similar. She’ll be so excited. Yours turned out so cute!
Why is it I always notice the mistakes in my comments AFTER I publish it?? :)
Hi Ashley,
I did a tutorial on the Secret Stitch Club blog on how to make these. I came up with the idea because I have a tiny little dry erase board that was plastic, but you slide a picture behind it. I hated writing on it because you could never wipe it off very good.
I always left my babysitters notes on my large front room mirror with my dry erase marker. The ideas kind of collided. The frame I used was for a poster and looks like a big peice of glass, but there is the tiniest frame.
I like the one you used a lot better. I plan on making a fancier one for my kitchen. The one featured in the tutorial was more functional for my sewing room. Thanks for making this project. Your turned out great!
SO brilliant! I love checking your blog because you always have great ideas or find great ideas! Thanks so much for sharing. :)
I made one and love it. Actually I made 2. And then had the idea to use cute scrapbook paper instead of fabric. Just cut the paper down to the size of the frame. But I guess in only works if your frame is smaller than 10 x 10. It turned our super cute and was a lot easier. (not like the fabric one was hard though)
(I only have a second because I am on someone else’s computer.)
MAREN!!!! That was it!! Thank you so much. It was all you! Somehow I linked over to it, saw it, and loved it. So thank you. I will go edit the post right now with a link to your post.
And good job Christie, you’re quite the super slueth!! ;o)
Oh, and Philpott family…..great idea to use scrapbook paper. Perfect for a smaller board. I’ll have to try that.
This is genius! and oh so cute! Thanks for sharing!
I love it!!!! And this one I can actually do, because I can’t sew!!!
Fab idea!
:)
Oh my gawrsh! what a genius idea! Beautiful!
Here via stumble, in case you'd like to know…
I loved this idea the second I saw it. I linked you on my blog, I made one similar but turned it into a calendar.
LOVE LOVE LOVE your blog and all your great ideas!
THANK YOU!
Melissa – NannyGoat
https://littlenannygoat.blogspot.com/
If you're interested in turning this into a calendar as Melissa suggested, Say it With Style has a vinyl decal in her Etsy shop that makes this easy. Visit her shop sayitwithstyle.etsy.com.
Thanks so much for this post!!! I found it just at the right time … and made a dry erase board for my daughter. I changed it a bit and did not use a picture frame with glass in there. You can read about it here
https://muffinsnmore.blogspot.com/2009/09/diy-whiteboard-dry-erase-board-for-kids.html
I also put a link to your post into mine.
Thanks so much!!!
i will be linking to mypetitepurse. we have a slight variation…just using paper!
Thank you so much for this! I'm a crafter wannabe and this is the first project I've finished in a LONG time. I actually went to the store today to get everything and am done already. I even had to go back out because I found out hubby had left the glue gun on for over a week in his work room. I got 4 frames on sale (2 for $9.99) fabric and complimenting ribbon. I made one of the frames a cute little crisscross pattern with the ribbon for business cards. I also borrowed the idea of the big clothes pins, painted them with chalkboard paint and glued it to a board from another project. The only thing left to do is hang them in my office tomorrow. I can't wait. I'm so proud, I'm a crafter!
: ) Thank you!
Thanks so much for the tutorial. I made one for my kitchen and love it!
https://mamarockwell.blogspot.com/2010/08/picture-frame-dry-erase-board.html
Hey:) I used this idea (and 2 others)in my post and linked back to your home page and your tutorials.
You can check it here
https://gaiainlove.blogspot.com/2010/09/bir-cesit-pano.html
I love love love your blog!! I'm crafty myself and love creating…but you have made me want to create even more and made me realize it can be very easy as well!! Keep the ideas coming!!
i home school and our living room is our school room. i totally rejected a large white board in my nice living room! but this is perfect!! and i have a great spot for it.
i've been on the hunt for a frame (can't find second hand ones easily where i live) and good fabric.
thanks for posting the idea!
I love this! My husband likes the big in the way dry erase board… and I just can't gather up the nerve to go buy one cause they aren't really cheap. I love this idea!
I was inspired by yours and other bloggers to make one of my own. It is such a great idea!
I linked from my site to yours so that readers could see a variety of different ones:
https://kidscatsclutterandklutz.blogspot.com/2011/01/decorative-dry-erase-board.html
This makes me SOOOOO happy! Thanks!
I just found your site through my sister's blog. You have so MANY AWESOME ideas here! I homeschool, too, and have a huge ugly white that doesn't erase very well (got it second hand). This is such an awesome idea! I think I'll head out to the thrift store to see if they have a huge picture frame with glass that I can use… can't wait!
So in love with this! Mine just broke so I think I am going to use my old frame and put some magnets on it so it can go on my fridge :)
Thanks so much for the tutorial!
I love this idea!! CAN’T wait to try it out!! Make two good christmas gift ideas!! Thanks
https://orangiesattic.blogspot.com/2011/03/diy-shabby-chic-dry-erase-memo-board.html
Maybe this is the original idea?? saw it a few months back.
Love it.. thanks for your inspiration…Love your blog.. check out my board too.
https://nancyogengayouree.wordpress.com/2011/11/24/diy-wipe-off-menu-board/
I’ve just moved to a new (rented) flat and your site has so many great ideas!!
And I also got some of my own, I’ll post pics later.
Thank you so much Ashley!!
Nice stuff! I’d be interested to see if doing this would scale to a larger size – say, 4′ by 8′. I think that people would really like having a patterned whiteboard, or maybe it could be an easier (and changeable) way of making charts, calendars, etc.