Make It and Love It

Free and Inspirational Do-It-Yourself Crafting/Sewing Tutorials

  • Home
  • Tutorials
    • Clothing
    • Home Decor
    • Children
    • Baby
    • Re-purposing
    • Accessory
    • Sewing Tips
    • Kid Craft
    • Holiday
    • Home Improvement
    • Gift Ideas
    • No Sew
    • Misc.
    • Round Ups
    • Make-A-Cake
    • Top Tutorials
  • Shop
  • Recipes
    • Appetizers
    • Beef
    • Beverages
    • Breakfast and Brunch
    • Chicken and Turkey
    • Desserts
    • Dinner
    • Eggs
    • Gluten Free
    • Pasta
    • Pork
    • Salad
    • Sandwiches and Burgers
    • Seafood
    • Side Dishes
    • Soups and Stews
    • Vegetables
  • My Book
  • FAQS
  • Archives
  • Contact
    • General
    • Advertise
    • Orders
    • HOI Friends
      • Ashley Johnston
      • Kim Byers
      • Lindi Haws
      • Mandy Beyeler
      • Mariah Leeson
      • Michelle Stewart
      • Randi Dukes
      • Tammy Mitchell
      • Tauni Everett
      • Toni Roberts
      • House of Ideas
  • About
Home » Crafts, Sewing, & Home Decor » Home Decor » Project Display Board

Project Display Board

December 28, 2009 by Ashley

Or I guess I should say……..
project/photo/bills/chores/etc. display board. 

The uses are endless. And you can make this little board fit the theme of any of your decor.
So it blends right in.

Perfect.

I just needed a solution for wet art that was making a mess touching other things in my home.

Solved that problem.

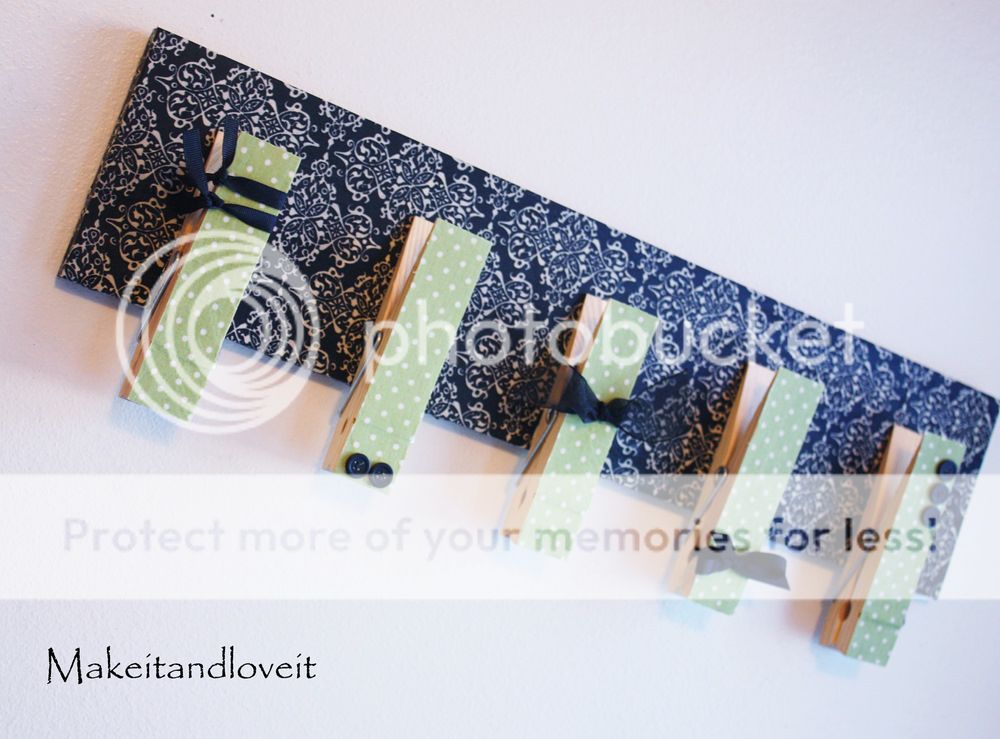
All I did was cover a board with a layer of Mod Podge and then layed a piece of fabric on top of that. (and I used this tutorial to fold down around the corners/edges of the board.)

And then I covered the front and sides with a nice layer of Mod Podge.

Then I covered some jumbo wooden clothes pins the same way. But only the front of the pins.

Next, I let everything dry completely and the hot glued the jumbo pins to the board. Lastly, I added ribbons and buttons….but that’s completely optional.

Great for all sorts of purposes.

Share170
Pin3K
Tweet
Email
3K Shares

Related Posts

  • Cork Board

    Here's the tutorial for the Cork Board.   You'll need: Buy the least expensive wooden frame you can find. (Or, I guess, plastic or metal…

  • Home Decor

    Click on any of the images below........and you will be directed to the full tutorial.(Tutorials are listed from the most current, down to the very…

  • Jelly Bean Jar Decor

    I can't stop.     I am just loving the bright colors in my home. I need some light.......and for today, this just hit the…

  • Autumn Wheat Basket

      How about a quick and easy project to liven up your front porch or inside by your other autumn decor...     I just…

Filed Under: Home Decor, Miscellaneous, No Sew

« Merry Christmas
I’m back… »

House of Ideas

Check out Ashley’s featured Disney Costume tutorials, baby costumes, DIY halloween crafts.

Comments

  1. Carol B says

    December 28, 2009 at 2:44 pm

    great idea, very cool
    Thanks

  2. Lynn from For Love or Funny says

    December 28, 2009 at 2:45 pm

    I could definitely use this in my office. I hope your move is going smoothly!

  3. Jen says

    December 28, 2009 at 3:07 pm

    I love it! I made something similar years ago, but using liquid nails to adhere the pins, to hang a crib quilt on the wall. Worked great and was sooo cute! Thanks for sharing this idea – I definitely will try it with the fabric and modge podge for my new office.

  4. Jennifer Dawn says

    December 28, 2009 at 3:09 pm

    I love this idea. I am going to have to try this the first chance I get. So cute!

  5. Precious Memories Scrapbooking & More says

    December 28, 2009 at 3:40 pm

    Oh this is a great idea, I am constantly looking for a place to dry my daughters paintings & glued stuff. I will have to try this once my craft/office is done! Thanks for sharing!

  6. Blissfully Enamored says

    December 28, 2009 at 3:43 pm

    that is so cute!!!

  7. Mrs. Darnell says

    December 28, 2009 at 4:02 pm

    Love this! Going and getting supplies today. Thank you

  8. Angie says

    December 28, 2009 at 4:42 pm

    This is SUCH a cute idea!!

  9. greetingarts says

    December 28, 2009 at 4:55 pm

    Totally fantastic.

    Good luck with the move, hope all goes smoothly.

  10. Rose says

    December 28, 2009 at 5:01 pm

    So cute! Hope your move went smoothly and you had a fantastic Christmas!!

  11. SkyleRae says

    December 28, 2009 at 5:34 pm

    This is an awesome idea! May be just what I was looking for to organize my space a bit! Thank you so much for the tutorial!

  12. peace.love.applesauce says

    December 28, 2009 at 6:16 pm

    Excellent idea!

  13. sofia's sketchbook says

    December 28, 2009 at 6:38 pm

    i soooooo need to do this…thanks for the tutorial…

  14. Infant Bibliophile says

    December 28, 2009 at 7:19 pm

    I love this idea! I really need to buy clothespins, because I keep seeing crafts I want to do with them. Would definitely come in handy for drying wet artwork, but I also think I'll make one for bills and hang it in a recess where it is a bit out of the way. I just got a new label maker, and I might label the pins "paid – to be filed," "need to pay," "need to make a phonecall" etc. 2010 is my year to get organized. Thanks for the idea!

  15. Jon, Amber, Caleb, and Skyler says

    December 28, 2009 at 8:38 pm

    It's a great idea! A lot of the people in my ward this past month made one for each child. The whole top had a row of pictures of the child, to show it was their board, and then clothespins or clips to hang artwork! Just another idea! :)

  16. Kelli says

    December 28, 2009 at 8:59 pm

    This is a GREAT idea and a perfect one for gift ideas! Thank you.

  17. Lacy says

    December 28, 2009 at 10:08 pm

    Great idea! I love the use of the fabric.Where do you buy the jumbo clips?

  18. Brook & Jared says

    December 28, 2009 at 11:06 pm

    So darn cute! I'm totally going to make each of my kids one for their rooms to go along with the over crowded magnet boards.

  19. Angie says

    December 29, 2009 at 1:03 am

    genius! this will be so handy!

  20. Drew and Tiffany says

    December 29, 2009 at 1:34 am

    super cute, what a great idea! I was wondering if you or any of your readers had any ideas for a cute jewelry type holder. One that could hold stud earings, hook earrings and a couple watches/bracelets.

  21. Bear Hugs Baby says

    December 29, 2009 at 12:03 pm

    Ohhhh! I LOVE this idea!!!

  22. I BLEED PINK says

    December 29, 2009 at 4:04 pm

    I love this idea, I was looking for a way to hang up all my aprons and I think this will be perfect!

  23. brannangirl says

    December 29, 2009 at 4:16 pm

    LOVE this! Where did you find the clothespins? I couldn't find them at Michael's. I'm thinking of doing a long one of these over my couch with a little more decorative pins and some sepia pictures. Great idea!

  24. janadec9 says

    December 29, 2009 at 4:54 pm

    so cute!!! great idea!

  25. Nic and Shannon Rich says

    December 29, 2009 at 6:24 pm

    I love this idea very cute for when I get to the stage of hanging art work but for now I think you just gave me an idea for a coat rack!!!

  26. Brenna says

    December 29, 2009 at 6:52 pm

    Love this! I love everything you do. I hope your move went well.

    Where do you find the clothespins?

  27. crazy family of 6 says

    December 29, 2009 at 7:09 pm

    I am going to have to try this! perfect for my girls

  28. Ashley says

    December 30, 2009 at 12:55 am

    Hey everyone! I got the clothespins at a local craft store. You may be able to find them online. Best of luck! Let me know how yours turned out. Some of you have shared some great uses for this board!! :)

  29. Rachel@oneprettything.com says

    December 30, 2009 at 6:42 am

    That is super cute! Thanks tons, I'll be linking.

  30. Rachel Marie says

    December 30, 2009 at 10:30 pm

    I love this idea and really want to do it. Question though- I'm new to mod podge so I'm wondering why you put a layer of it on the top and sides of the fabric?

  31. Emily says

    December 31, 2009 at 1:03 am

    Very cute! Right now I use a magnetic strip (modpodged with purdy paper, of course), but this one is super-cute and I may just have to make it too!! Congrats on your move…..I HATE to move, I even get anxious hearing about other people moving, so I'm glad it went well :)

  32. Michelle says

    December 31, 2009 at 3:23 am

    very cute! i'll be making one soon! ty!

  33. Ashley says

    December 31, 2009 at 1:39 pm

    I love all of your other uses for this…..I may have to try some out for myself.

    I bought the clothes pins at a local craft store so it may be hit or miss when you check your local stores out. Or you may be able to find some online.

    The pins are about 6 x 1.25 inches and the board is about 24 x 5.5 inches, in case you're wanting to make something similar.

    Rachel Marie, I mod podge over the top of the fabric to seal it all in. It also keep the fabric from peeling off and is barely visible. You can feel a difference but you can't really see one. It just makes the fabric a part of the board. Try it out and you'll see what I mean!!

  34. Laura says

    January 1, 2010 at 12:32 am

    Ashley,

    I found your blog last night and can I just tell you that you have the most cutest, creative blog ever!!! I am SOOO excited to make a lot of the stuff you have made!
    Thank you so much for SHARING your talent and showing how to make it!
    You have given me confidence that I can do it instead of buying it!

  35. A says

    January 5, 2010 at 7:26 pm

    i just found your blog and i love it!! I am just learning to sew and getting into the craft thing.. Thanks so much for all the great tips and how to's. I cant wait to make this and other things… LOVE IT. i was going to make this to organize myslef but i may be making more. I love the apron idea

  36. A day in the life of Stacey.... says

    January 6, 2010 at 10:08 pm

    HI! Love your blog! One question where do you find the jumbo clothes hanger??

  37. TrudyAnn says

    January 17, 2010 at 1:53 am

    I love this idea for my grandchildren's craft/art projects! Where can I get those large clothes pins?

  38. Trista says

    January 21, 2010 at 6:40 pm

    I love this project!! I am just having trouble findin' those clothes pins!! I am gonna keep looking though! Thanks for the idea!

  39. TrudyAnn says

    January 21, 2010 at 8:19 pm

    I found these clothes pins at
    crafthobbywholesale.com they have a sliding price scale depending on how many you buy. 12 – 17 cost about $1.19 @ and less the more you buy. I bought 20 for $1.04 @ to make a couple of really bid boards, one for my daughter and one for me. Hope this helps! TrudyAnn

  40. griggsy says

    February 23, 2010 at 9:47 pm

    I came across your blog today. You are so talented! I love your blog! I have been looking at it all day!

  41. Andréa Morrow says

    March 10, 2010 at 12:16 am

    I found some jumbo clips at hobby lobby!

  42. barneyn says

    June 10, 2010 at 5:08 am

    Neat idea! i love it! where did you find the jumbo pins!

  43. catnap says

    November 2, 2010 at 1:59 pm

    I'd vote for this to show up on Mod Podge Rocks. Very cute. My son made the same thing in summer camp one year (umm, not as "pretty" as this but still cute). He made it specifically for work, where I did use it till I left that job. Now he's 19 and it's still hanging in the kitchen and I must say it is pretty darn useful. It really works well. Lots of possibilities with this project from a pretty one like yours carefully coordinated to the decor, to a simple kid's craft, to ones with labels for specific info. So low tech but so useful.

  44. tina Rothwell says

    January 17, 2011 at 1:34 am

    so cool, can't wait to try this!

  45. Heather says

    October 2, 2011 at 10:55 pm

    Just made this today! Thanks for the tute! http://houseofwoyaks.blogspot.com/2011/10/andrews-project-holder.html

  46. Raphaela Dias says

    November 19, 2011 at 1:13 pm

    Could I use only hot glue? I dont have mod podge… Or would not work it?
    Thanks Raphaela

  47. Laura overstreetlg says

    December 27, 2011 at 10:01 pm

    Can’t wait to do this one

  48. Jenny says

    March 26, 2012 at 5:58 pm

    This is a great idea! I want to do something like this across the “big” windowless wall in my dd’s room.

Subscribe

Sponsors

House of Ideas

Find more great DIY craft ideas and project tutorials as well as DIY Costumes on House of Ideas.

Copyright © 2019 · Privacy & Terms