My little Oliver is growing so quickly. In fact, some of the little summer clothes that I bought him about 6 weeks ago, are already getting too tight on him. So, because our Oklahoma summer is only getting hotter and HOTTER, I decided to try my hand at making him a little Tank Top Romper. Not only because it’s hot and this little guy doesn’t need any added fabric to overheat him (including sleeves), but also because I have seen these little tank top rompers at the store……and just couldn’t bring myself to buy them. I mean, come on, they’re like 2 little pieces of fabric, no sleeves at all…..and they want $20?? Nope. No thanks. Surely I can figure this out! So, I started measuring and cutting — and after about 90 minutes (which included creating a pattern piece), I made him his own little Tank Top Romper, with an Envelope Neckline.
And was thrilled that it actually turned out. (…LOVE it when that happens!)
Even better — this little romper didn’t cost me a penny because I used an old shirt from my “old clothing stash” (which includes some of our old clothing that we’re ready to donate PLUS hand-me-downs that others pass along to us and either doesn’t fit or we don’t need…..or they know I’ll cut it up and use it for something)!
So this donated striped shirt……was transformed into a simple romper. Because that fabric DESERVED to be a romper, don’t you think?! ;)
That envelope neckline is the same as the ones you’ll see added to a lot of children’s clothing. It sure makes fitting over those heads a breeze……..but it also adds the cutest detail!
And because life is so much better when there’s quick access to a messy diaper, I made sure to include a snap-crotch to the romper.
And for fun……I had to add the “m” tag (you know, for “Make It and Love It”). Yes, these are the same tags that I bought years ago and still have plenty of them left. It really makes a project look so polished and professional when you add your own tag (but sometimes I forget to add them).
This little romper is so perfect and comfy for mobile babies like Ollie. There’s plenty of room in the bodice and bum area, which allows for movement to crawl…..
…..and then eventually walk. (Which I thought he was going to do earlier than any of the other kids and start doing a month or so ago…..but then he lost interest. But believe me, I’m VERY okay with that!)
It’s a good thing I created an actual pattern piece because I’m pretty sure I need to make several more of this same exact romper for my growing Ollie boy! Such a cute monkey, this kid! :)
Would you like to make one too??
Of course you do!
Here we go…
SUPPLIES:
***Check out my Sewing Terms 101 post, for additional help.
To get started, grab a onesie that currently fits your subject. Be sure that it’s one that fits more loosely. Sometimes, a onesie will fit a little more snug, like the striped onesie on the left. Be sure to choose a onesie that fits loosely, like the green one on the right.
See the difference? You’ll want the extra space because the romper will need to have space for the bum and legs.
Now, it’s time to use your onesie to create your pattern piece. (For more examples of using current clothing to create pattern pieces, check out some of the other clothing tutorials here.) Fold the onesie in half with the front of the onesie facing outward. Place the fold of the onesie along the edge of your paper…..and then begin tracing around the FRONT NECKLINE of the onesie, the curve of the arm hole, and then the side of the onesie. However, you want to angle out the side of the onesie to allow for more room for the bum. Also, add the curve for the crotch area and then decide how long you want each leg to be.
Now, lift off the onesie and you’re going to extend the shoulder fabric just a bit to create the envelope closure neckline. Continue the curve of the armhole 2-3 inches……and curve the line of the neckline over at a more extreme angle, to meet the extended line of the arm hole.
Now, you’ll need to add an extra 1/4 inch seam allowance to the side seam. But none is needed for the arm hole, neck hole, crotch, or length of the leg. However, if you aren’t making your romper from an old Tshirt (and/or using the hem of the Tshirt for the hem of each romper leg hem), you’ll need to add a little extra seam allowance to the length of the leg.
Now, this is the FRONT PATTERN PIECE……cut it out.
Then, trace around it to create the pattern piece for your BACK piece. However, you’ll need to adjust the neckline and make it slightly higher. Use the existing onesie as a reference.
Now, it’s time to cut out your fabric piece.
If you’re using an old Tshirt as your fabric for your romper, cut the shirt apart at the side seams and the shoulders. And then cut off each sleeve.
Then fold the front of the shirt in half vertically, with the RIGHT sides of the fabric together. Be sure that the hem of the shirt is along the bottom. Place the pattern piece on top of the folded fabric, line up the straight edge of the pattern piece along the fold of the fabric, and the bottom of the pattern piece along the hem of the bottom of the shirt. Cut out around your pattern piece.
Repeat with the back pattern piece and cut out your BACK piece.
Then cut 4 strips of your scrap fabric into 1 1/2 inch wide strips. 2 of the strips will be for the neck lines and 2 of the strips for the armhole openings. (The length of each strip depends on your particular size romper that you’re making.) Be sure that the stretch of the fabric strips are going lengthwise, WITH each strip.
Then, place one of your strips along the neckline of one of your romper pieces. Place the strip RIGHT side face down on top of the WRONG side of the romper piece. Sew the strip of the fabric to the curve of the neckline, using a 1/4 inch seam allowance. BE SURE to slightly pull the strip of fabric as you’re sewing, to help with the ease of folding and sewing down the strip of fabric in the next few steps.
Also, BE SURE to use a narrow ZIG-ZAG stitch when you attach your strip to the neckline. This will ensure that fabric will still stretch a bit, even after it’s sewn.
Now, place the romper piece in front of you, RIGHT SIDE FACING UP. Pull the strip up and lay it flat. Then fold the edge of the center of the neckline (of the romper fabric) up…..
…..the fold the strip of fabric down 1/2 inch……
………and then fold it down one more 1/2 inch. And then pin in place.
Start at the center and work your way outward, pinning the neckline in place.
Then, using a double needle (more on using a double needle here), sew the neckline in place. If you don’t have a double needle, you can also use a zig-zag stitch, to allow for stretch.
Use the steam setting on your iron and press flat. Repeat wit the other romper piece and add the neckline fabric.
Now, grab your FRONT romper piece and fold each of the shoulder pieces back, right where the shoulder line would be. Use your pattern piece and match up the cut of the armhole and side with the pattern piece. Pin each of the shoulder folds in place temporarily.
Then, place the FRONT romper piece on top of the BACK romper piece…..with WRONG sides together. Match up the sides and arm holes. and pin them together temporarily.
Then, fold the extended shoulder pieces from the BACK romper piece down onto the FRONT piece, folding right at the same spot that the FRONT romper piece is folded. Pin the flap of the BACK PIECE to the curve of the armhole on the FRONT piece.
Keeping the shoulder flaps lined up just the way they were, open them up carefully and continue pinning the flaps of the shoulder pieces onto each other with the BACK piece overlapping onto the FRONT piece. Also, be sure that the curves of the arm holes are lined up evenly with each other. Repeat with the other arm hole.
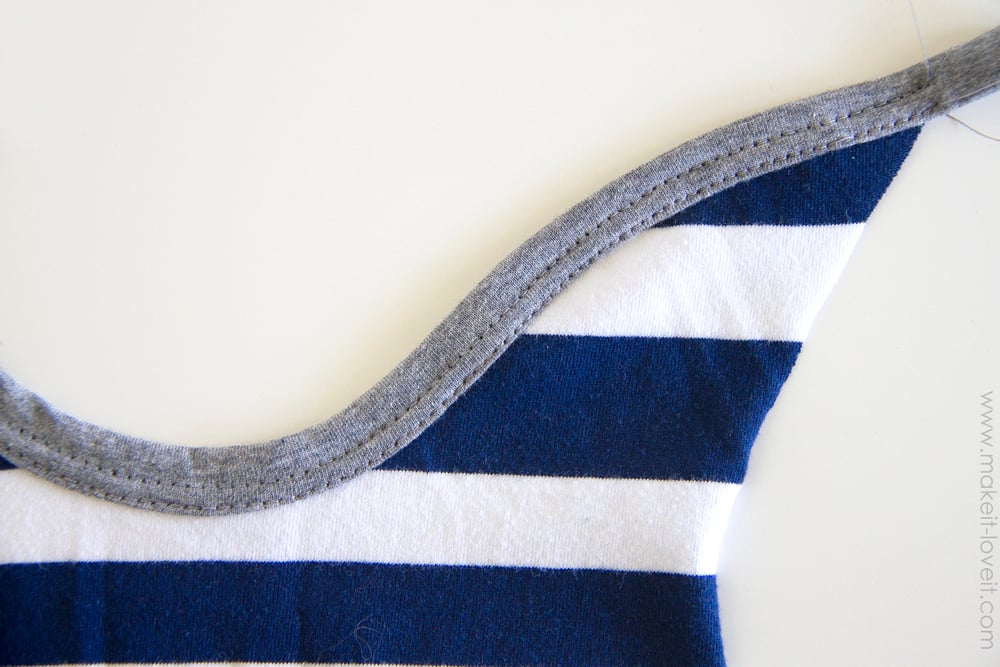
Then, sew along the curve of the armhole with a nice long basting stitch (just to hold the layers together temporarily) and then add your other strips of fabric to the arm hole openings, the same way you added them to the neck lines.
It should look just like this when you’re done. Steam press flat.
And then once folded back in half, it will look like this. Ack…..it’s looking so good! :)
Now, cut two more small strips of 1 1/2 inch wide strips of your knit fabric and attach it to the curve of each of the crotch sections of your front and back pieces.
However, make sure to leave about an inch or so at each end of your fabric strips, so that once you’re finished attaching the strip, you can trim down each end to about 1/4 inch, fold it back to the WRONG side of the romper fabric, and then sew in place.
Now, add your snap pieces to your fabric….making sure they line up evenly.
Then, fold the romper back together but with RIGHT sides together, line up the sides, and then sew along each of the 2 long side edges, using a 1/4 inch seam allowance. BE SURE to use a zig-zag stitch to allow for stretch.
Now, turn right side out, press the side seams flat……and then admire your work. Because that little romper turned out so cute! :)
And now, enjoy!
-Ashley
. . . . .
Want to see a few more ways to use up your old Tshirts?
Make a Color-Block Dress with Pockets….from old Tshirts
Turn a Long Sleeve Shirt into Short Sleeves…..with a Bow Front

Hi, I’m Ashley—the DIY-enthusiast behind this crazy blog!