Make It and Love It

Free and Inspirational Do-It-Yourself Crafting/Sewing Tutorials

  • Home
  • Tutorials
    • Clothing
    • Home Decor
    • Children
    • Baby
    • Re-purposing
    • Accessory
    • Sewing Tips
    • Kid Craft
    • Holiday
    • Home Improvement
    • Gift Ideas
    • No Sew
    • Misc.
    • Round Ups
    • Make-A-Cake
    • Top Tutorials
  • Shop
  • Recipes
    • Appetizers
    • Beef
    • Beverages
    • Breakfast and Brunch
    • Chicken and Turkey
    • Desserts
    • Dinner
    • Eggs
    • Gluten Free
    • Pasta
    • Pork
    • Salad
    • Sandwiches and Burgers
    • Seafood
    • Side Dishes
    • Soups and Stews
    • Vegetables
  • My Book
  • FAQS
  • Archives
  • Contact
    • General
    • Advertise
    • Orders
    • HOI Friends
      • Ashley Johnston
      • Kim Byers
      • Lindi Haws
      • Mandy Beyeler
      • Mariah Leeson
      • Michelle Stewart
      • Randi Dukes
      • Tammy Mitchell
      • Tauni Everett
      • Toni Roberts
      • House of Ideas
  • About
Home » Crafts, Sewing, & Home Decor » Baby » Car Seat Cover

Car Seat Cover

December 15, 2008 by Ashley

I was faced with a problem this winter.


We live in Idaho, where we get a lot of this……

 

And while in his car seat, my long and chubby 6 month old baby wouldn’t fit under one of these……..


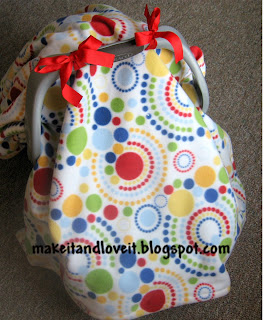
So I decided to make one of these……….

Do you want one too??


I bought 1 1/4 yards each of 2 different colored coordinating fleece. I ended up trimming it down a bit but see how you like it once you get it home. You might like it larger or smaller. The bigger you make it, the more you can tuck around your baby once they’re inside the car seat but if there’s TOO much, then it’ll drag on the ground if it’s not tucked in. Decide what will work best for you.


Then place right sides together and sew all the way around (5/8 inch seam), except for about 10 inches or so, on one side. Trim your corners and then turn it right side out through the 10 inch hole. Poke your corners out so that they’re nice and square and then fold the 10 inch opening to the inside, 5/8 inch, just like your seam. Pin it closed and then top stitch around the entire thing, 1/2 inch from the edge.


Next, you’re going to tack the 2 pieces together all over the cover, in random places. This will keep the two pieces together a little better. Use the zig-zag stitch, but adjust it so that it stays in one spot……… (It’s the white thread, next to the green dot…….see it?)


Then measure out 2 pieces of wide grosgrain ribbon, that are about 24-26 inches long (depends on how long you like it). Pin the ribbons to the cover and then place the cover over your carseat to see if the ribbons are in a good spot. Sew the ribbons, down the middle, several times to secure them tightly.


Then tie your cover on…………..All Done!


And while your baby is in the car or in the store, just flip the blanket up over the car seat handle…….no need to untie it every time.


Nice and cozy!
Share55
Pin3K
Tweet
Email
3K Shares

Related Posts

  • Car Seat Handle Cover

      One of you readers emailed me, asking if I could show how to make one of these. I'm so sorry, but I can't remember…

  • Sewing Machine Cover

    If you have your machine out a lot (or if you always have it out in your, coveted-by-me, craft room), this will help keep the…

  • DIY Car Seat Toys...for baby!

    DIY Car Seat Toys...for baby! A great gift for babies of all ages!

  • Nursing Cover Clips

      Do you have any of these laying around from the binky clip tutorial?   Well, I did. A whole package of them. I know…

Filed Under: Baby, Gift Ideas, Sewing Tagged With: baby car seat cover

« A FREE giveaway
Cinnamon Stick Candle Holder »

House of Ideas

Check out Ashley’s featured Disney Costume tutorials, baby costumes, DIY halloween crafts.

Comments

  1. Shay says

    December 16, 2008 at 2:58 am

    Ashley,
    I hope you get this. I didn’t know that you were so talented!! Everything you make is so adorable! I have to say i was trying to view your blog and it won’t let me. Will you add me? poogie123@hotmail.com. Chuck and I have a blog called shayandchuck. But it would be good to keep in touch:)

  2. Bruce and Brandi Bryce says

    December 16, 2008 at 5:34 am

    Hi Ashley,
    This is Brandi used to be Nicholls! Your blog is so cute! I will be following it and I will put your button on my bog! I am excited to make a some new crafts thanks to you!

  3. Giles Fam says

    December 16, 2008 at 7:27 am

    ooohh! GOod Idea! I may have to try this out!!

  4. Ashlee says

    December 16, 2008 at 5:52 pm

    I like this! So cute! –ash fincher

  5. giddymomof6 says

    December 16, 2008 at 8:32 pm

    Super cute! And what a fabulous idea! I love it! Thanks for sharing!

  6. Diane says

    December 20, 2008 at 6:15 pm

    I totally went to Joann’s yesterday and picked up fabric to make this! I was going there to get other stuff, and on the way there it started to blizzard (Can you use blizzard as a verb?) Anyway, bringing Hunter into the store, I realized how esential this was! ;) Thanks for the simple directions! You should also check out http://www.craftstylish.com/ They have soooo many super cute craft ideas! I bet you would find lots of fun stuff on there too! – to go along w/all your great ideas! :D Happy Sewing!!!

  7. Jes says

    March 5, 2009 at 2:16 am

    Ok, I dont know you, but I found your blog from Delia, Erin and etc(girls from the 52nd ward)… You are SO talented! I love all your stuff!… however, this one totally frustrated me!
    OH.MY.GOSH!!
    Yours is simple, easy, quick, and ADORABLE!! The one I made was all fitted and cut to the shape of the carrier and had elastic around the bottom and etc… I liked it ‘cuz when we pulled it down her lap and feet were still covered and we could keep everything tucked in and warm.
    …sooo not worth the work though! lol…Yours is awesome and Im totally making one tonight!
    Also, Ive started posting things I make on one of my blogs, so dont worry I will give you credit for the genius and put a link for you!

  8. Leah says

    June 16, 2009 at 4:13 am

    I'm making this. So cute.

    And I just wanted to remind everyone out there to put your carrier handle DOWN when your baby is in the car.

    And while you're at it, get your car seat checked to make sure it's installed correctly. For a car seat check location near you, visit seatcheck.org

    • Anonymous says

      December 16, 2014 at 11:04 pm

      My car seat actually says to keep the handle up. So I think that rule may not apply to all car seats :)

  9. Levi's Mommy says

    July 30, 2009 at 10:57 pm

    I'm so happy you posted a carseat cover that doesnt interfere with the staps! Those stupid 'bundle me' ones make the carseats really unsafe because they go under the baby, but yours is much better because baby can be safe as well as warm.

    Now just take off those dangerous aftermarket strap covers that are preventing you from tightening your straps up and making the chest clip too low (it needs to be at armpit level), and you will be good to go!

  10. Adelle says

    November 2, 2009 at 11:48 pm

    I love this because it looks warm AND SAFE! I found your blog on a list of favorite's on Babycenter's group "Crafty Mama's", and I am a big advocate of car seat safety. This is perfect for little one's in an infant seat!

    I just recently started sewing, and love it! I am planning on making this for a baby shower gift tonight! Thanks so much for being awesome!

  11. Stacy Family says

    December 12, 2009 at 5:59 pm

    Ashley,
    I can't start to thank you for all your adorable ideas. My sister is Pregnant and I just found out today that I am expecting also. I have been looking every where for a pattern or something, for this very thing. We live in UT and for the past week it has been below 0 degrees. So this is ideal!! THANK YOU so much!! Your craftiness is AMAZING and inspiring.

  12. Dee & Gabe says

    December 16, 2009 at 4:08 pm

    This is perfect! Thank you for posting all of your ideas!! With the cold winter weather this past week, I've had a screaming child everywhere we drive because she doesn't like all the blankets getting in her face. Your ideas are all amazing!

  13. Lydia Story says

    August 14, 2010 at 6:21 pm

    These are great! I made one for my sister and found a cute very very soft blanket at the store that was cheaper than buying fabric. So I just attached the ribbons which was tied around the blanket when I bought it. So easy and cute. She loved it!!

  14. The Cookie Mama says

    September 25, 2010 at 4:10 pm

    I know this was an older posting, but I was wondering if you used a snow suit underneath the blanket or if you just wrapped baby in another blanket? I just made one and am due any day now, but wasn't sure if it would be warm enough in the winter.

    Thanks!!!

  15. The Cookie Mama says

    September 25, 2010 at 4:12 pm

    Oops, sorry, my e-mail address is my_cookie_mama@yahoo.com.

    Thanks again!
    Kris

  16. Anonymous says

    January 16, 2011 at 10:55 pm

    Can I just say that I LOVE your blog! I am learning how to sew and I love the pictures and tutorials! I like to make things but am not creative enough to come up with ideas of my own! Thanks for sharing!

  17. Car Seat Covers says

    May 21, 2011 at 10:03 pm

    nice blog, keep it up!

  18. Jenny Richins says

    June 22, 2011 at 1:50 am

    Yeah! I am so excited about this. I have been looking for something like this. Putting a blanket over the canopy doesn’t always work because they fall off or sloop to one side or best is that they aren’t long enough so the wind blows off with it. I will be making one or two of these. thanks.

  19. Katara says

    September 17, 2011 at 1:29 pm

    Thank you for this wonderful idea! I received one of the fitted covers but it didn’t “fit” and my baby is tall as well, so I will be making one of these for him!

  20. wendy says

    September 26, 2011 at 3:11 pm

    Thank you so much for this tut.I was going to pay like $30 for a already made one for my grandaughter and then was going to buy one for my new baby.I am so glad I can go and spend less than $20 for material and make it myself.
    Now if I could just sew all the other stuff I would be happy camper LOL

    • wendy says

      September 26, 2011 at 3:11 pm

      BTW we also live in Idaho

  21. Dakota says

    February 20, 2012 at 10:24 pm

    Yay. Made this in like an hour and a half. It is wonderous. And I dont even get to use it. Its for my neighbors brand new baby girl. Humph.

  22. Nikki says

    September 16, 2012 at 6:24 pm

    I know this is an older post but I just found your pattern and I’m excited to start making it! We also live in Idaho and with the smoke and wind, I need something to cover my 6 week old right now but also need something for the winter. I was wondering the same thing as Cookie Mama. I’m assuming in Idaho you have the baby bundled in a snowsuit and not just a blanket. But if you could let me know, I would appreciate it. Thank you!

  23. Wendell says

    August 7, 2013 at 1:57 am

    Quality articles is the main to be a focus for the visitors to go to see the web page, that’s what this site is providing.

  24. noleggiare auto alghero says

    September 4, 2015 at 1:24 pm

    I have read so many posts regarding the blogger
    lovers but this article is in fact a good paragraph,
    keep it up.

Subscribe

Sponsors

House of Ideas

Find more great DIY handmade and personalized gift ideas for family, friends, and neighbors on House of Ideas.

House of Ideas

Find more great DIY craft ideas and project tutorials as well as DIY Costumes on House of Ideas.

Copyright © 2019 · Privacy & Terms