Today’s contributor is Jill from Snugglebug University. All posts written by Jill for Make It and Love It can be found HERE.
. . . . .
Hi, it’s Jill from Snugglebug University! Today I’m excited to show you how to embellish store-bought gloves and mittens in lots of fun ways.

Have you noticed that I have this horrible habit of not ever being able to make just one of something? Remember the time that I went crazy making all sorts of puppets for my kids? It’s that time again when I go crazy with mass production. So I have to warn you…you might not be able to stop at just one pair of gloves or mittens!

But, hey, it’s holiday time! The more gloves the merrier, right? Give them to everyone on your list…or stuff these easy-to-make mittens and gloves in stockings!
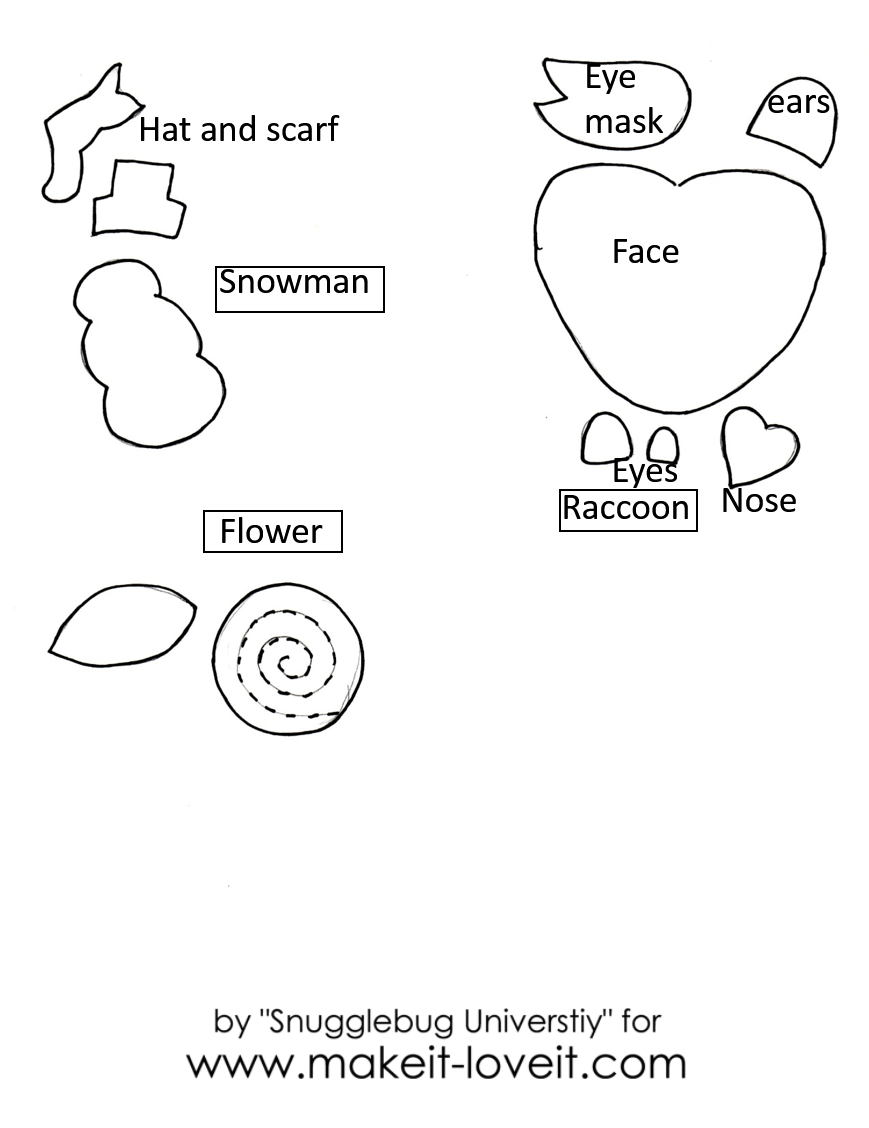
I’m going to show you how to make TWO pairs of mittens: a snowman pair AND a raccoon pair.


Both pairs of mittens are made by simply appliqueing on some felt designs by hand. You could totally add whichever design (or animal!) that you like…but I’ll give you the template to make these raccoon and snowman ones.
And I’ll be showing you how to make 3 different pairs of gloves:

These gloves were made by simply adding a few felt flowers:

Another pair just involves some simple embroidery stitches:

And the last pair is completely no sew!

I think the best thing about these gloves though is that they are made from the readily available (and super cheap – I bought mine for about $1 each) mittens and gloves that you can find at Target or the local craft store.
Ready to make your own?
Supplies:
***As always, if you need a bit of help with the basic sewing skills used in this tutorial, don’t hesitate to check out the Sewing 101 post for more help.
Alright, let’s get started on these easy to make mittens and gloves!
We’re going to begin with the raccoon and snowman gloves. Begin by cutting out the raccoon (or snowman) pieces from felt.

Using basic embroidery stitches–mostly a whip stitch–sew all of the facial pieces onto the raccoon face and snowman body. (Here is a good resource for embroidery stitches if you are unfamiliar with hand embroidery)

For the raccoon ears, sew the ear fronts to the ear back, leaving the base open. Place the ears on top of the mittens, such that the bottom of each of ear slightly overlaps each side of the mitten or each side of the glove.

Whip stitch each ear base to the top of the mitten. When you are finished they should look like this:

Now it’s time to attach the snowman or raccoon to the gloves. The key thing here is to put your hand in between the glove layers so that you do not sew the snowman or raccoon to both layers of the glove. You only want to attach the snowman or raccoon to the glove front.
For the snowman I changed embroidery floss colors around the scarf so that it matched the scarf. I also used a backstitch to sew on the snowman arms.


And you’re done! Pretty simple, right?

Ok, now let’s look at the geometric designed gloves. Just simple embroidery here. Sew up your design, again being careful not to catch the back side of the glove. Don’t pull the stitches too tight or they won’t have room to give when you out your hand inside.

Sometimes I found it easier to flip the glove inside out and work from there.

Once you’ve finished adding your design, you’re done with this pair too!

The flower gloves are also simple to make.
Cut out a circle, and then spiral around the circle with scissors.

Fold the spiral, beginning at the middle, so that each edge slightly overlaps. Then sew through the flower several times (all around the flower) to secure the layers together.

Tack the flowers onto your gloves. Again, make sure that you don’t sew the front of the gloves to the back.

Alright, that brings us to our last pair of gloves! These are totally no sew! We’re just going to add a bracelet and ring to the gloves.
Cut a piece of elastic thread (You can find this in the jewelry section of the craft store). Tie a big knot. (If it’s too small it will pop through the knit glove.)

Then just add on your beads and tie another knot. Repeat for the “ring.”

And that finishes all the gloves! Pretty easy right?

Thank you so much for having me here on Make It and Love It!
–Jill
You can follow Jill on her blog (snugglebuguniversity.com), on instagram, on pinterest, and on facebook.
***All contributor posts by Jill can be found HERE.
. . . . .
Why not put together an entire winter ensemble with these easy tutorials?
Scarf Re-purpose into a winter hat

Hi, I’m Ashley—the DIY-enthusiast behind this crazy blog!


