The last of our Halloween Costume Circus Theme……is COMPLETE!!!! (In case you missed them, Ellie’s wearing a Lion Tamer Costume, Connor has a Circus Clown and Bear Piggyback Costume, Chloe is wearing a Tight Rope Walker Costume, and Max has a Lion Costume and Circus Cage/Wagon.) Oh man, now I need a nap! Ha! But really, I get so hyped up while making costumes….that once I get going, I can’t turn my mind off until they’re done. In fact, some of my best work happens late at night when I tell my husband, “okay, just 30 more minutes”…which turns into at least another hour—or three! ;)
But from the very beginning of the circus theme idea, Oliver has wanted to be the STRONG MAN from the Circus! Connor tried encroaching on that idea and hoped to be able to convince Oliver of being something else, so he could be the Strong Man….but Oliver wasn’t having any of that! HA! Once he saw a picture of a strong man and saw that he had big MUSCLES and a big stick with balls on it, he told us ALLLLL about how he was going to wear a Strong Man Circus Costume this year!!!
And boy, was he excited!!!!! :)

It’s funny though, because I don’t think Oliver has ever seen a full set of weights on a bar. I have some hand weights at home that he has seen me use with a workout video…but never a full bar. But once I finished making this bar with the “heavy” weights on the end, he knew exactly what it was for! And that they make him look STRONG! :)

This Strong Man is kind of a show-off though…..just look how he flexes while doing this one-handed lift. Ha!

But if you think that’s impressive folks…..check out this full extension, with a side bend! (Hahaha…..this kid cracks me up!)
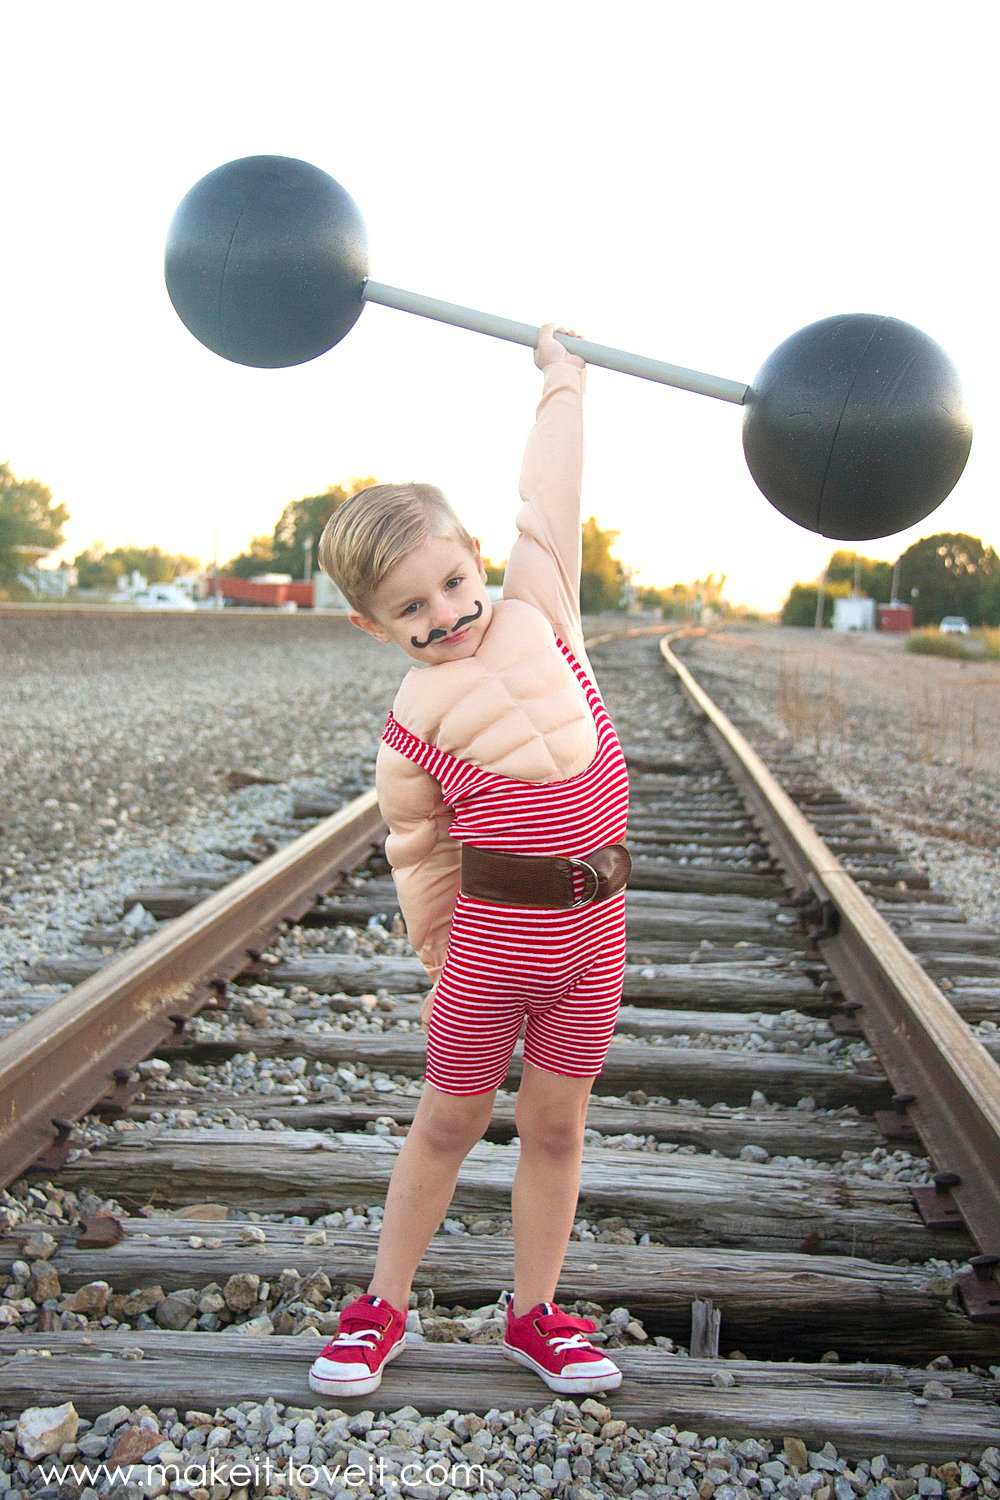
Just don’t try and distract him while he’s doing his reps. Lifting weights is serious business!!

I originally ordered a muscle shirt that I thought would save me some time and keep this costume nice and easy….but once it arrived, I was so disappointed with how it looked! The muscles were in the wrong spots and they were so flat. So I made a muscle shirt instead and it came together much easier than I thought! And now this Strong Man has a nice set of muscles to show off at the circus!

The striped jumper is a quick sew but I think I’ll add a little velcro to the shoulders before Halloween, to keep the shoulder straps up on the shoulders better. Those big bulging muscles tend to cause those straps to slide off….especially while doing arm curls. :)

Oliver has been training all year to join his friends at the Circus….and is now finally ready to impress his circus fans!

Good luck Strong Man……see you at the next big city!

Want to make a Strong Man costume too?
Okay, here’s how I made ours…
***Check out my Sewing Terms 101 post, for additional help.
Begin by creating the jumpsuit. This jumpsuit is very basic and is only made with a front and back piece, that are identical. Similar in shape to a wrestling jersey. Place a shirt down with a pair of knit shorts (that are more fitted and stretchy) and overlap the shirt the same amount as it would if your subject were wearing them. Use the height of those two together to determine the height of the jumpsuit. This will also help you determine the width of the leg portion….and then just go up straight from there. The scoop in the front should dip down about halfway between the pecks and the belly button…..maybe slightly lower. (Because you want the abs on the muscle shirt to show.) It’s easiest if you place the shirt and shorts down on some paper and create a pattern piece to then cut out your actual knit fabric. Just make sure you add a 1/4 inch around the edges for a seam allowance. And also be sure the fabric stretches from left to right, so the jumpsuit is easier to get on.

Once you have your two jumpsuit pieces cut, place them with right sides together, and then sew the shoulders together, along each side, and then along the curve of the crotch…..using a 1/4 inch seam allowance. Turn right side out…..and that’s it! (You could finish off the neckline, arm holes, and hem each leg….but knit fabric doesn’t fray, and I didn’t think it was necessary for this costume (or want to take the time to do it)! :)

Okay, now onto the muscle shirt portion of the costume. Grab a Tshirt that fits your subject pretty well and is not overly baggy. Use that shirt to create a pattern piece for the main bodice of the muscle shirt. Just add a few extra inches at the bottom, to be sure there’s plenty of extra fabric to keep tucked inside the jumpsuit.

Here it is opened up… (Make sure you added an extra 1/4 inch around the arm holes and both sides for a seam allowance. Also, the fabric should stretch right to left.)

Now, cut out another main shirt piece…..the same as the first. (I didn’t create a front and back piece. I just made both neck lines the same….which matched the scoop of the front neckline of his existing Tshirt.) Then, I used the Tshirt to create 2 sleeves that were a little wider than his existing sleeves, to allow for a little extra batting for the muscles….and also made them long sleeves.

Now, use a fabric pencil or chalk to mark the lines of your muscles. The lines I made were hard to see, I marked over them with black lines in photoshop. The top 2 sections of this muscle grid are supposed to be the “pecks”, so try and have them align with where your subject’s pecks would go. The bottom 6 sections on the grid are for the abs (or 6-pack)….so just divide those evenly.

Next, place another piece of scrap piece of your nude fabric underneath your shirt front and add pins to keep the layers together

Then increase your stitch length to a longer length (I bumped mine up to about a 4, on my 1-5 scale) and then sew along the lower scoop of the muscles. (The pins help hold the 2 layers of fabric in place during this step, since knit is stretchy.)

Then, turn over the fabric and cut away the extra fabric along the back, so that it doesn’t flap around and get in the way.

Now sew your vertical line down the center of the muscles, creating two separate pockets to fill.

Then start placing some batting down towards the bottom of these 2 sections, puffing out your very bottom 2 abs.

Then, sew a horizontal line to close off those 2 abs, following the markings you created with your pencil/chalk.

Next, repeat the same thing, creating your next 2 abs….

….and then 2 more after that, until you have a complete 6-pack!

Now, using a ZIG-ZAG stitch, sew right along the neck line, which will join those 2 layers of fabric together along the top. (The zig-zag will still allow the neckline to stretch, so it can fit over your subject’s head.) Then trim away all the extra fabric along the top…..which will get your shirt back to its original shape.

Stuff one of these “pecks” with batting, through the shoulder opening…..and then sew the shoulder closed.

Then fill the other peck….and sew it closed too.

For the arms, draw a similar set of lines with your fabric pencil/chalk….to use as a guide. There’s kind of an upper bulge and a lower bulge. Between the two is where your subject’s elbow should be, so make sure and line that up accordingly when your drawing your muscle shapes.

Just like the the other muscles, place a piece of fabric beneath your sleeve piece and pin them together. Then sew around the main shape of the muscles.

Then cut away the extra fabric from the back and then sew along the vertical line that divides those lower muscles.

Place batting into those two sections and then sew them closed.

Now add a little more batting, and sew off this section.

And then finally, fill up this upper muscle section and sew the entire arm close along the top, using a zig-zag stitch. Then trim away the extra fabric along the top.

Now, place your front shirt piece (with all the muscles) together with your back piece, with RIGHT sides together, and sew along the shoulders, using a 1/4 inch seam allowance.

Then, attach your shoulders to each arm hole opening, making sure that your are sewing them with RIGHT sides together.

Fold the shirt back together, but with RIGHT sides together, and then sew closed along each arm and then down each side of the shirt, using a 1/4 seam allowance. And that’s it….your muscle shirt is done!

For the weight bar, I grabbed a 1 inch dowel and some large styrofoam craft ball halves (they’re normally used for flower arrangements) that fit together to create a complete sphere. Cut a hole in two of the ball halves.

Slide one of the halves with a hole onto your dowel and then glue the other half (without a hole) onto the end of the dowel.

Slide them together and hot glue the two halves closed. Also, place a line of glue around the hole in the styrofoam, to seal it around the dowel. Repeat with the other end of the dowel and styrofoam halves.

Paint each ball black and the dowel silver…..and you’re ready to go!
For the belt, I just cut 2 pieces of faux leather that were 2 inches wide and then long enough to fit around Oliver’s waist, plus another 5-6 inches. I cut one end into a curve and then I sewed the 2 strips of leather together with WRONG sides together, nice and close to the two edges. Then, I placed one end through my two D-rings, folded over the end about an inch….and then sewed that edge down.

Now, you have a weight lifting belt.

Now it’s time to put the muscle shirt on, the bodysuit, and then paint a little mustache onto the face…..and then this STRONG MAN is ready to IMPRESS! :)
Haha…..still cracks me up!
I hope that was helpful!
Good luck!
-Ashley
. . . . .
Check out these other boy costumes ideas:
Aladdin Costume
Werewolf and Werewolf Hunter Costumes
Monsters Inc. Tshirts
Batman and Robin Costumes
PJ Mask Costumes
Captain America and Thor Costumes
Upside Down Man
Charlie Brown
Football Field Costume
Mad Scientist Costume
. . . . .

Hi, I’m Ashley—the DIY-enthusiast behind this crazy blog!


