I’m such a sucker for random costume ideas. And today’s post is something different from anything we chatted about or voted on almost a month ago…..but I just couldn’t help it. (And yes, the other costumes from the vote are in the works. Don’t worry!) I got this little Carrot Costume stuck in my head and I knew it would be quick, so I hurried and whipped it up the other day. And haha, it just makes me laugh! Especially those leafy carrot greens sprouting from the top of Oliver’s head! :)
Now, I know your average 10/11/12-year-old kid isn’t going to beg you to be a carrot for Haloween this year….but it’s a fun idea for babies, toddlers, or even high school aged kids who are past dressing up like super heroes and princesses but want something a little more unique and kind of hilarious to wear! Or hey, this would be an awesome adult costume too! I’d wear it! (And then I’d make my husband wear a bottle of ranch costume! Ha!) Also, just like some of the other costumes I’ve made this month, I’ll be giving this costume away too. Because our dress-up box is absolutely overflowing! So hopefully one of you could use this. (More on the giveaway down below!)
But who can resist a cute little BABY CARROT?!!! (<—see what I did there…..haha!)
The costume is made from fleece and can be worn as-is for warmer places (like here in Oklahoma), but can easily be layered with leggings and a long-sleeved shirt for colder places.
The sprouting leaves are made from stiff netting…..and surprisingly, they stood up REALLY well! But even if they flop back a bit, you still get the idea! :)
I added some stitched lines to the fleece, to give it that textured carrot look…
The front and back come down to a point to mimic the shape of a carrot…..but since it goes up at the sides, there’s plenty of room for movement and walking.
Oliver is just barely taking some steps and getting comfortable with walking, but still mostly crawls (that’s why you see his daddy’s hand in all these pictures). But those higher sides also allow for crawling.
Wouldn’t it be fun if he had a twin brother and we dressed him up as a stalk of broccoli? Or a pea pod? Or, like I mentioned above, a bottle of ranch dressing?! Ha! ;)
Oh, baby boy…..you’re such a good sport! And make the cutest little bundle of beta carotene!
SO—
If you don’t sew, don’t have time to sew, or would rather not sew…….this costume is up for grabs! Oliver wears an 18-month in clothing but it would work for a 1 year old (and would be a little longer) up to probably a 3 year old, maybe a smaller 4 year old (but would be a little shorter).
If you’d like the costume, leave a comment below (make sure you leave your email address in the comment form, not inside the actual comment, just the form) and let me know who you’d like this costume for! :) Hopefully it will work out for one of you! ****Giveaway closes Saturday October 3rd, 11:59 p.m.
And if you’d like to make your own carrot, in any ol’ size you want — let’s get started!
SUPPLIES:
***Check out my Sewing Terms 101 post, for additional help.
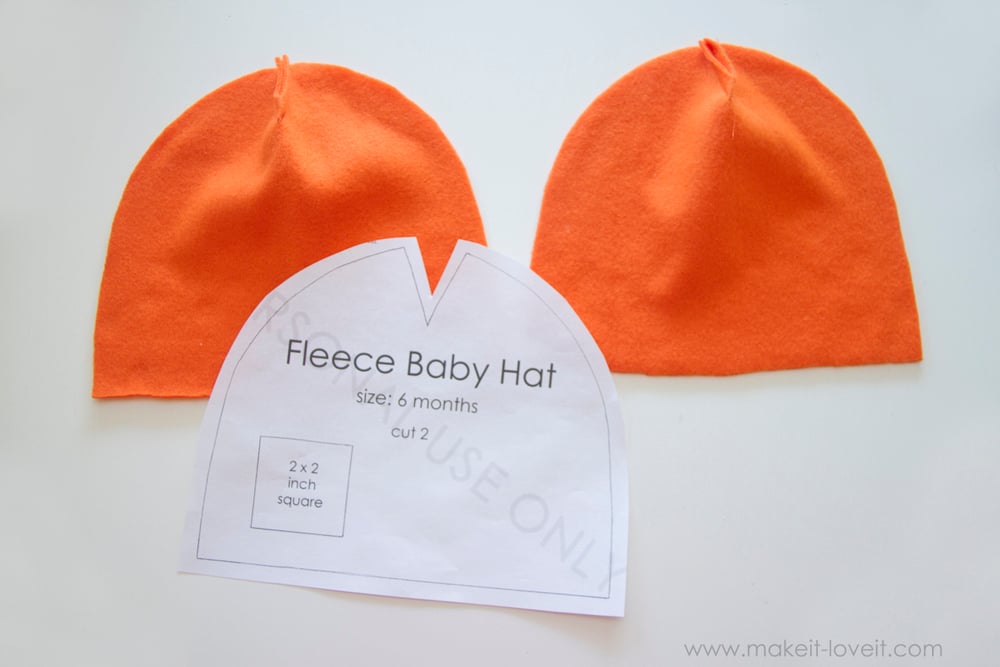
First of all, go and check out the Baby Cow Costume tutorial and print off the pattern piece for the fleece hat. You may need to adjust the size for your needs, so be sure and make a test hat, just to see how it fits your subject. (It’s really fast to make!) I ended up adding about a 1/2 inch around all edges but I didn’t end up needing it, even though Oliver is a year older than when I originally drafted that pattern piece. Sew the darts on the front and back hat pieces.
Now, there is no right or wrong way to do this…..but you need to sew a wad of your netting to the top of one of your hat pieces. I folded my netting into 3rds and then bunched it up at one end and then attached it to the RIGHT side of the hat piece. It will be a little tricky to fit it under your presser foot, but the more netting you can wad up into one place, the tighter it will be and the better it will stand up on the head. Attach your netting about 1/4 inch from the edge of the fleece.
Place the other hat piece on top, with RIGHT sides together, and then sew your hat together along the curved edge. (Refer to the tutorial above if you need more help sewing the hat together.
Trim off any excess fleece.
Now, you’re going to have a bunch of netting edges at the very top of the hat…..but that will be itchy for your subject. So, cut a circle of fleece and hot glue it over this inside section of the hat. (This will also help give the base of the netting a little more stability and will help it to stand better.)
Turn the hat right side out and turn under the bottom edge and sew in place, using a zig-zag stitch.
For the main bodice of the carrot, you’ll be putting your pieces together a lot like the Strawberry Costume tutorial. So, read through that first and then come back to put your carrot together.
Now, measure your subject just like the strawberry and decide how long you want your costume to be. Then add 1.5 inches to that measurement. Next, measure around the chest of your subject and then multiply that number by 1.3, then add 2 inches for seam allowances, and then divide by 2. (The 1.3 can be adjusted…I just found multiplying it by 1.3 was a good ratio.)
Oliver is almost 15 months old and wears size 18 months in most things. SO, if you want to use his measurements as a guide, here’s what I came up with. I decided to make the carrot 22 inches from the top of shoulder, down to mid-calf. 22 inches plus 1.5 is 23.5…..which was the length of my fleece piece. Oliver has a chest size of 21.5 inches…..so after being multiplied by 1.3, adding 2 and then dividing by 2, I had a width of 15 inches. So, I cut 2 pieces from my fleece that were both 23.5 inches tall and 15 inches wide. JUST BE SURE THAT THE STRETCH OF YOUR FLEECE IS GOING LEFT TO RIGHT, NOT UP AND DOWN.
Then, cut the bottom edges to a curved point, mimicking a pointy carrot.
Place your two pieces together (with right sides together) and then sew along both sides, using a 1/2 inch seam allowance. However, be sure to leave two armholes open towards the top of your pieces, just like the strawberry costume tutorial linked above.
Now, cut 2 more identical pieces, just like the first (as a sort of lining to help stiffen up the costume). Sew the sides together just like the last step, making sure to leave the armholes open. Now, turn one of your sections of fabric right side out and then slide it into the other one, and line them up, making sure the right sides are together.
Match up the side seams and the curved bottom edges. Pin the curved edges together.
Then sew them together, using a 1/2 inch seam allowance.
Turn the entire thing right side out, press flat with your fingers, and add pins to keep the curved edge flat. Sew in place, about 1/8 of an inch from the edge.
This is optional, but I decided to add some lines to the costume, to make it look like those lines on a carrot. However, I think I would use brown or something a little more obvious next time. Just be sure that the 2 layers of fleece are flat and matched up on the side seams as you sew.
Now, sew a seam all the way around the upper edges of the costume, securing the 2 layers together, 2 inches down from the top edge.
Now, fold those edges down and inward on themselves 1 inch, and sandwich them closed. Sew all the way around the top edge, about 1/8 inch from the edge…..leaving a 1 inch inch opening somewhere along the top. This is your casing for your elastic.
Now, finish of the armholes, just like the strawberry costume linked above.
Lastly, thread your elastic through the casing, knot the ends together, then sew the opening closed.
That’s it for the bodice.
And now your little Baby Carrot is complete!
Enjoy!
-Ashley

Hi, I’m Ashley—the DIY-enthusiast behind this crazy blog!