In year’s past, my kids have agreed on a theme for Halloween costumes (with help from my husband and I, since they were kinda young) but then they decided for a couple years that they wanted to do their own thing. However, last year they decided it’s way more fun to dress up as a group and wanted to do the same this year. Connor (who’s 10) and Ellie (who’s almost 12) are my little avid readers and get totally sucked into so many different book series. They both REALLY LOVE the Percy Jackson series, which are highly adventurous books about a 6th grade boy, who finds out he’s the son of a Greek God, so they’ve been talking for months about dressing up as Greek Mythology characters (and I know Ellie has been dying for a Greek Goddess Costume). So they convinced Chloe and Oliver to join them (Max is 1 and clueless…so he does whatever!).
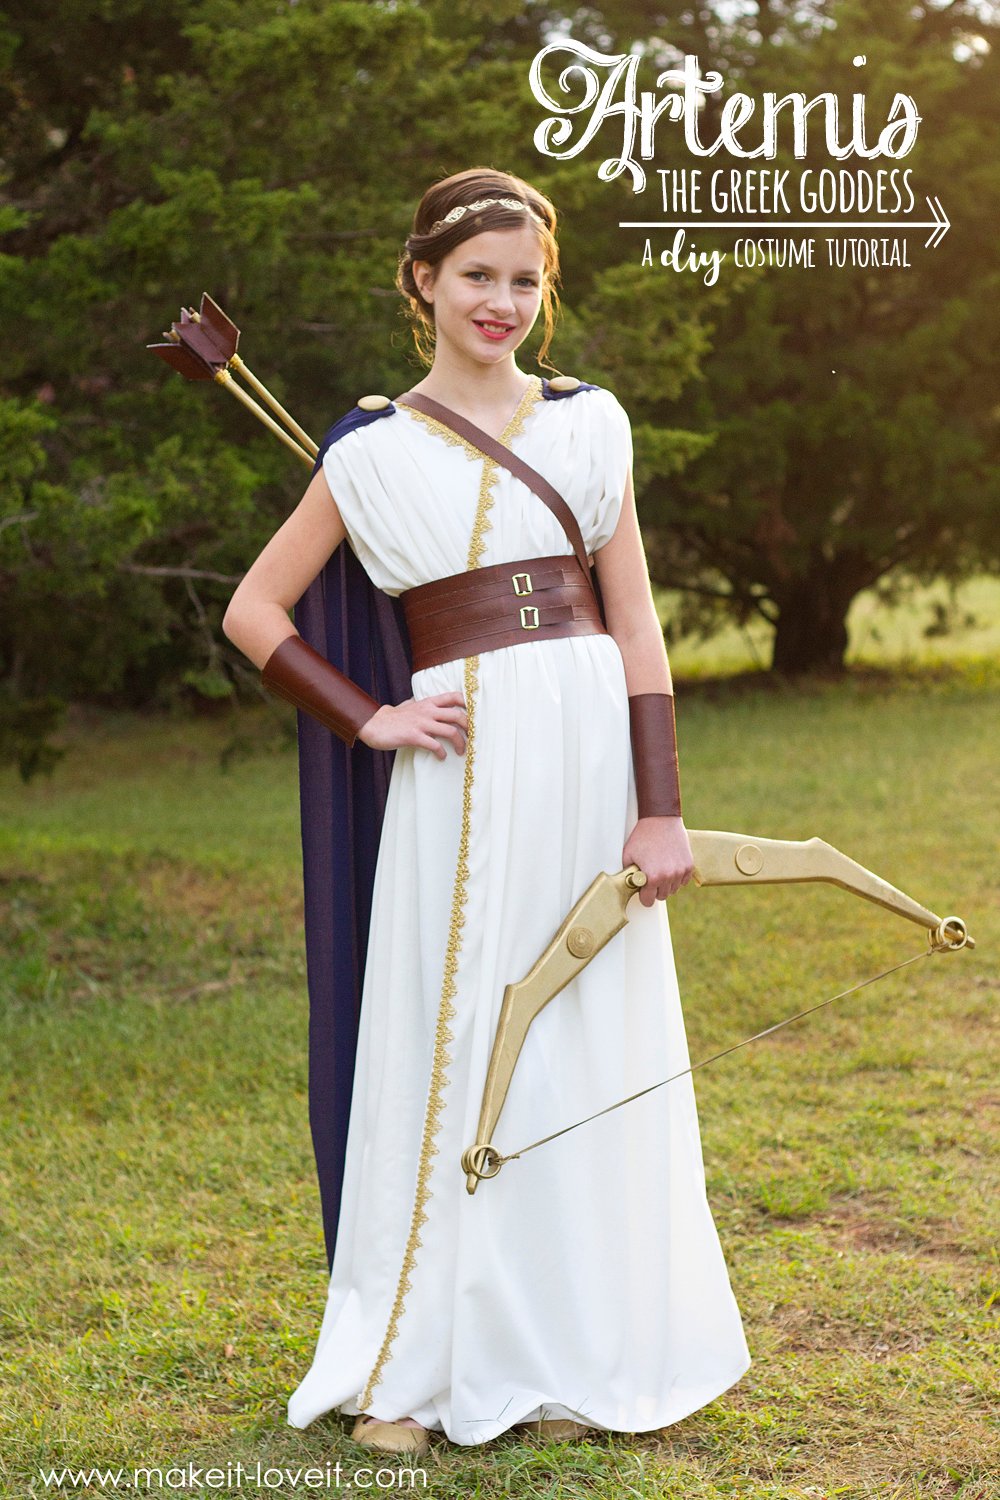
But first up, is Ellie in her Greek Goddess Costume: ARTEMIS
. . . . .
Max’s Eros Greek Costume is HERE, Chloe’s Demeter Greek Goddess Costume is HERE, Oliver’s Satyr Greek Mythology Costume is HERE, and Connor’s Poseidon Greek Costume is HERE.
. . . . . .
ARTEMIS is the goddess of the hunt, wilderness, animals, and the moon…..and Ellie loved her character in the Percy Jackson series because she is a tough, yet kind goddess. She thinks it’s really cool that Artemis is a skilled huntress and provides food for others, but is also considerate of all creatures. Ellie told me she also loves that she doesn’t take any guff from any of the male gods, demigods or mortals, which in her eyes, is pretty stinkin’ awesome! :)
Oh, this girl. She suddenly looks 17 all dressed up like Artemis. Good thing Halloween is only one day. ;)

You guys, Artemis has things to do and people to help. So get out of her way when she’s on a mission…

Ellie is definitely more of a “girly” type of girl who is naturally drawn to the elegant and regal side of all the Greek Goddesses….but I think she was fascinated by this heroic side of Artemis that is brave and strong and always fights for good. So I think Ellie really enjoyed imagining that she herself could be both!
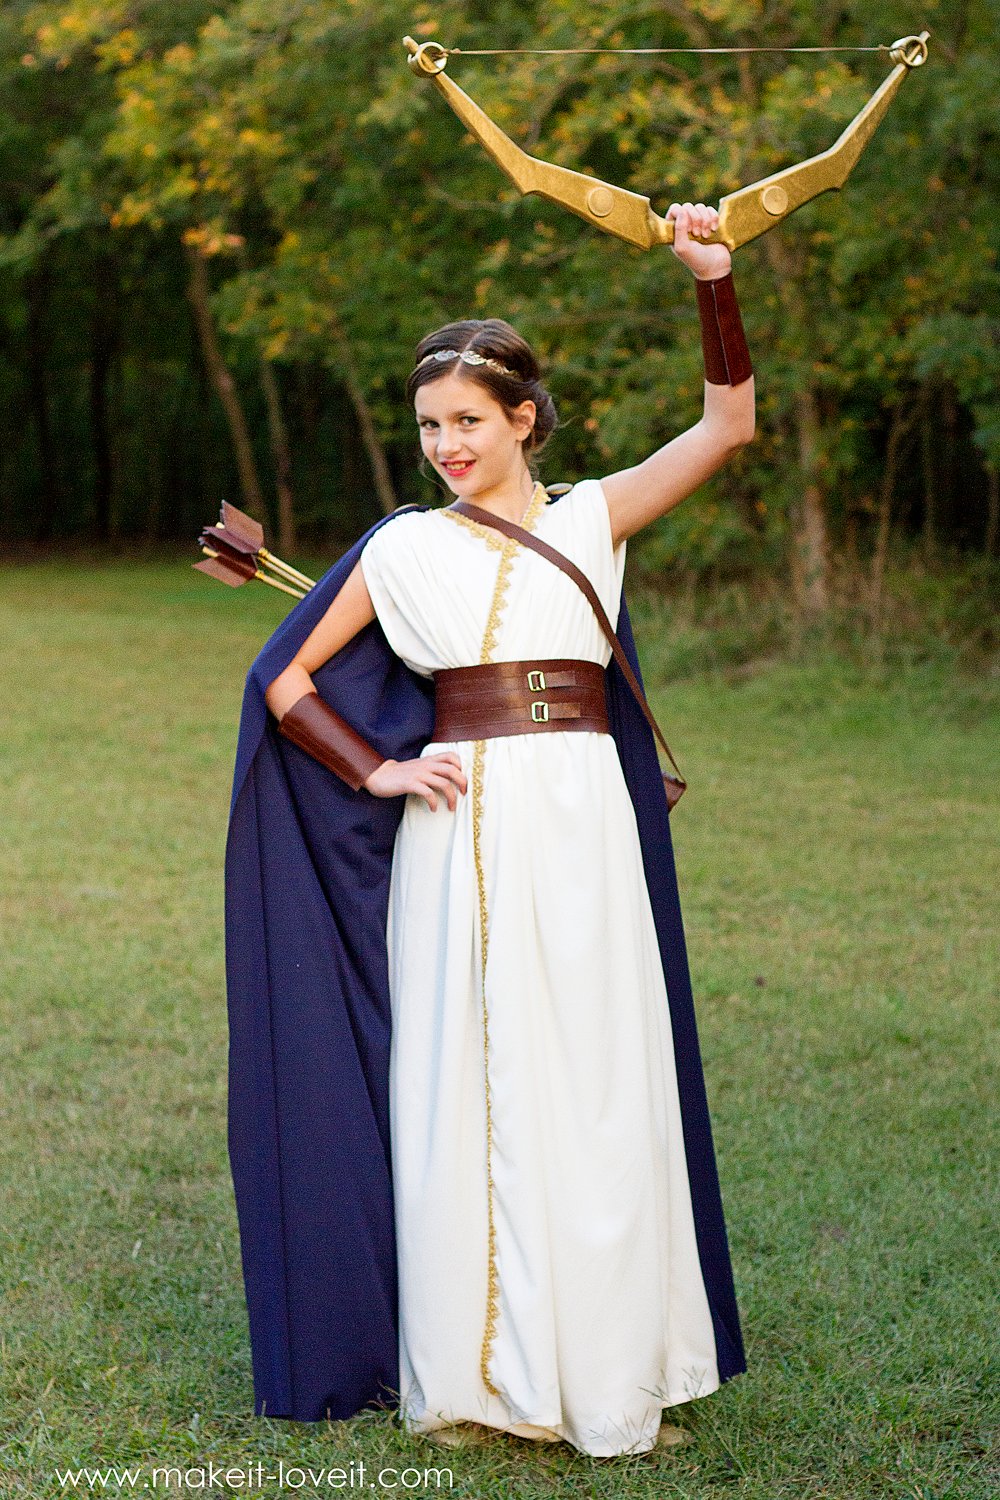
So when it was time to hunt….this girl was ready!

I’ll admit, I have nothing to offer when it comes to hunting, so Steve had to teach her what he knew from hunting as a kid, growing up in Idaho. We’re hoping we remembered it all, because he wasn’t there with us taking pictures. (And to all of you who are noticing which hand she’s using, yes, Ellie is a lefty! And yes, in some of the other pictures she has the bow in the wrong hand, but hey, it looked better in the wrong hand for the composition of some pictures, so I had her switch. Haha, don’t hate! But when she pulled back on the arrow, she used her dominant hand.)

Ha……this girl was serious about playing her role as Artemis! It cracked me up as I was taking all of these pictures….because GAHHH, so much intensity in that face!!

And let me just tell you one thing……this greek goddess costume is probably one of the EASIEST ones I’ve ever made! There’s really not much sewing required to make this dress and when you do need to sew certain parts, it’s not difficult stuff at all! The dress has a very easy shape that doesn’t require any fitted sleeves or neck holes, but that’s how the Greek characters wore it—simple and flowy!

But all that fabric creates some good dramatic movement when Artemis is on the go…

…and still provides plenty of comfort for this skilled huntress!

And since Artemis is also a goddess of the moon and is very comfortable with hunting at night, she needed a dark blue hooded cape that can be pulled around her and keep her hidden in the forest.


Every good huntress needs a quiver to hold all her arrows….so we made one for Artemis out of a cardboard mailer. You know, that kind you get in the mail with an oversized picture or poster rolled up inside? Yep, worked perfectly….after it was covered in some faux leather!!

And those arrows….yeah, just some wooden dowels spray painted gold, with more faux leather pieces glued to the ends.

Artemis also needed a wide sturdy belt (which actually keeps the dress in place and all cinched in) and some guards to protect her forearms while using the bow. Yep, totally legit! ;)

I found this gold leaf headband super cheap at the store but you could easily make your own out of silk leaves that you’ve spray painted gold or even a plain gold headband. The back of the headband is elastic, so once the headband was in place, I just shoved the ends of Ellie’s hair up and under the elastic portion again and again, until it created this little up-do hairstyle. Super easy!

Steve made this bow from some scrap plywood and just played around with it until it looked just right. He loves to tinker around with wood scraps and make things….so he’s excited most of the kids need some sort of weapon/accessory this year, that he can make from wood! If you look closely, the rings at the very top and bottom that are holding the string, are two wooden napkin rings that he snagged from my craft stash. And that little round piece that holds the tip of that arrow (I’m sure there’s a technical name for that….ha!), yeah, that’s a tiny little wooden spool that he stole from my stash too. Funny, huh?

Even though Ellie will be 12 in December, I hope she still has plenty of years left in her to dream, imagine, and let her mind wander to far off places where all sorts of adventures can happen!

Oh sweet Elliana Grace, oh how I love your excitement for holidays and family traditions……and also how fiercely you want your siblings to enjoy it right along with you! You are a gift.
Good grief, that was so fun to make! Want to give it a try too?
Let me show you how basic this dress construction really is…..and then you could use it to make it in any size, including your own!
Okay, let’s do it!
***Check out my Sewing Terms 101 post, for additional help.
Okay, let’s start with the main dress portion of this costume. Measure your subject from the top of the shoulders down to the ground and then double that length and then add about 6 inches, for wiggle room and seams. You’ll need a piece of white fabric that is at least that length. For example, Ellie measures about 51 inches from the top of her shoulder down to the ground. So I doubled that number to 102 and then added 6, making the final number 108 inches. So I bought 3 yards of fabric, which was exactly the length I wanted. (My fabric was 60 inches wide, which was nice and wide and gave the dress more fullness. But, if your subject is bigger (like an adult) and you want the same fullness and the dress I made, you’ll need to consider making your piece of fabric wider, or be okay with it not gathering in as much and looking quite as full.
Now, find the very center of your fabric and draw a circle that is similar to the circumference of your subject’s head. Cut out your circle.

Now, because it was hard to get a good picture of such a big piece of fabric, I made a diagram of what the next step looks like, but it’s definitely not to scale. So keep that in mind.
But now, find the center of your fabric lengthwise, and cut from one end, until you reach the center circle you cut out. This will be the front opening of the dress.

Here’s a picture of my actual fabric.

Now, let’s smooth out that neck opening by cutting off the corners of the bottom portion of the circle opening into a gradual line that meets up with the straight line opening.

Now, use a serger or a zig-zag stitch and finish of the raw edge of the dress opening that you just created.

Next, lay your fabric down and fold it in half, with the top of the circle opening at the very top. Grab your gold trim and pin it to the neck opening and down the right side of the opening. You don’t need trim down the full length of both sides but be sure you go down far enough on the left side of the neck opening that it will be hidden when you overlap the right side over the left side.

Sew the trim onto the edge of the fabric, keeping the fabric edge underneath hidden. I used a zig-zag stitch to help it stay flat and in place.

Lay your fabric flat and folded in half again, with the top of the neck opening at the top of the fold and line up your side edges so that they’re evenly lined up. HOWEVER, make sure that you have your fabric is folded together with RIGHT SIDES TOGETHER. So your gold trim will be facing the inside, not the outside like shown below. (I switched it before sewing it…..but forgot to take another picture.) You’ll also notice that the bottom edge is uneven and the front edge hangs over a bit. Don’t worry….you can even that up later.
Sew along both edges, leaving an opening at the top of both side edges, for the arms to fit through. (I used a 1/2 inch seam allowance.) My arm hole openings were 9 inches from top to bottom….but yours may vary, depending on your subject. The easiest way to determine how big to make the arm hole openings is to drape the fabric over your subject and test how big you’d like the openings.

Fold over the arm hole opening 1/4 inch, another 1/4 inch, and then sew in place.


Now, turn it right side out and you should have nice finished side seams and arm holes.

Now you can go ahead and even up the bottom and fold up the bottom edge 1/2 inch and then another 1/2 inch, then sew in place. Press flat with a hot iron. (You may have to cut off a little more to be sure it doesn’t actually drag on the ground…..but just try it on your subject before cutting and hemming.)

Now, onto the gathering of the shoulders. (Make sure to check out this Gathering Fabric Tutorial first, if you need it.)
Place the dress on the ground flat with the fold along the top of the dress. Make small marks along the folded edge on either side of the neck opening, marking where the fold is. (I folded the fabric back just a bit, so you could see my pencil marks in the image below.)

Using a basting stitch (a really long stitch length), start sewing about one inch from the gold trim at the neck opening all the way along the markings until you reach the shoulder opening. Make sure that when you start this stitch next to the neck opening, that you back stitch to lock those thread ends in place. When you reach the shoulder, leave the thread ends free and don’t back stitch at all.

Pull the top thread and start gathering in your fabric all the way along the markings.

Once you have the fabric gathered in as much (or little) as you want, sew right along the top of the gathers, sewing them in place. Repeat with the other shoulder.

Now it’s time to create your cape. You could always make the cape like this Little Red Riding Hood tutorial…..or you can make it a little simpler like I made this one. I started by cutting out two hood pieces that are shaped like shown below. (You may have to experiment a little with scrap fabric until you get the right shape and size, but as a guide, my hood piece is about 10 inches wide and 15 inches tall. Just be sure you’re adding enough in your measurement for a seam allowance.
Place your two hood pieces together with right sides together and sew along the top and back edges with a zig-zag stitch, using a 1/2 inch seam allowance. Trim off extra edges. Now, repeat and cut 2 more hood pieces and create the exact same thing again.

Place your 2 separate hood pieces together with right sides together and then pin both layers together along the front opening where the face will go.

If you open it up, it will look like this. Sew all the way along the pinned edge, using a 1/2 inch seam allowance.

Turn the hood right side out and press along all the seams to flatten it out.

Next, cut a rectangle piece for the main body of the cape that is about 3 times as wide as the width of the top of our dress. For the length of the cape, measure from the top of the shoulder down to the ground. For example, the width of the top of Ellie’s dress (from shoulder to shoulder) is about 16 inches and the measurement from the top of her shoulders down to the ground is 51 inches. So I cut a rectangle that was 48 inches wide and 51 inches tall.
Pin your hood to your cape, centering it along the edge of one of the ends, with right sides together.


Sew the cape in place, using a 1/4 inch seam allowance.

Next, you’re going to be gathering in both sides of your cape, just like you gathered along both shoulders of the dress. Start your needle right where your hood ends (where the red arrow is down below) and do some back-stitching to lock it in place. Use a basting stitch and sew along the rest of the edge of fabric, using a 1/4 inch seam allowance.

Now, grab the top thread and gather the fabric in.

Tie your thread ends together to lock them in place.

Repeat with the other side and gather it in too.

Cut a long strip of fabric that is 2 inches wide and slightly longer than the top edge of your cape (where your hood is attached).

Pin the strip along the top edge of the cape, on top of where the hood is attached and let the ends of the strip hang over at each end. Then sew in place, using a 1/4 inch seam allowance.

Fold the strip upward…

Then turn the whole cape over so that the raw edges are facing upward.

Then fold your strip inward so that the edge meets up with the other raw edges.

Then fold it over one more time and pin in place.


Sew in place.

With each of the ends that are hanging over, all I did was fold it over and sew in place and then trim off the excess.

Then I used some cover buttons and added gold fabric to them and hand stitched them to the the corners of the cape.

Then I added mini snaps to the underside tip of each of the cape corners and then each corresponding snap directly onto the dress. I attached them further down than the actual ruffled shoulder seam because I didn’t want them to just sit perched on top of the shoulder, but I wanted them further down so that you could actually see the gold buttons from the front when looking straight at Ellie. I also added one more snap to the neck line of the dress, to keep it closed.

I made the belt from faux leather that I had on hand and made it about 6 inches wide.

I added a strop of velcro to both ends so that it could be secured at the back.

Along the length of the belt, I cut strips of the faux leather and sewed them to the front and added little pieces of hardware to make it look like the belt functioned with these little strap closures, but it didn’t really.


For the arm guards, I just cut out shapes that would fit around her forearm and would wrap around and be secured with velcro. Here’s the shape below, to give you an idea.


As for the arrows, I just spray painted wooden dowels gold and then cut little pieces from the faux leather and added them to one end of the each down, similar to a real arrow. Then I wrapped the base of the pieces with some gold wire, to hide the tips of the pieces.

Here’s a better idea of the shape that I used.

And then how I spaced them around the dowel…

Steve carved a tip for one of the arrows from some scrap wood…but we only added it to one of the arrows, just so it would be more fun to pretend shooting with an arrow that actually had a tip. Ha!

And the quiver that holds all the arrows was made from a cardboard poster mailer that I had laying around. I just covered it with more faux leather and then added a strap that I hot glued to the top and bottom of the quiver.


And that’s it! Artemis is ready to go!
Ahhh…that was so fun to make!
I can hardly wait to show you what the others kiddos are going to be!
I’ll try my best to have more done this week! :)
-Ashley
. . . . .
And you can always browse all of our DIY Halloween Costumes and even specific categories —> HERE!!

Hi, I’m Ashley—the DIY-enthusiast behind this crazy blog!


