Home » DIY Tutorials » DIY Sewing » How to Marble Fabric (with shaving cream!!)
How to Marble Fabric (with shaving cream!!)
August 20, 2014 - By Ashley Johnston 42 Comments
Cami from “Tidbits” is back today…..and I couldn’t be more excited! She has created the coolest marble effect on fabric, using SHAVING CREAM!! I know, so weird, but the result is amazing! And she’s done all of the hard work and experimenting for us. Check out all these cool ways to marble your fabric!
-Ashley
. . . . .
Hello again! It’s Cami, from Tidbits – and I am thrilled to be here today!
Perhaps, I am even more than thrilled. I am here to share a project with you which I absolutely fell in LOVE with! Did you know you could fall in love with a project? For me, I know it is true love when a wet load of laundry sits in the washer for 3 days straight. I know it is true love when I tell my kids we are not going to swimming lessons for the day because I want to work on my project. I know I am deeply in love when that disgusting fast food joint down the road is our dinner 2 nights in a row.
Yes, my friends. That is true love.
Now, if you too are craving a little “project love” in your life, I am convinced that after you discover what you can do with a can of shaving cream and some fabric paint . . . . . . . . . we will all be running the same load of wet stinky laundry, over and over again.
And you will know when you are hopelessly in love – because you’ll want to marble everything in sight.
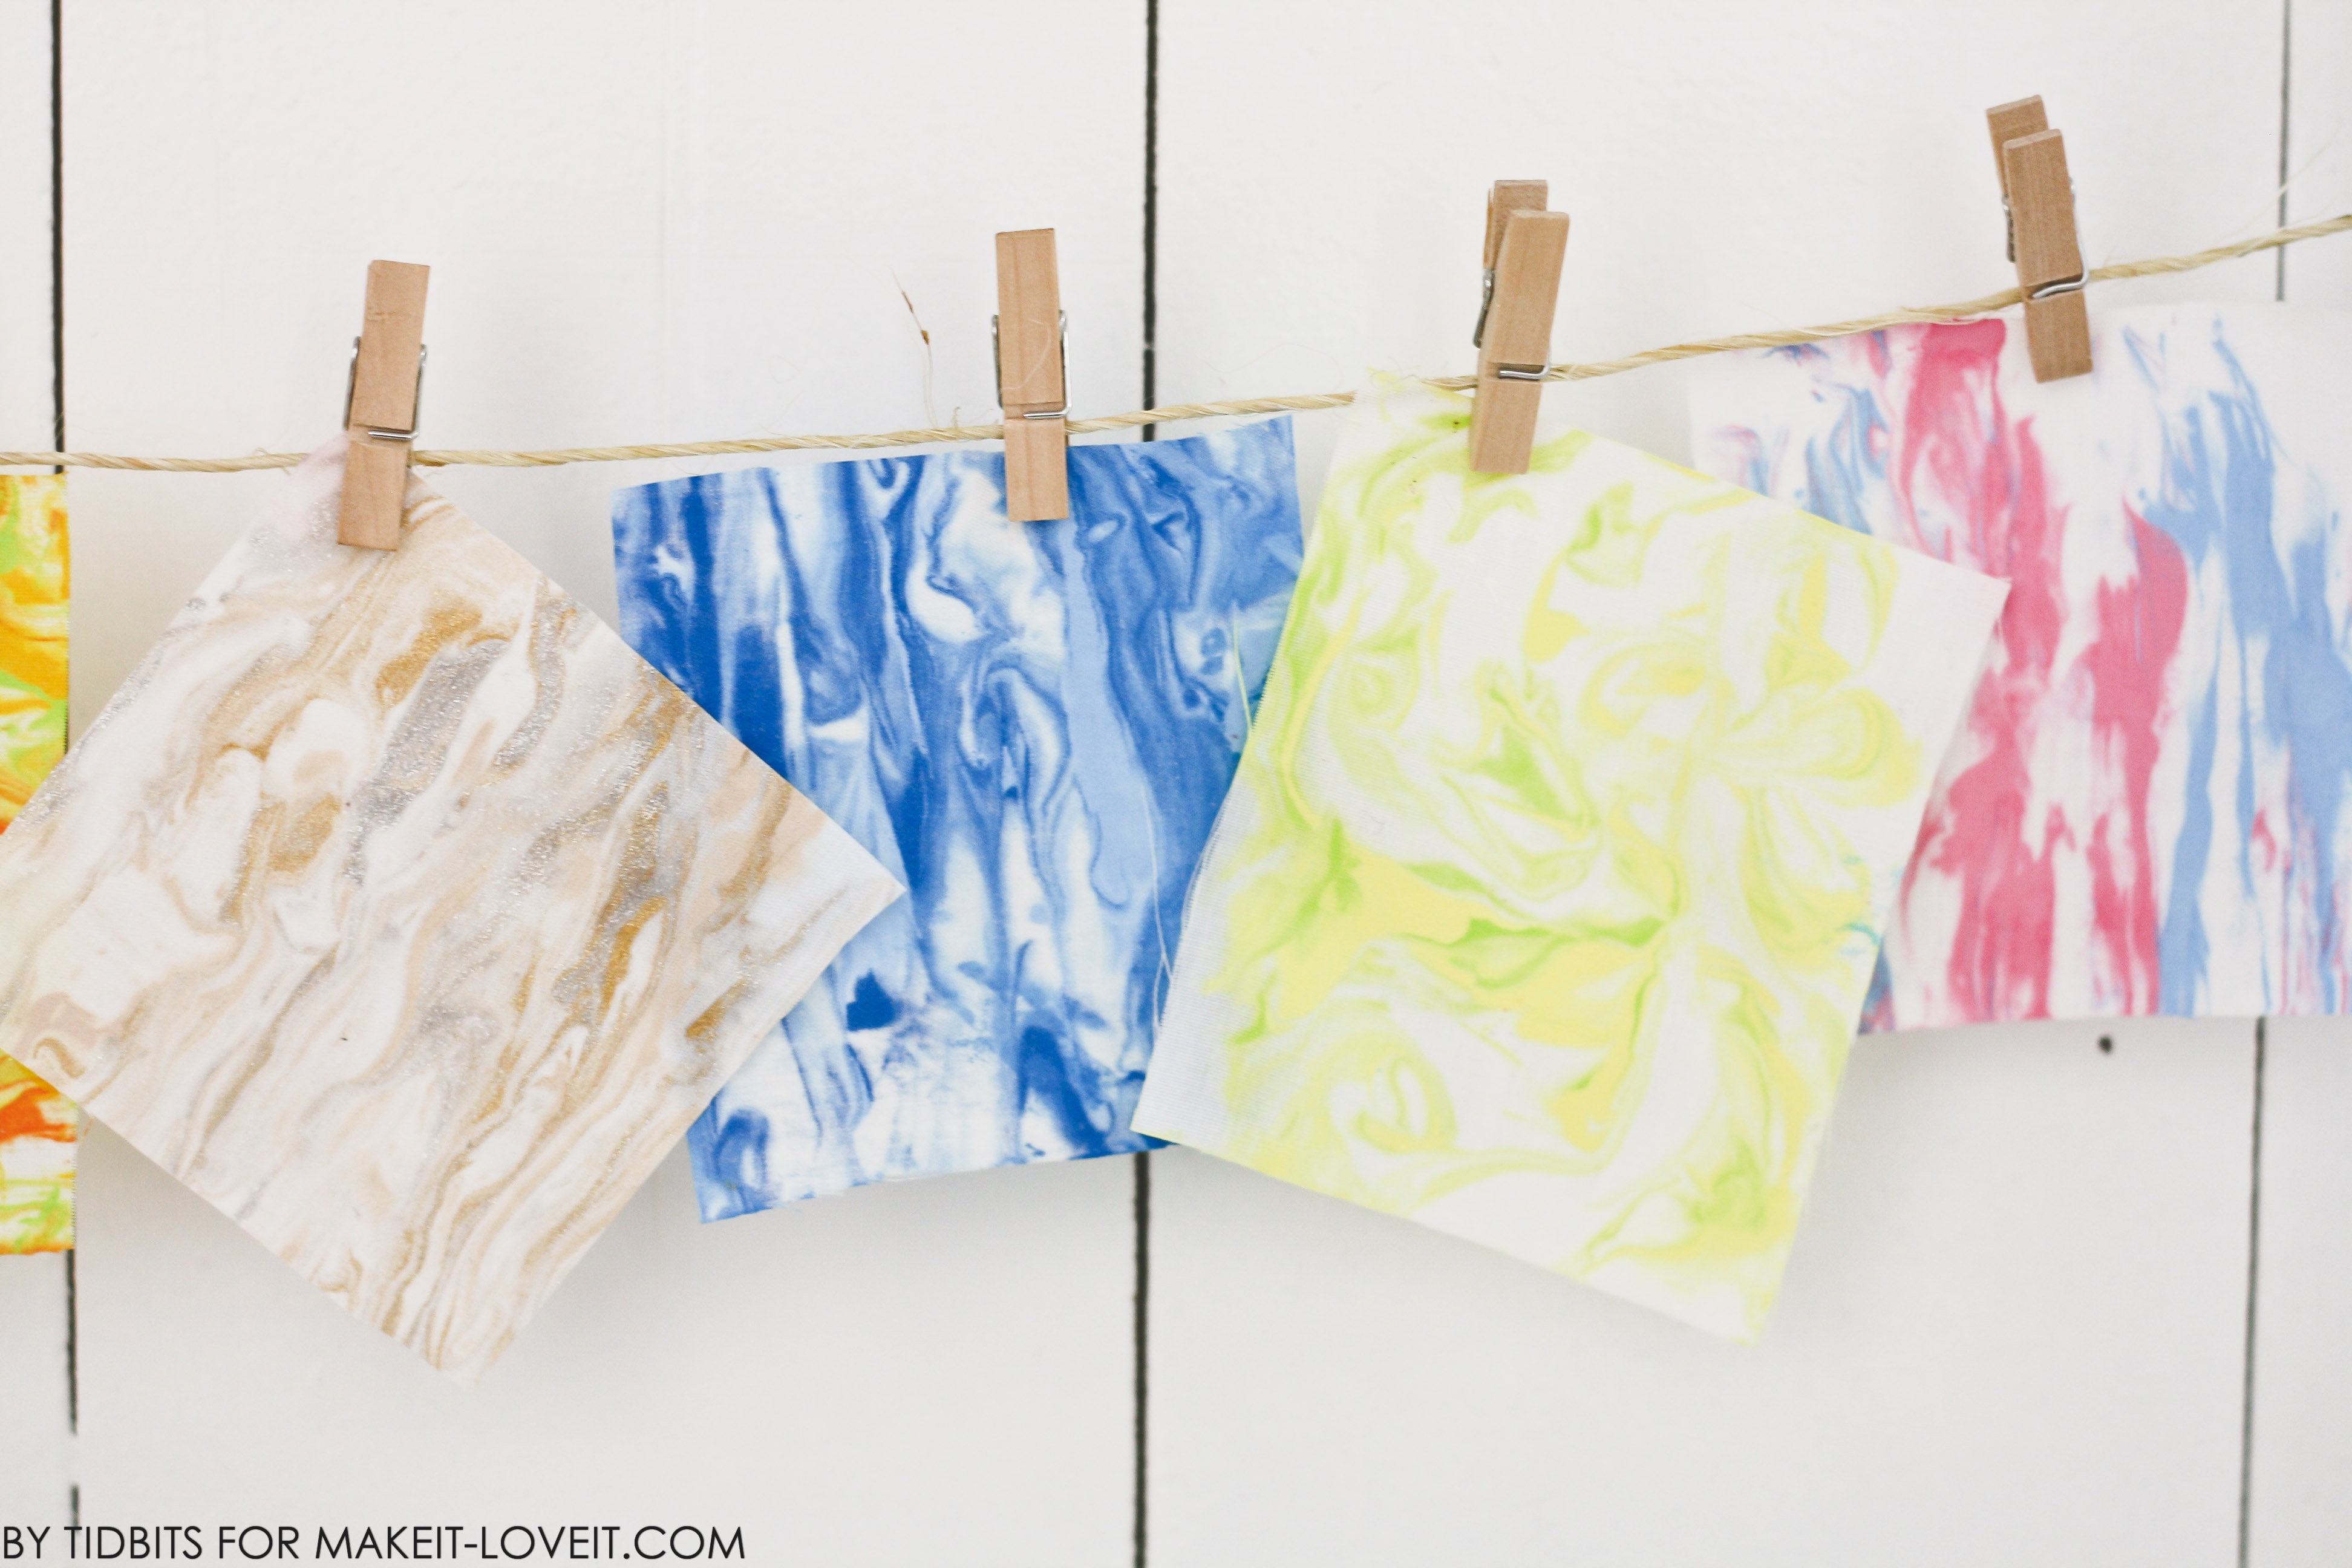
First, I want to show you some of the adorable things you can make when you know how to marble on fabric. Then, I will show you just how easy it is to do it.
And I have to tell you – I went so fabric sample happy, that I learned lots of tips and tricks along the way, which I would love to share with you. You know, so you don’t feel like you need to make 27 samples . . . unless, of course, you want to ;)
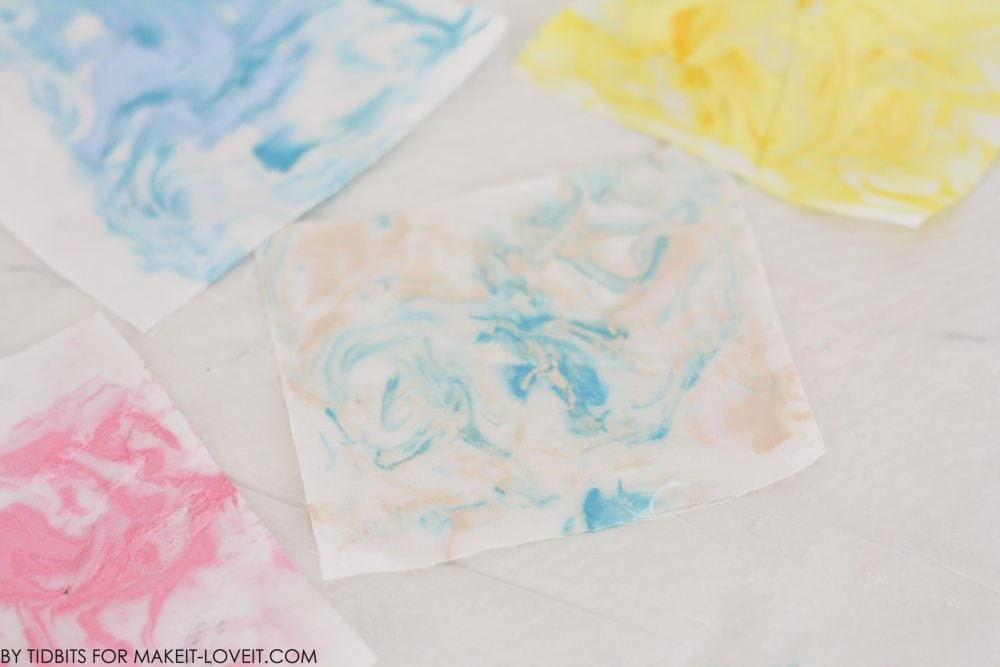
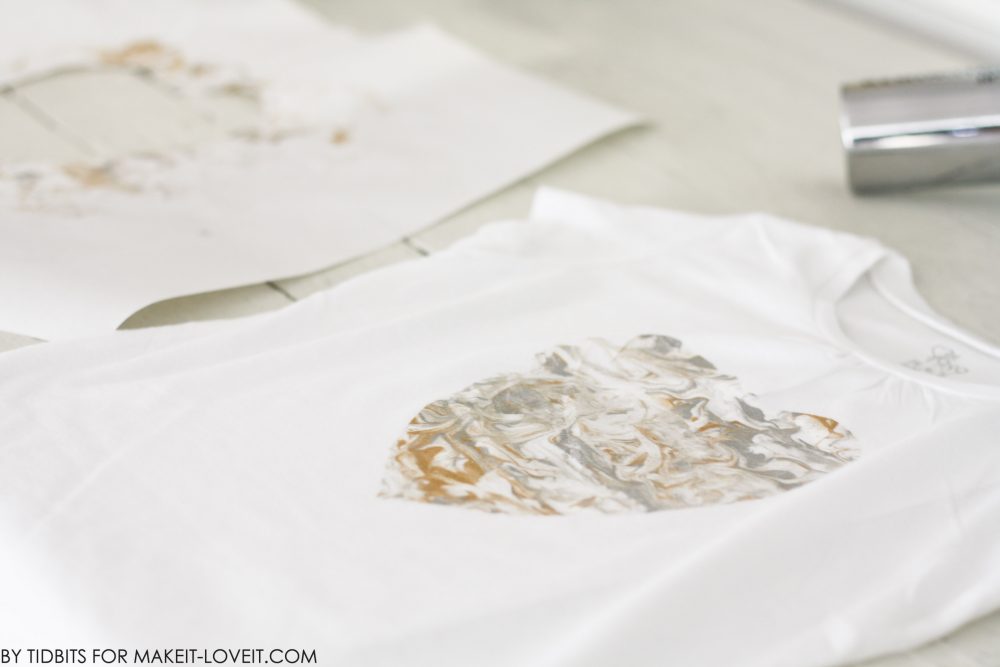
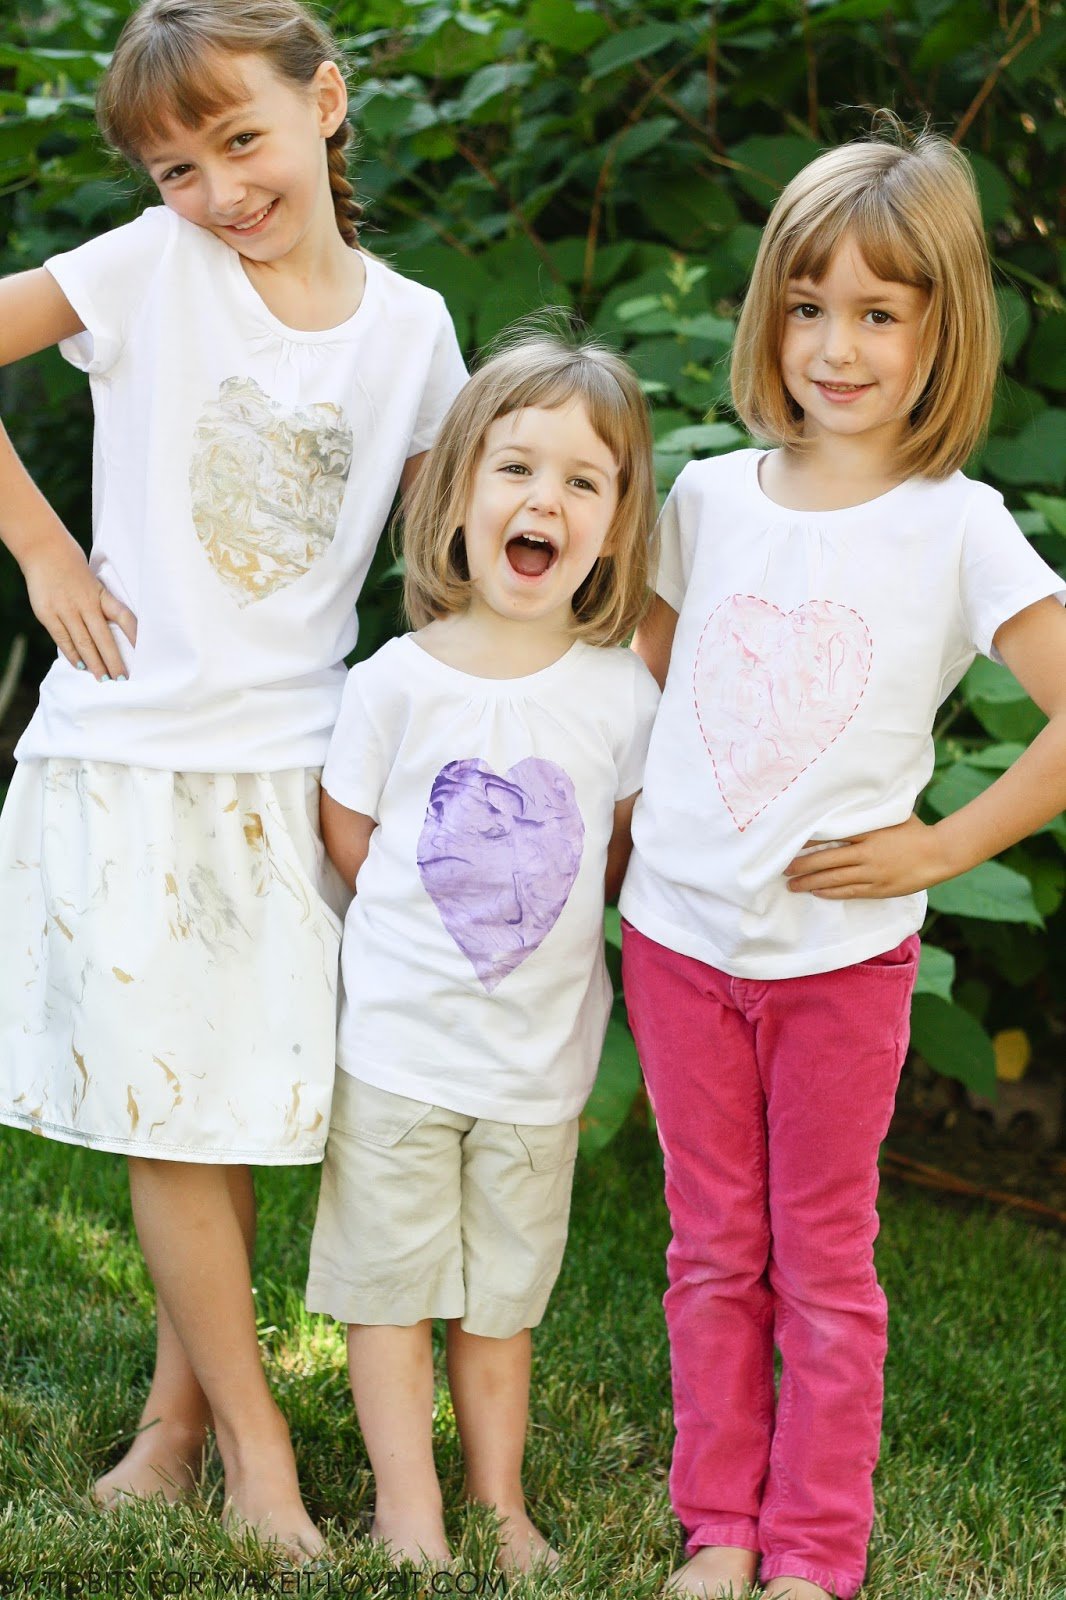
Once I was done experimenting with small squares of white fabric, the first thing I made was this shirt.
I took a plain white T-shirt, made a simple heart stencil out of some freezer paper, and and marbled inside. It turned out better than I had hoped for! (I will show you how to do this down below.)
Though, with 3 girls, a mother cannot play favorites.
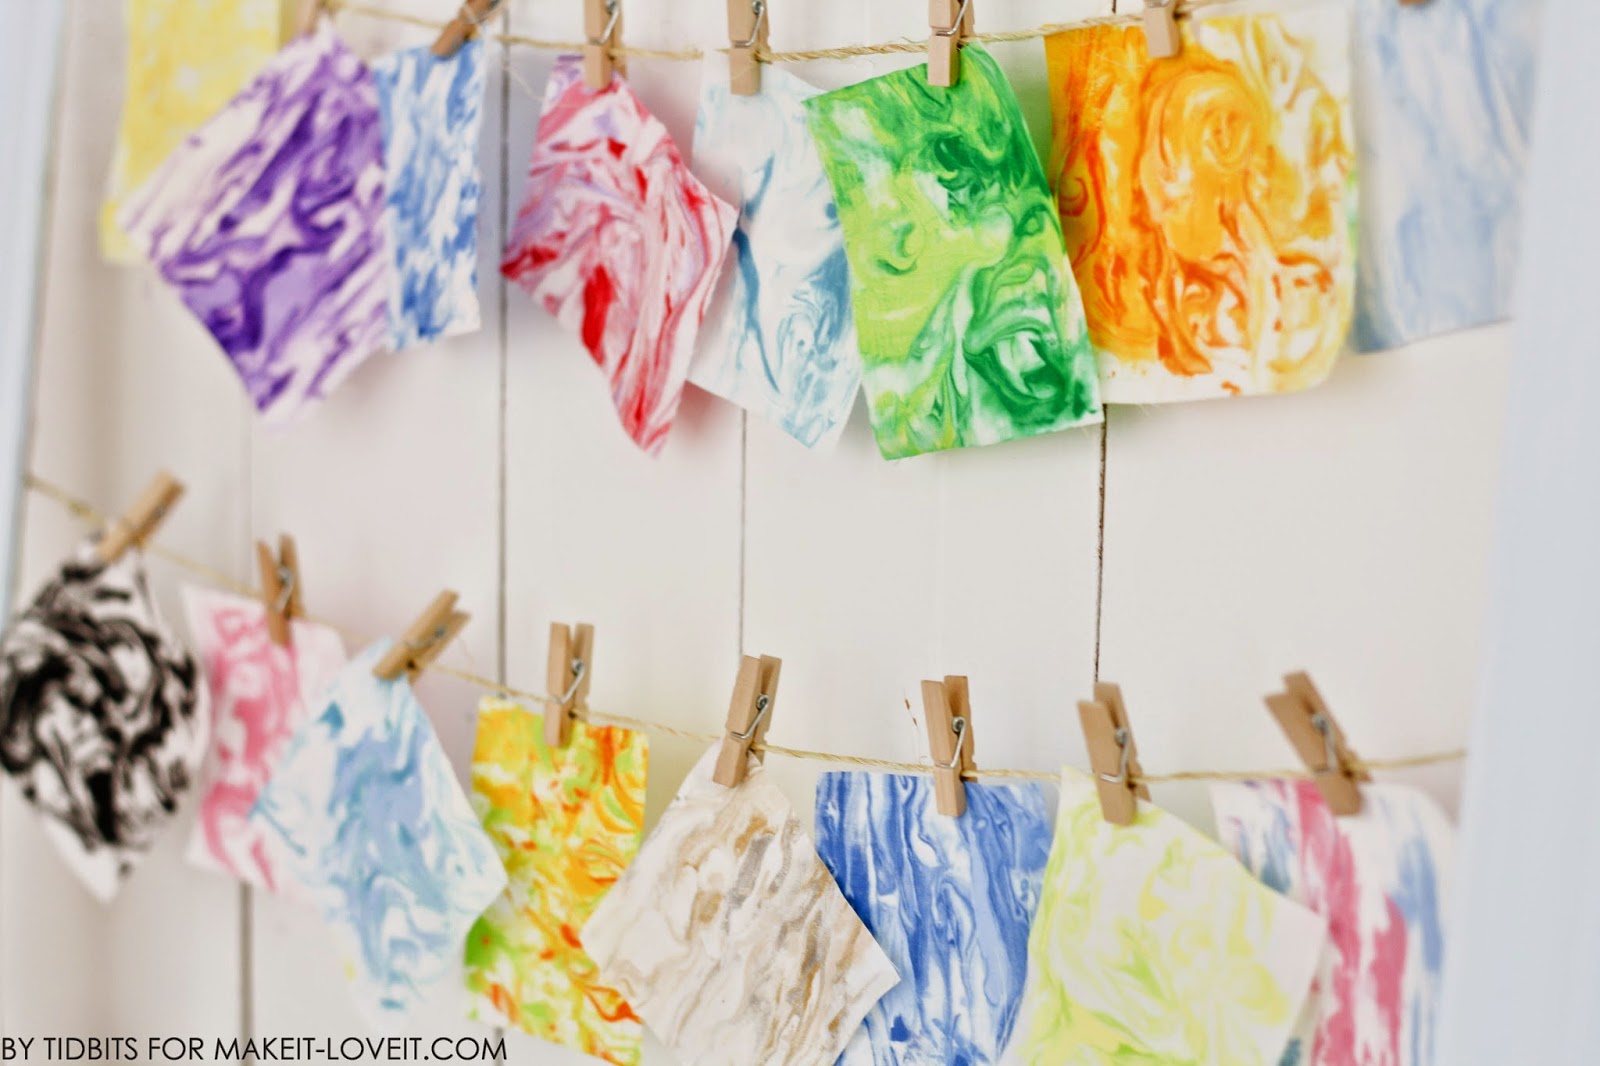
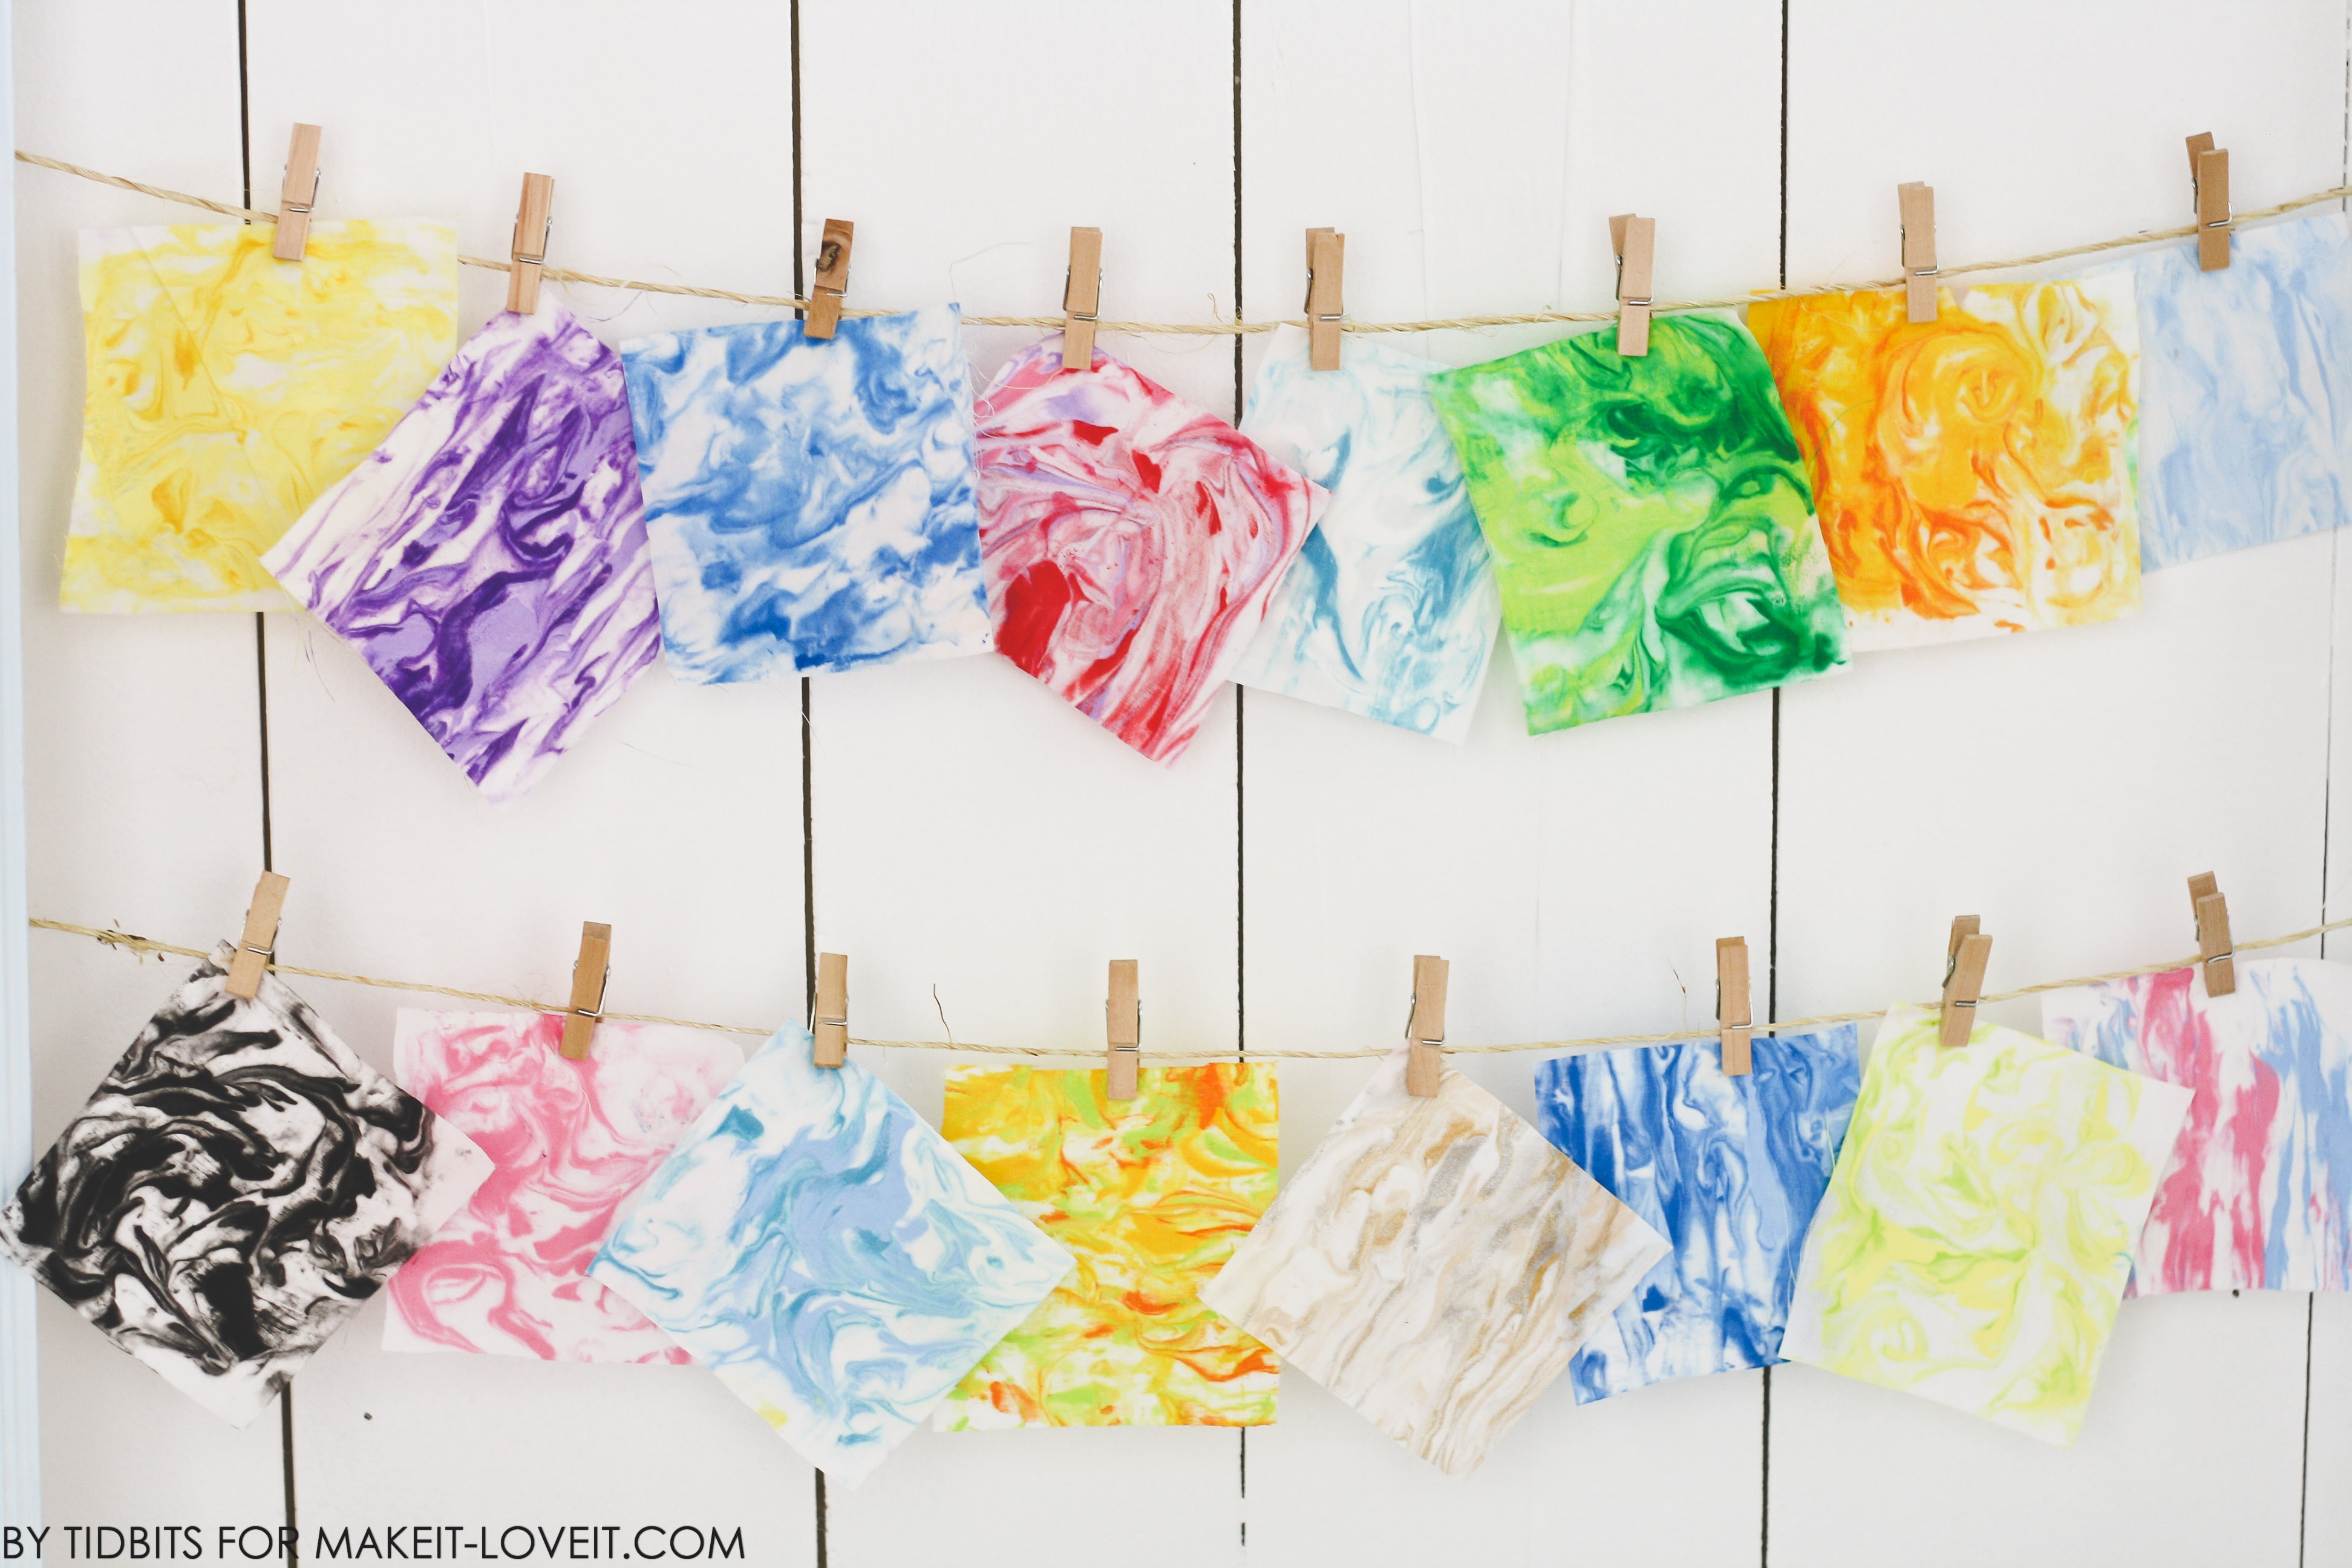
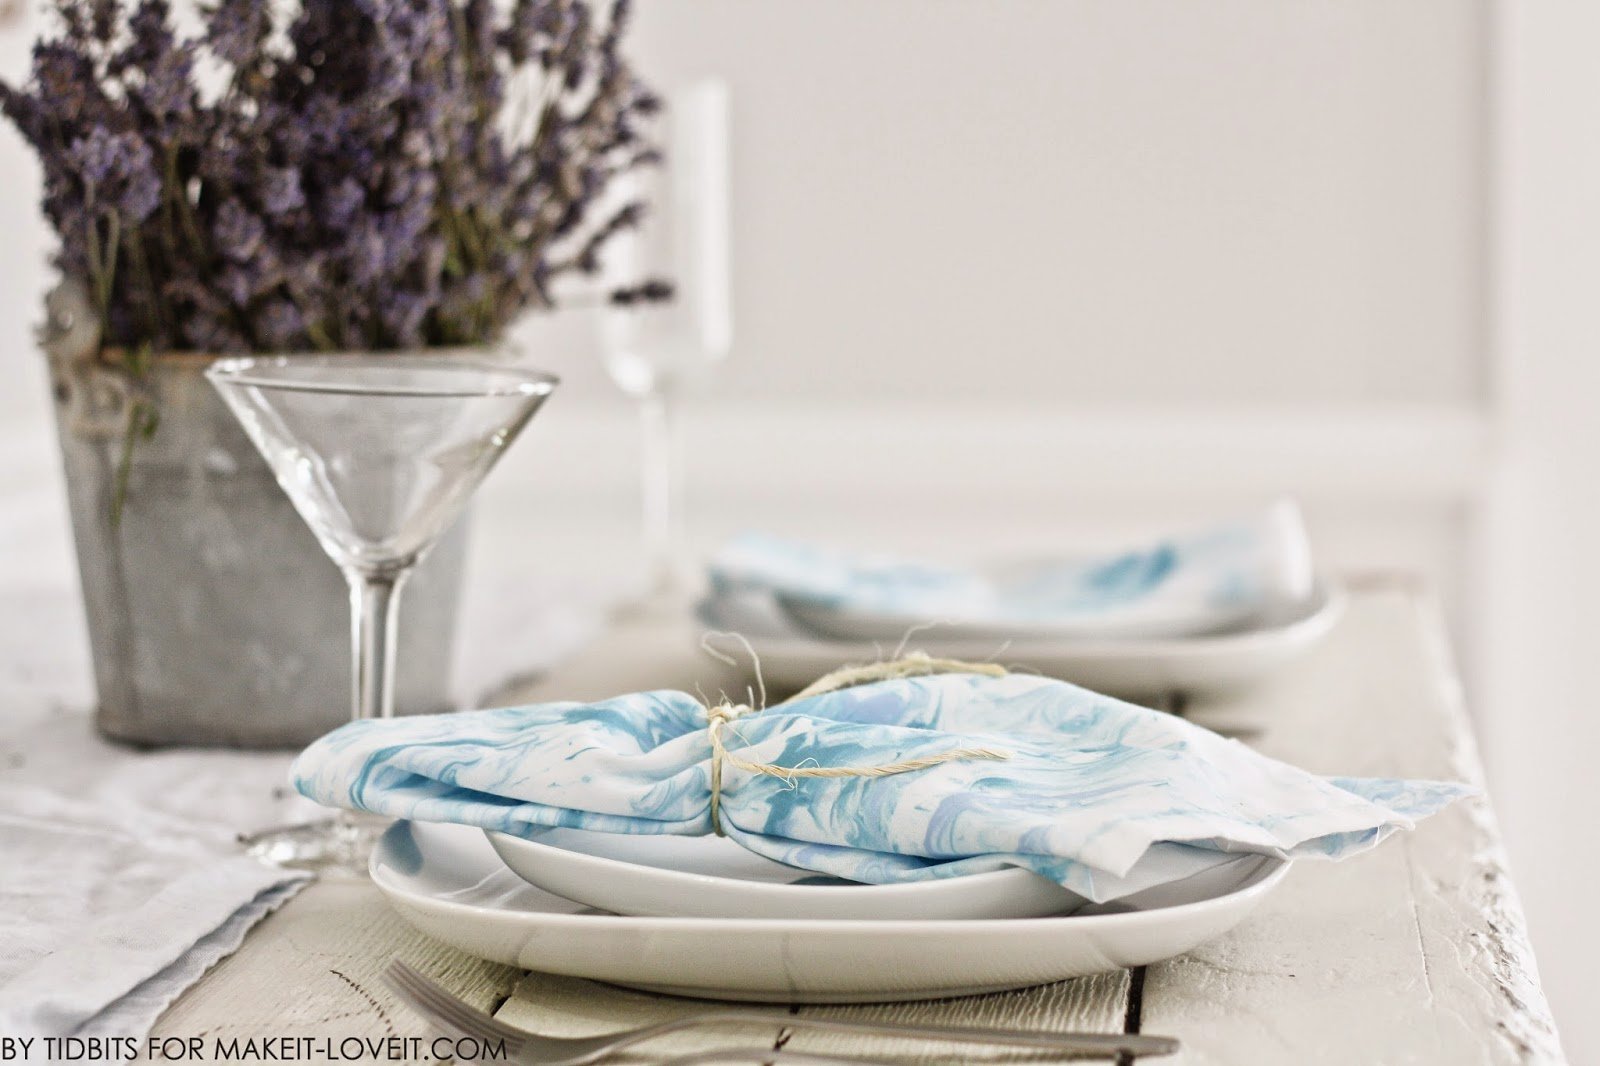
Next, I remember I had some plain white cloth napkins I bought at Wal-Mart about a year ago. They were begging to be marbled.
This color scheme was my absolute FAVORITE!! Unlike kids, you can totally have a favorite marble color scheme. It reminds me of the ocean.
Then I found myself wanting to sew something with marbling in it.
So, using my daughters favorite colors of sparkly gold and silver, I marbled and sewed up an adorable skirt to go with her shirt.
When this turned out so adorable, I found myself wanting to marble a skirt for each girl . . . . . and pillows, and curtains, and place mats, and baby blankets and entire cloth napkin sets for gifts . . . but I ran out of shaving cream. And time.
So let me show you how to do it, so we can marble the world together! (Now that I mention it, from outer space the earth kind of looks marbled! Cool!)
****Quick Disclaimer: I was totally convinced I was going to change the world with this original idea, until I did a google search and discovered I was not the first to have it. Total bummer. Is anything original anymore?! I think Pinterest is to blame. Anyway, years ago I found this concept on this website. She did it on paper as a kids craft! I was so excited about it I actually did it with my kids (see the outdated post here). Fast forward to now, when it dawned on me – how cool would this be on fabric!! I guess I just feel better now telling you this was my awesome idea – but there are other pretty awesome people who have already done it as well. Okay, and my last plug – there are all sorts of products you can buy at craft stores to marble on all sorts of surfaces. I just personally think shaving cream is the most genius of methods (and cheapest!).
Okay, enough babbling – are you ready?
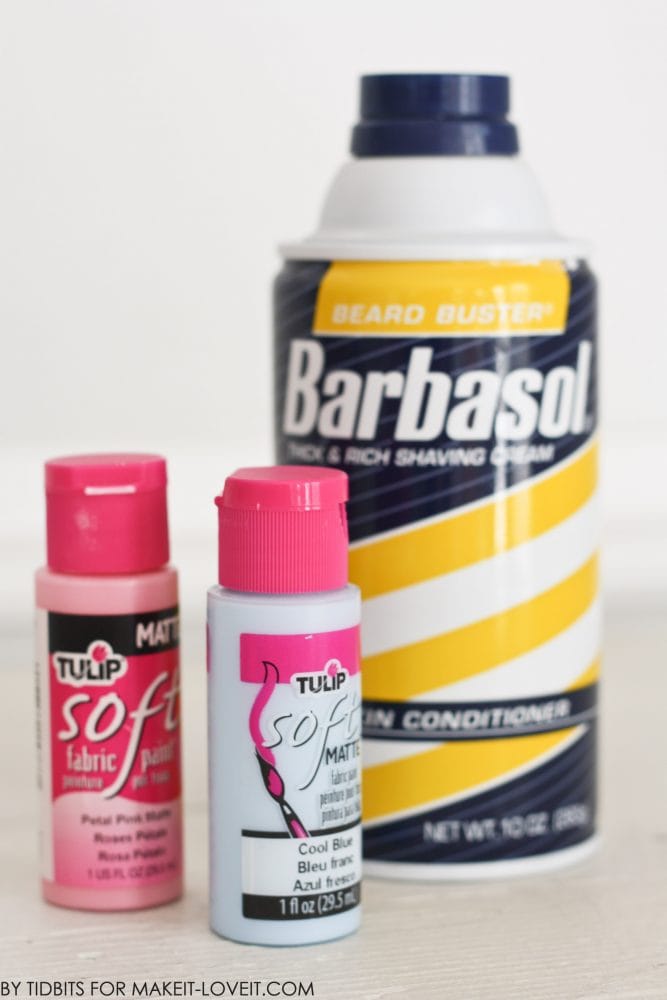
Basic and Helpful Supplies:
- Shaving Cream
- Any name or brand. Though I recommend avoiding the color tinted varieties.
- Fabric Paint
- The ‘Tulip’ brand is my go-to brand. Mostly because I can find it at any craft store or Wal-Mart.
- Pan of some sort to spray the shaving cream in.
- Garbage bag
- Ruler with metal edge
- Fabric
- I only tested on white cotton fabric. It would be fun to try it on other kinds as well.
- Toothpicks or Pencil
- These are for swirling the paint. For a finer swirl use the toothpicks. I prefer the look of the eraser end of a pencil.
- Sink (somewhere nearby)
- Iron/Ironing board/pressing cloth
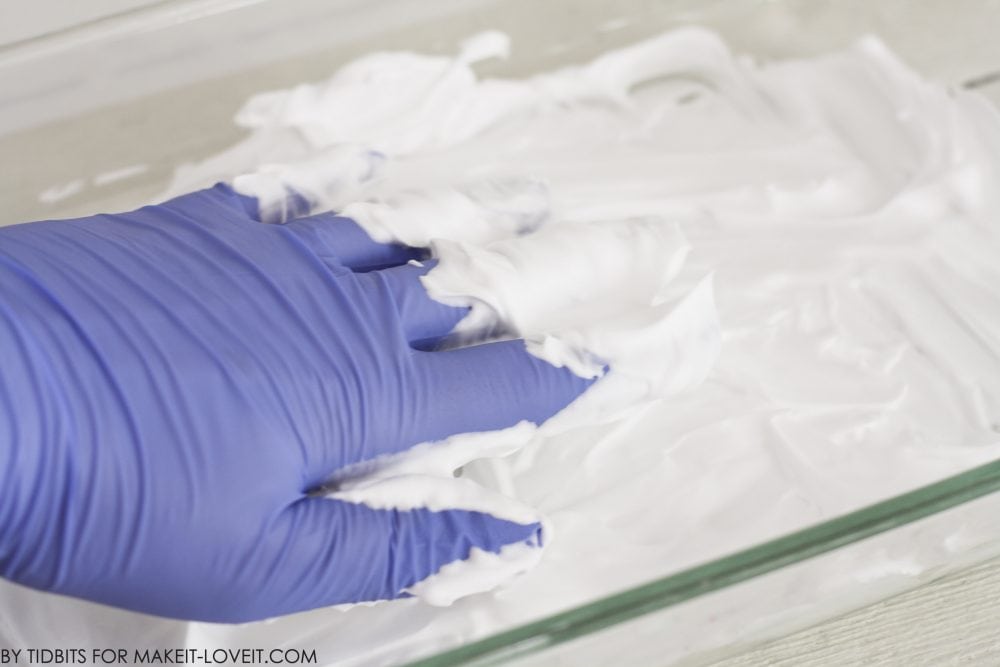
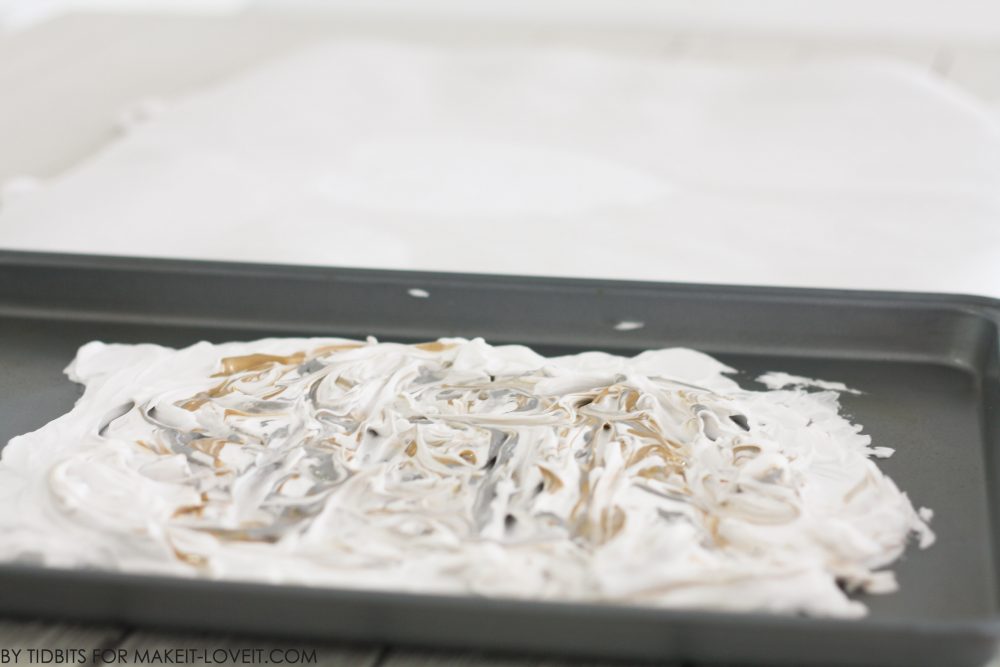
Begin by spraying your surface (in this case a pan) with shaving cream. Rub it around until you have a thick enough layer to cover the bottom of the pan completely (or for the most part). And yes, I used a glove to touch the shaving cream. I have issues.
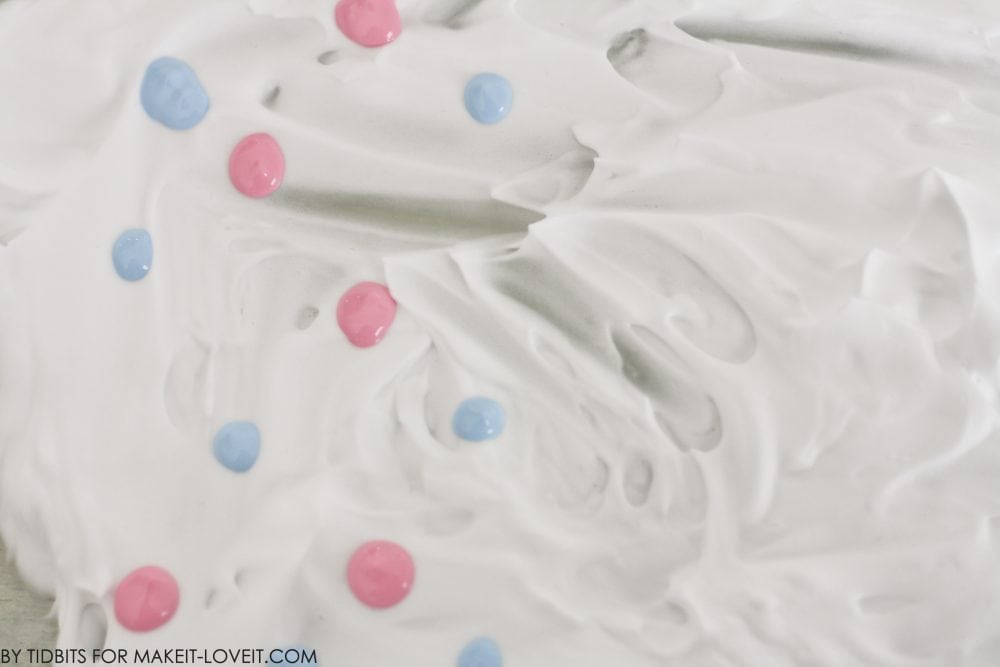
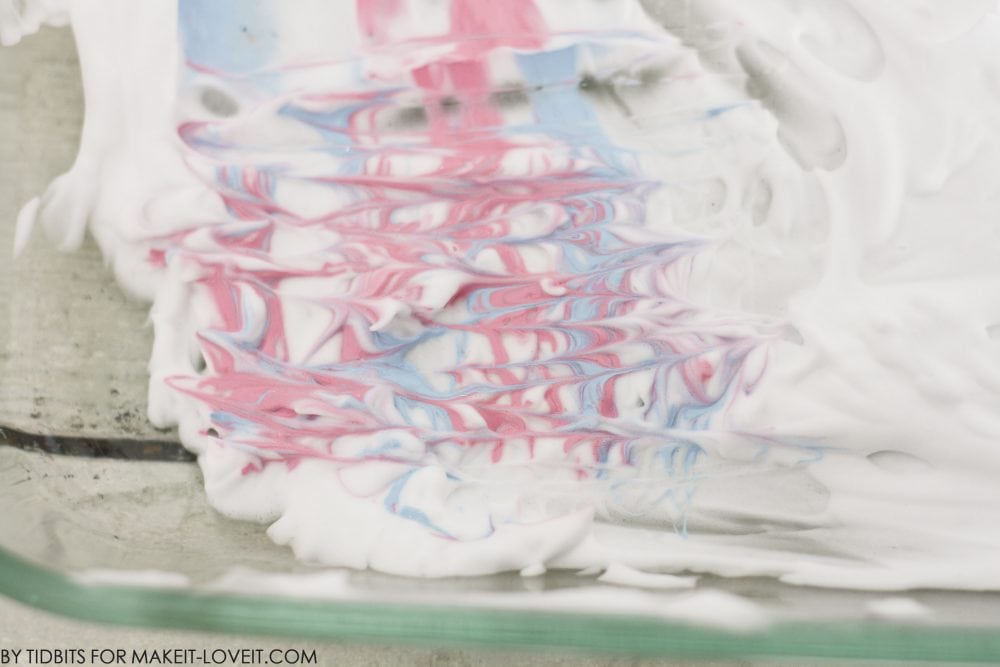
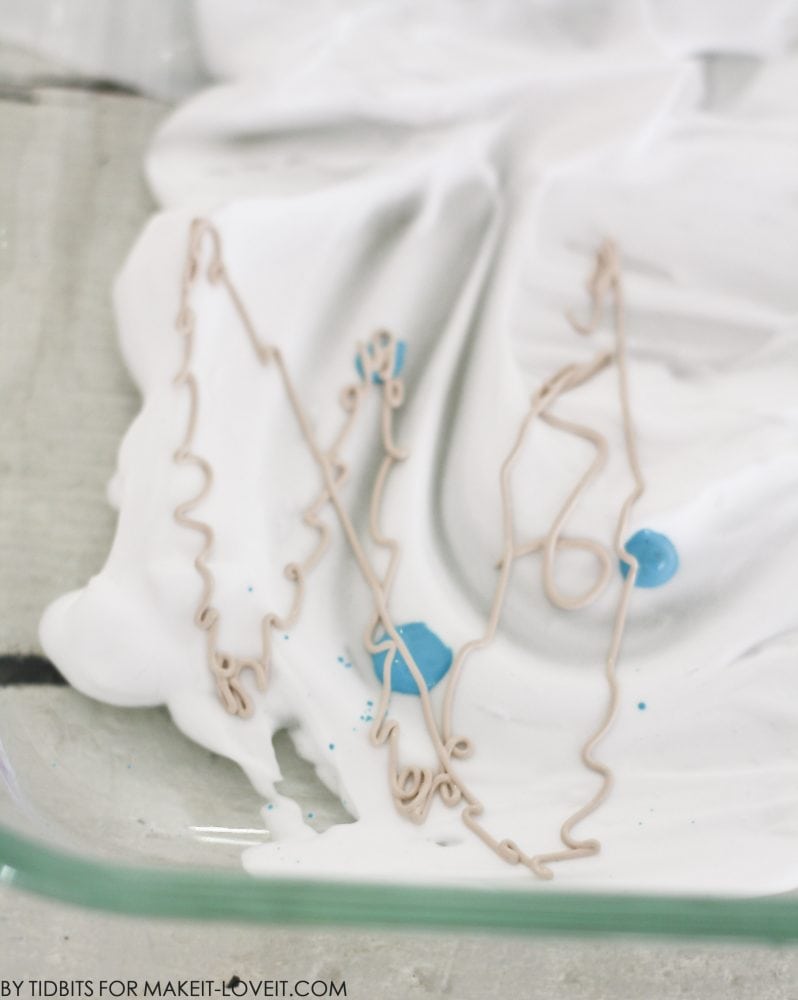
Add dots or random squirts of the paint you’d like, on top of the shaving cream.
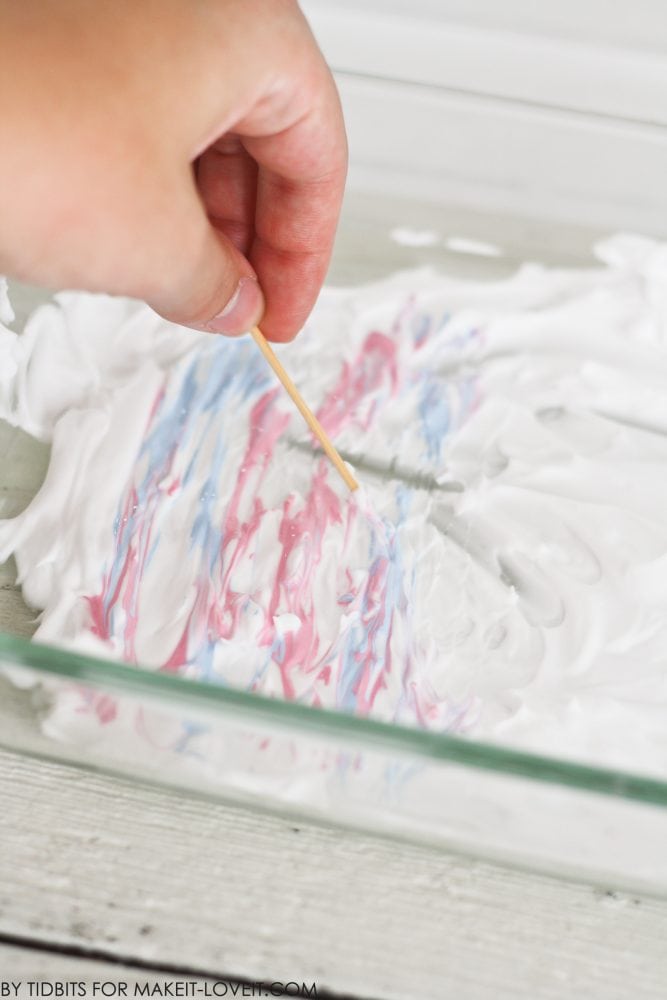
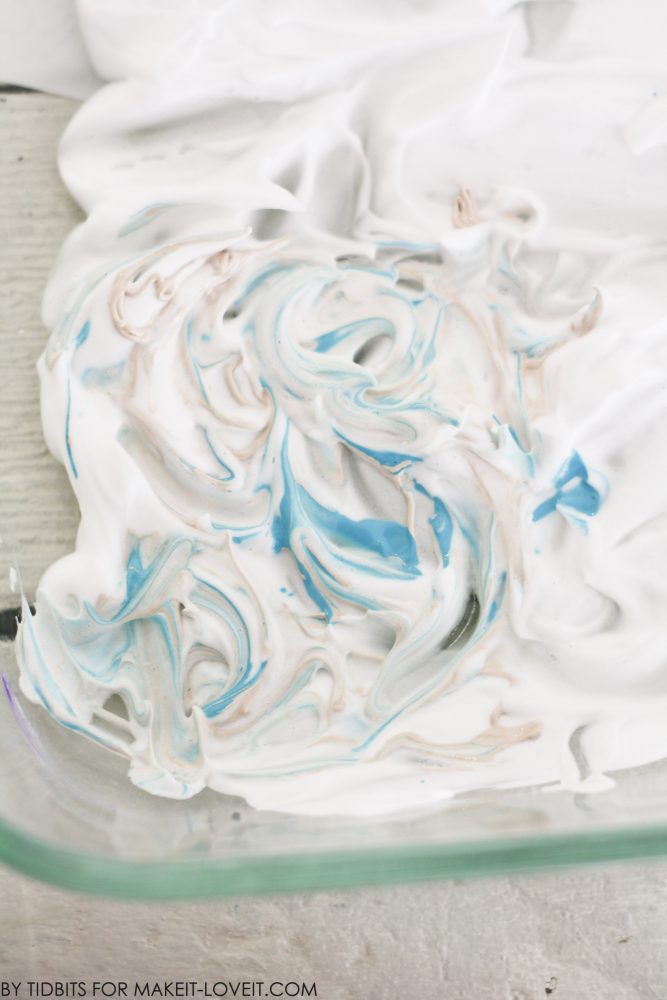
Using a toothpick or something pointy, swirl the paint around until you reach your desired look.
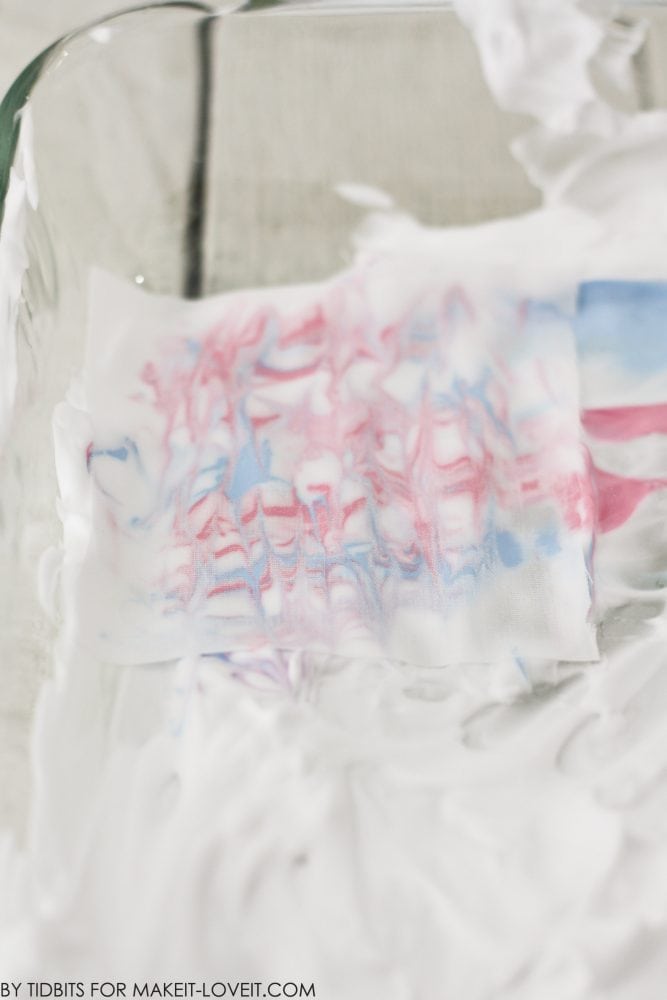
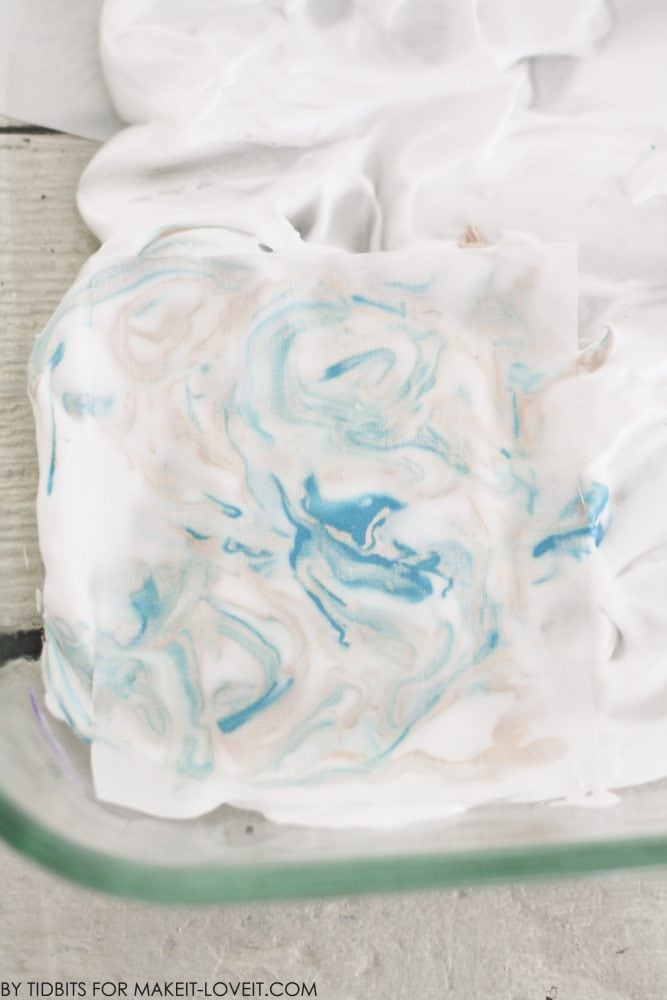
Place the fabric on top of the swirled paint, with the side you want dyed face down into the shaving cream.
Pat the fabric gently into the shaving cream until you can see the pattern appearing on the other side.
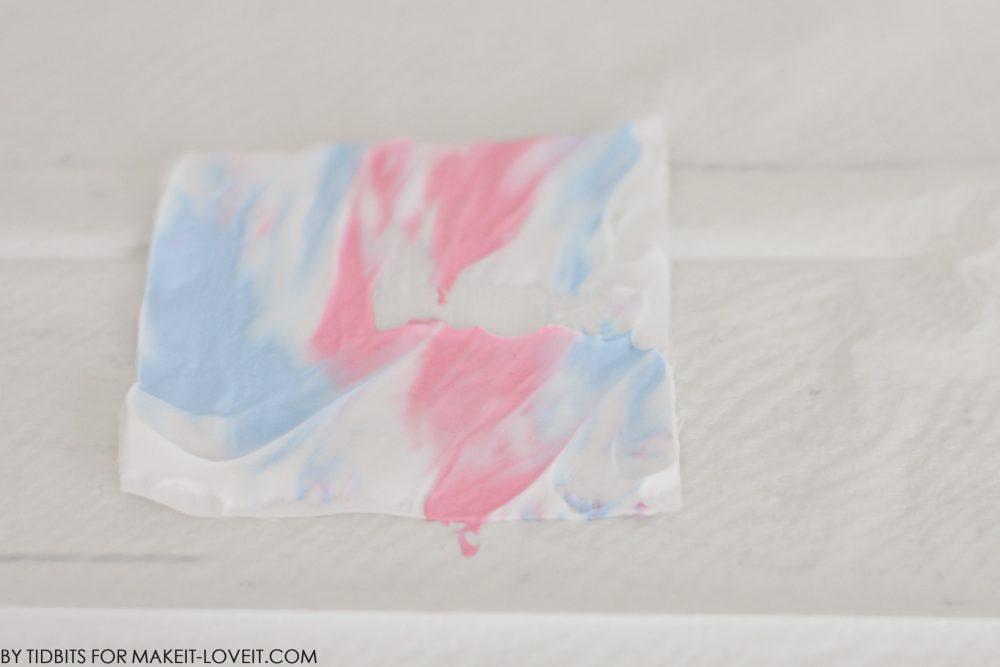
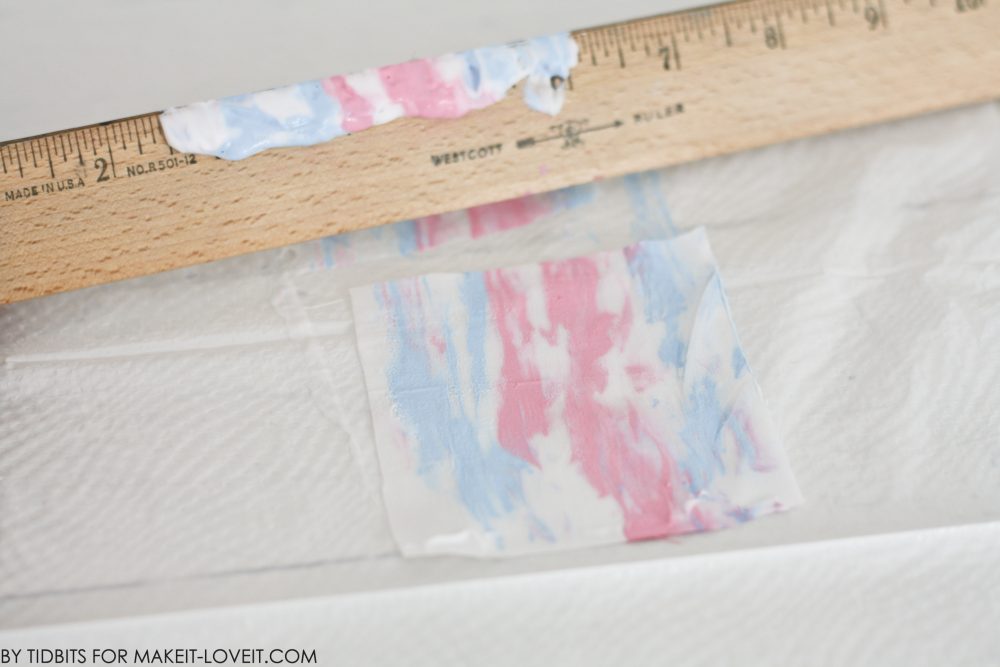
Carefully lift up your fabric from the corners and place the clean side down onto a garbage bag.
Using the metal edge of a ruler (or anything you can find with a flat edge), scrape off the shaving cream as evenly as possible with a smooth consistent motion. Rinse and wash the ruler.
Let your paint dry on your fabric, and then heat set by placing a pressing cloth over the paint and pressing with a dry, hot iron.
Now you should be able to wash your fabric without loosing any color!
Okay, now that you understand the basic steps to marbling fabric, I will share with you some of the things I learned along the way.
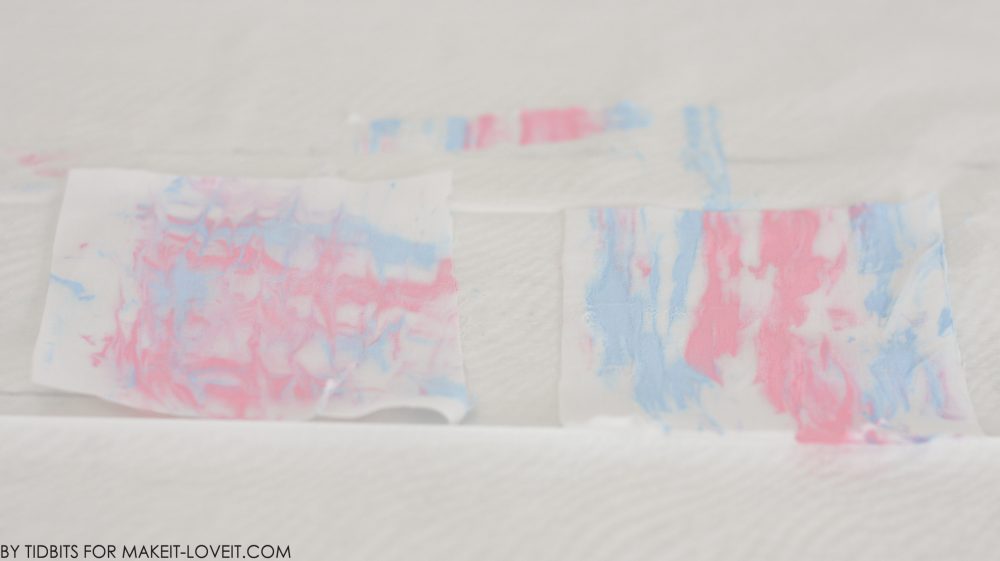
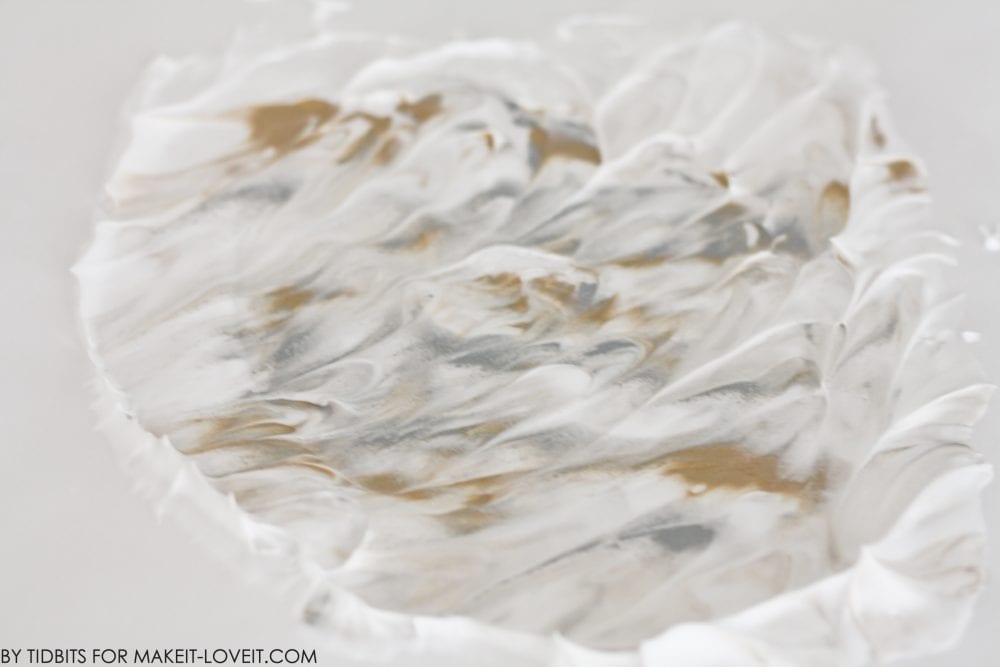
Tip 1: The look of the paint swirled in the shaving cream is basically the look you will achieve on your fabric.
Below you can see I swirled with a toothpick in both up and down motions as well as side to side.
Contrast this with the fabric sample I marbled for the instructions. They pretty much appear the same as the method in which I marbled.
Tip #2: Experiment your desired effect on sample pieces of fabric, before you tackle a project.
My favorite method turned out to be to squirt my paint on willy nilly.
Then I preferred to use the eraser end of a pencil to swirl around in circular motions.
You’ll once again see how the look of the paint in the shaving cream keeps its look, even after the shaving cream is scraped off.
Even though it looks nothing like it when you lift the fabric from the shaving cream. Somehow the paint soaks in place and shaving cream acts as a stabilizer for the paint. So fun!!
Tip #3: Find the perfect color combo before you commit to a project.
This may take a few tries. ;) For me, I discovered I LOVED the samples that used a lighter and darker version of the same color. For example, light blue and dark blue or lime green and forest green. However, don’t be afraid to use just one color, or 3 or 4 or more.
Tip #4: When using a darker and lighter version of the same color, use more of the lighter paint then the darker paint.
If you use more of the darker color, it seems to mix out the lighter color and it can be hard to tell if you used 2 colors.
Tip #5: Lay the paint on thick or thin.
By this I mean, if you want your fabric heavily saturated with paint, use a lot of paint. If you want more white space showing, use less paint.
You can see how in this purple heart, there is hardly any white space showing. That’s because I used a lot of paint. And once again, more of the light purple then the dark purple.
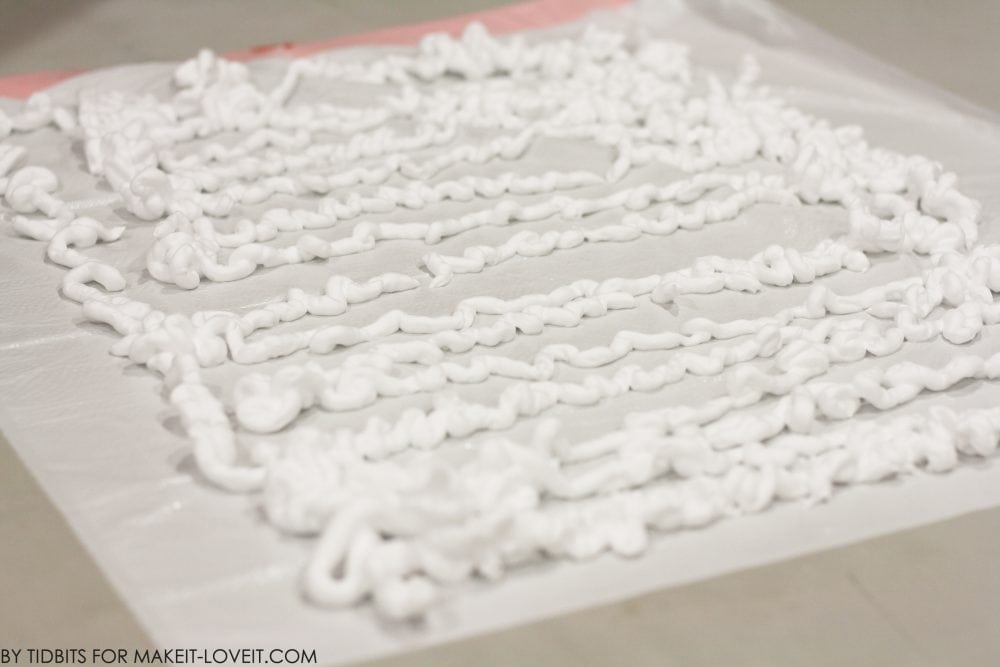
Tip #6: Use garbage bags for a larger surface of fabric that needs to be marbled.
Simply spray the shaving cream on top of the garbage bag, smooth it out, and add your paint…just like above.
Lay another garbage bag to the side to catch the extra shaving cream/paint that you scrape off. You can easily toss the bags away, with no mess left.
This is how I did the larger pieces I needed for the skirt.
You can still use a ruler for the scraping, just scrape off the shaving cream in sections.
Tip #7: If you are working in sections for a big piece of fabric, always rinse the ruler off before scraping another spot. Otherwise, the paint on the ruler gets smeared around on the next spot.
Tip #8: If you marble a piece of fabric and decide it needs more, you can begin the process over with clean shaving cream and paint and dip the fabric again. However, be careful to swirl your paint the same both times. Otherwise you end up with fabric that looks more like abstract art then marbling. Which was kind of cool the first time I did it, but not really the look I was going for.
Tip #9: Get your kids involved! However, I didn’t. I was having way too much fun in my own creative world and was being way too protective of my work. But they watched me with wonder and begged to try it themselves…..and I feel kind of bad about that. So I promise to the world – they will have their chance. This is really a perfect kid craft, on paper or fabric. Messy and beautiful!
Tip #10: Next time you go to Wal-Mart, buy up every white cloth napkin they have because you are going to want to make a complete set for your whole family.
True Story.
And finally, I promised to show you how to make a stencil, like I did for these T-shirts.
It was so easy.
I began by cutting a simple heart shape out of my freezer paper, large enough to cover most of my T-shirt. You’ll want to pretty much cover the shirt with the extra freezer paper so you don’t get the paint where you don’t want it when you are dipping the shirt in the shaving cream. I ironed the freezer paper to the shirt, wax side down.
Then I prepared my shaving cream and paint.
Next, I carefully dipped the open heart section into the paint. (Be sure you place cardboard between the layers of your shirt, so it doesn’t leak through to the back of the shirt.)
After I scraped off the shaving cream, I used a hair dryer to speed up the drying process and then peeled off the freezer paper to reveal the heart.
And then I did it again and again. (The pink heart was a little hard to see so I used a fabric marker to outline it.)
And that’s it! Pretty cool, right?
As always, I would love to hear if you try this out! I wonder how many surfaces we can marble if we put our heads together! Feel free to leave your ideas in the comments below, or stop by
my blog and let me know.
Happy Marbling!! -Cami