Oh my word. I have been so excited to share this costume with you guys!! But first, I apologize for not having it ready yesterday like I said I would in that quick post I put up over the weekend. I had everything ready to go, I just needed to finish the instructions…..but I have had some sick kiddos (who have stayed home from school) and have been needing some extra love. So thanks for understanding. :)
But, I’m now ready to share with you the winner of the Costume Vote from several weeks ago. There were so many good ideas…..I was so excited watching all the votes come in. And honest to goodness, I looked at the winner of the vote about a week after the voting and it was a BUTTERFLY COSTUME! And then in second place (I think), was Harry Potter and then maybe Star Wars?? But, I forgot to close the vote and since then……the actual winner has changed. Accckkk!!! So, if you go back and look at the results, you’ll see that Zootopia is the new winner! WHHAAA?!?! I had no idea it had changed until I looked at it over the weekend. Whoops! But too late—–I was already finished with the Butterfly Costumes….so we’re gonna go with it, mmmkay?? ;)
We also had different plans for my kiddos’ costumes this year (it was actually going to be Zootopia, which they LOVE…so how ironic that it ended up pulling ahead) but since I’ve been so sick and my kiddos are all taking turns missing school from being sick…..the girls are now happier than clams to wear these butterfly costumes! (Now I’ve got to figure out something for the boys!)
Anyway, there are butterfly costumes all over the place…..and you can definitely find all sorts of butterfly wings at the store, etc. So, I was actually kind of surprised that this costume won the vote. So, I was determined to do something a little more unique. And something more fun than the standard wire mesh wings for my 5 and 9 year old girls!
So I made EXTRA LARGE WING Butterfly Costumes….for both Elli and Chloe! :)
Eeeeeeh, these girls have been SO EXCITED!!! In fact, when I first started making these about a month ago, I told the girls these were the costumes that just won the vote on my blog and that we would be giving them away and I would be making them their real costumes later! They were fine with that at first. But once I actually finished them, they begged and begged to keep them! Ha! Well, looks like that was going to be the new plan anyway…because time has run out to make them any other costumes! Whew!……SO HAPPY they were thrilled with this change of plans! :)
So, here’s the deal. These aren’t your standard non-mobile wings that sit perched on your back and just look pretty. These huge wings FLAP!!! The girls can run around and expand their wings and flap around in nature, just like real butterflies!
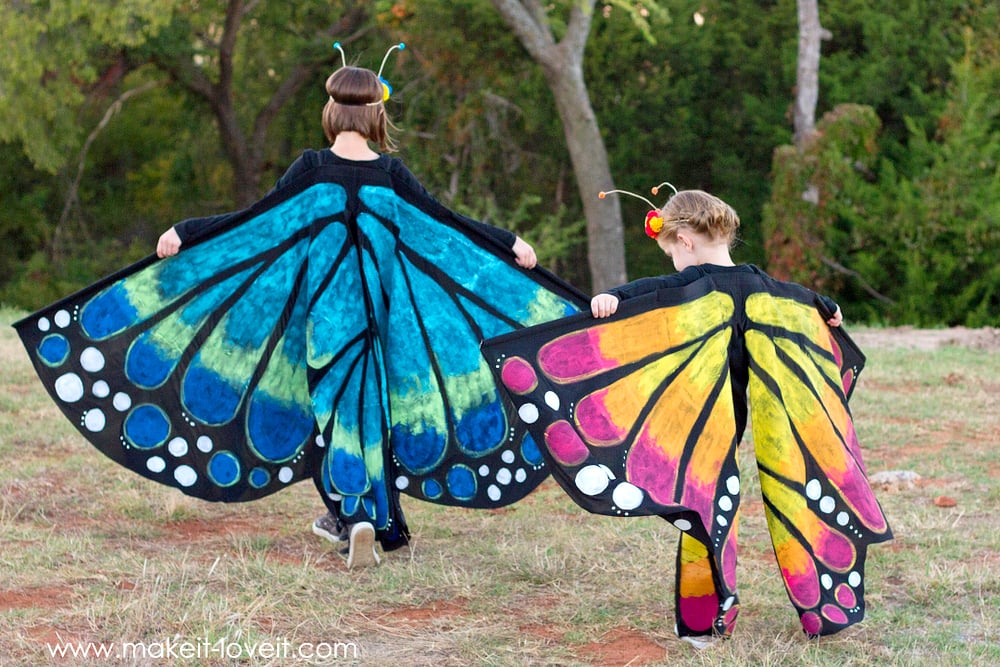
There’s a wooden dowel partway along the top of each wing that extends out to the very tip of each wing, so they can grab it and extend outward, making their wings SO MUCH BIGGER than most costume wings!
And when not in use (and when they need to use their hands for something like trick-or-treating), they can drop the wings and just let them hang down their back. Still pretty and colorful……just resting!
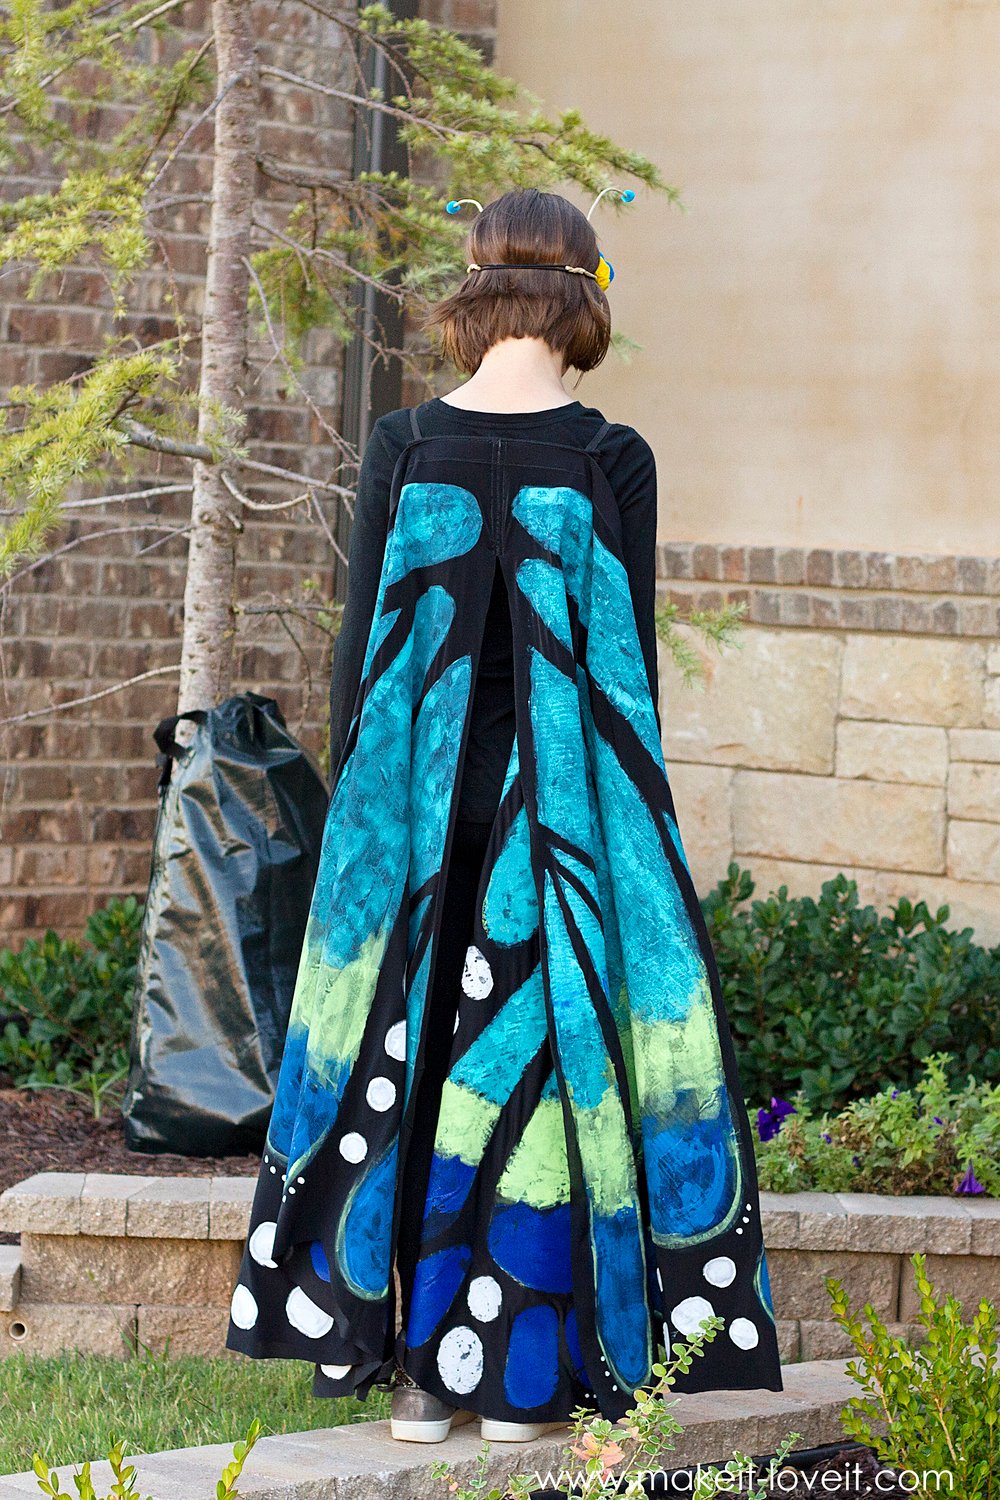
There’s actually very little sewing involved with this costume. It’s mostly just acrylic paint (which is CHEAP)! And because of the thin flow-y fabric that I used, once you paint on one side, it soaks through to the other side…..so both sides of the wings are beautiful!!!!!
The wings are also attached to a base, that is then strapped onto the shoulders, with little elastic armhole loops…..so it’s worn like a back pack!
Surprisingly to me, I really had so much fun making this…..even though it was more painting than actual sewing! I’m not super talented in the painting department either but this was a very forgiving project and the more paint I added and blended, the more it kinda worked. YES!
But my goodness, look at the SPAN OF THOSE WINGS!!!
Elli told me when I was all finished, “I’ve always wanted a bird costume AND a butterfly costume, so I kinda feel like I can pretend to be both! (And yes, my 9 year old still really LOVES to dress up! She still orchestrates dress-up parties with her siblings on the weekends and LOVES pretending. I know she must almost be to the stage of outgrowing this…..but please let it last a little while longer!!!)
Oh, how I love these two girls! And am especially thrilled that they were more than happy to change costume ideas, among all the set backs of being sick, etc!
Sweet girls…..enjoy your younger years, for they are precious! :)
***Side Note: I didn’t include a tutorial for the headband and antenna. It was a last minute afterthought. But I’d be more than happy to share how I put it together…..if enough are interested!***
***Edited To Add: I created a tutorial for the Flower Antennae Headband —> HERE!!!
Okay, ready to see how these Butterfly Costumes were made??
Let’s do it!
SUPPLIES:
***Check out my Sewing Terms 101 post, for additional help.
Before getting started, measure your subject. Start at the middle of the back, just below the neck, and stretch your measuring tape out past the arm, as far as you want the wing to spread.
Keeping one end of the measuring tape at the back below the neck, rotate your measuring tape down vertically to be sure the chosen length doesn’t hit the ground. You don’t want the wings dragging on the ground when they are hanging and not in use. (I made my vertically length reach just to my girls’ ankles….and my horizontal length as far out as I could, without hitting the ground….it pretty much ended up being a square.)
Using your vertical and horizontal dimensions, cut out your square/rectangle for one wing. Cut a piece of fusible interfacing that is the same length as you horizontal dimension and is 2 inches wide. Iron it in place, along the very top edge of your fabric (which is the horizontal measurement).
Here’s a closer look…
Fold the top edge over 1 inch (or just slightly more to cover up the white completely) and sew along the bottom edge, using a zig-zag stitch. Repeat the process again…..so that you have 2 wings this same size.
Slide your dowel in, to be sure it fits. (NOTE: I cut the dowel down shorter so that when fully extended it only came back in to the middle of the forearm. That way, there was still some flexibility in the wing and it could even be wrapped around the shoulders and body. The dowels are just needed to keep the wing extended out straight past the hand anyway.)
And sew one end closed so that the dowel can be pushed all the way to the wing tip. (Later we’ll sew on the other side of the dowel to keep it closed….but not yet.) Be sure that you sew the opposite end closed on the other wing….since the wings will be mirroring each other.
Take your dowels out for now, and set aside.
Now, it’s time to cut your wing shape. Using chalk, create a butterfly shape, trying to keep as much of the fabric as possible. (It won’t look exactly like a butterfly wing shape since the wings will generally be held straight out from the body….not all the way upward above the head, like a real butterfly would.)
Since the chalk line is a little hard to see……here’s a dotted line to help out! Also, Be sure that sewn edge for the dowel is laying towards the very outer edge of the wing. (The sewn closed edge is at the left side in the picture below. It will be opposite for the other wing)
Now, create the inner design of your wings, using chalk. Try and mirror the wing designs to each other, so that they’re symmetrical.
Now, it’s time to paint. You’re going to need quite a bit of acrylic paint it and you’ll need at least 2 coats (in some places 3 coats), letting it dry in between. It’s best to buy the same brand and make sure there are several bottles available for each color you’re wanting to use. (I used about 3 bottles of the yellow, 3 of orange, 3 of pink, and 1 white. They were 50 cents each….so the cost wasn’t so bad!)
I had to experiment a bit….and let me tell you what I learned. DON’T PLACE YOUR WING ON CARDBOARD AND PAINT ON TOP OF THAT! Once it dries, it will stick to the cardboard and will peel some of it up with it. However, TIN FOIL works great……and allows the color to soak through to the other side of the wing and helps create a nice glossy coat on the other side once its dry (you’ll see what I mean down below).
Start with your first color and apply a nice even coat, trying your best to completely cover your fabric. Once it starts to dry, it will fade a bit (because it soaks through the fabric fibers), but that’s okay. Let it dry.
While the yellow is drying (you can see it already fading in the picture below), start with your next color….I used orange. Apply the same amount of paint as the first color.
And then move onto the third color.
While letting your 3 main colors dry, begin adding your white accent shapes. You probably wont need more than one layer of white paint…at least I didn’t.
Now, it’s time to add your second layer of paint. Start with your first color and paint right on top of the first layer.
Repeat with your second layer, but where it meets with your first color above, slightly over-paint just a bit in lighter strokes, to give a look of blending.
Do the same thing with your third color, slightly overlapping the color above with lighter strokes.
Once that dried, I decided to use my yellow paint to very lightly outline the very bottom of the darker pink color, to help define it.
Once everything has completely dried……..start peeling up your fabric. See that nice glossy look? It will have a slightly different look than the other side and will even be a little brighter….but it’s kind of a cool contrast!
Once both wings are completely painted and dried…..slide the dowels back in, sliding them all the way to the outer most tip of each wing. The dowels won’t be as long as the wing and that’s okay. But you want it to stay all the way out to the end of each wing. So once it’s in place, sew another line of stitches on the other side of the dowel, to keep it in place.
Here’s a closer look…
Now, we’re going to create a felt base for the wings to be attached to. Measure across your subjects back slightly more narrow than the armpits and at least several inches tall (mine is about 5 inches tall).
Cut 4 pieces of felt at the dimension you determined above. Sew around all 4 edges, securing them together, creating 1 sturdy piece.
Now, cut 2 pieces of elastic and attach them to the felt in the corners, creating arm holes for the wing base. These should fit nice and snug to keep the wings in place.
Now, turn your felt rectangle over (so that the attached elastic is facing down) and grab the right wing and place it on top of the felt centering the left edge along the middle of the felt. Sew the wing to felt along the top and left edge, using a zig-zag stitch.
Here’s a closer look….
Now, repeat with the other wing, attaching it on the opposite side.
Now, sew a wide zig-zag stitch down the middle, grabbing the raw edges of each wing edge….to enclose it and make it look nice and finished.
And that’s it!!!
Your wings are ready for wearing. And flapping. And playing!!!
Oh, and like i mentioned above, I didn’t include a tutorial for the headband and antennae. It was a last minute afterthought that I thought would be fun to wear….so I glued it together really quick without taking a single picture. But I’d be more than happy to remake one and share how I put it together…..if enough are interested! (Just let me know in the comments below.)
***Edited To Add: I created a tutorial for the Flower Antennae Headband —> HERE!!!
Enjoy!
-Ashley
Hi Ashley!
I know it's been a while, but can you remember if you used a regular acrylic paint, or a fabric paint?! And any chance you know the brand?! Thanks so much! George :)
Hi. Love these wings. I wondered if you could perhaps put an amazon link for the fabric please. I'm not sure which kind of fabric I would need. I work in a school and would need to make 12 of these fir a concert. Thanks
I made these wings for two girls this Halloween and have some suggestions. The paint mostly didn’t soak through. I had to do 2-3 coats on the first side and 1 on the back. The white covered better and the blue soaked through to the other side really well. Pink was the worst. I tried using a foam brush, but that worked horribly, and I ended up finger painting the paint on. I kind of wish I had used fabric and iron on adhesive to applique the colors on. The dowels were a neat idea, but we took them out because they were weighing down the wings so the fabric stretched and dragged on the ground a bit. Even without the dowels, the paint made the wings stiff enough that they could be held up without collapsing. I wish I would have made loops to go around wrists instead of the dowels. Lots of people loved the costumes, and I’m trying to convince my daughters that they should be butterflies for the next few years :)
I would love to send you our butterfly pics- the costume came out beautifully thank you!
natalia
Hello! Love the costume, I’m trying to make a hungry caterpillar (butterfly) costume so want to use a blue or white base would the paint work on that material too? Many thanks
Thank you so much for this fantastic method. I have followed the same to make beautiful butterfly wings for my sweet daughter.. She loved it… Whole credit goes to you only…..
Thank you, this made my very busy halloween a snap. They turned out beautiful. The directions were spot on and easy.
My daughters are so excited about these wings! I just have one question. I’m thinking about adding some elastic as a wrist band to hold the dowel to their wrists. What do you think? Are the wings too heavy? Or maybe if I add elastic at the wrists and elbows? I’m just thinking it would be easier for them if they didn’t have to hold the wings.
Update: I decided to add an elastic wrist band and sewed it a few inches down so it wouldn’t weigh too much on the fabric and stitches, and it seems to work well! Thanks for the great tutorial, my girls LOVE their wings!
Made a pair for my daughter – thanks so much for the tutorial!!! They came out great!
Also, my son wants to be a police car for Halloween so, if you wanted to do a tutorial for that next, it would really make my life easier ;)
Hello- These are beautiful! I am planning to make a pair for each of my daughters. I am not very familiar with acrylic paint, and I am wondering if they will do ok if we have wet weather for halloween. Do you know if the paint would bleed, or should it be okay?
thank you!
Just made a pair for my 4 year old. She loves them. Thanks for the tutorial
Dear Ashley,
thank you so much fo a wonderfull thutorial. I will do for my 11 pupils.
Muchas gracias.
Wow, I absolutely love it and it looks so easy to make. I have to get started right away. I am so blown away by how easy it is! OMG! Love all the ideas. Keep ‘them coming. Only one question: could a fourteen year old do it? Only one way to find out!
Hi THANK U SO MUCH. I made the costume but I bought printed fabric
Gracias!!!! Su tutorial nos ha ayudado a disfrazar 35 niñas.
I made it!!!
Thank you!!!
I don’t have words to express my gratitude for sharing this idea of making a wonderful butterfly costume. My daughter wanted to be a butterfly at the fancy dress competition and I Googled a lot. I even bought some cardboard sheets to make a butterfly but somehow I wasn’t convinced. And of course it was going to be very heavy for the child to wear. Then I stumbled upon your website and decided that this is it… I stitched the costume and painted it and made her learn few lines. And yo.. She won the first prize. And of course the brain behind this is yours.I have uploaded the video taken below our apartment in YouTube. Check under vihaana’s performance in fancy dress as butterfly. Also check our fb photos in my profile An Ju Aravind. Sheena thank you from the bottom of my heart.
Ashley thank you so much.. Sorry for wrongly typing your name as sheena. ?
These are beautiful! Were you girls able to sit down in these? My girls go on a school bus to school and I wanted to know if they would manage to get to their costume party in school wearing this.
Thanks for such a brilliant idea.
I’m using this tutorial to make dragon wings for my son. The paint isn’t bleeding through to the other side though like yours. ? It just looks like a messy blob from the other side. Could I have just gotten the wrong blend? Thanks!
I have very similar problem, colour doesn’t go through the fabric. Do you soke the brush in a lot of water before you soke it in a colour?
I’m also having the same issue. I might just paint the second side as well (sigh). I thought of adding water as well, but won’t that dilute the color even more? What did you do?
In the end I had to paint both sides, numerous times, to get good color. A bit more tedious than I planned but they did come out beautiful. So thank you.
These are the most beautiful butterfly wings! I love how you did them. I wish I’d seen them a week ago. My 4 youngest girls are doing play-on-words costumes (Holy Cow, Spelling Bee, Smart Cookie, Miss Understood) and if I had time to do it I would convince Miss Understood to be a Social Butterfly instead.
Hope you can get everyone at your house healthy in time for Halloween!
My gosh! I was looking all over your website for where to buy this pattern, hoping it was downloadable. What! It’s a free tutorial! How generous and cool. Thank you from my two little granddaughters. They will love their wings!
Oh good…..you’re so welcome! And I hope they love it!!! :)
I LOVE this. My daughter was pretty adamant on being a black cat and I was going to work on her costume and my son (mouse) tonight but she just saw this and she wants to be a butterfly. I am thinking little brother could be a caterpillar. Can you tell me which store you bought your fabric? Joann? Dowels there too? I actually made your parrot costume for my daughter and I got SO MANY compliments on it.
Ha….how funny that she changed her mind so quickly! And sure, I bought everything at Joann’s.
And ooooh, that parrot one is a cute one too. So glad you’re having so much fun making all these costumes!!! :)
LOVE these wings! Amazing!! I’m going to combine them with a fairy dress and it will be perfect for a RenFair. : )) I would love a tutorial on the headbands you made as they just make this whole outfit come together. Love your creativeness and appreciate you sharing with us!! <3 Love your girls high tops with the outfit!!
Oooooh, what a great idea to match it with a fairy dress!!!!! Hope it works out well for you! And I just finished posting the headband tutorial here: https://makeit-loveit.com/2016/10/flower-antennae-headband-to-match-the-large-wing-butterfly-costume.html
Thank you, I think so too! OH! I am so excited to make the headband. Thank you SO MUCH for posting these. I am so excited as we have a parade event coming up and we’re going to dress up as butterflies for the parade. I am sure we’ll be the envy of all with your great costume! : ))
wow! Ashley!! These are AMAZING.
Really, really cool.
Awwww, thanks so much Dana!! :)
My two boys are way beyond dress-up ages (they’re now giant almost-men!), but I do theater costuming for a couple different programs, so I can see how this could be very useful in the future. I LOVE this, and might even make one for myself for Halloween!!
Thank you for sharing, and I hope you and all your kiddos are feeling mended soon!
Oh wow, I hope this comes in handy for you and your costumes!
And thanks so much for the well wishes….we’re already feeling so much better! :)
I think this is my favorite costume ever! I would love it if you did a tutorial for the headband/antenae!
Oh wow, thanks so much Chisk!!! And I just finished posting the headband tutorial here: https://makeit-loveit.com/2016/10/flower-antennae-headband-to-match-the-large-wing-butterfly-costume.html
Oh my..this is gorgeous!!! I am sooo making this for my kids. Thank you so much for the tutorial. You really made my day!
Oh thanks…so glad you like it!
Hello Ashley,
I am very interested in the headbands with the antennas for the butterfly costume. Perhaps you could tell me how I made these beautiful headbands at my email address? (What material) ? I would be very happy.
Greeting Monika
Sure! I just finished posting the headband tutorial here: https://makeit-loveit.com/2016/10/flower-antennae-headband-to-match-the-large-wing-butterfly-costume.html
The guide is really great. I will sew the butterfly wings for my Enkeltochter. Thank you very much for these beautiful wings.
Beautiful. We saw some cool ones at a store, but they were a little small and overpriced. These are even better! We will have to make these and I’ll let the girls help paint them and individualize them. I’d love to see how you made the headband!
The wings are so ingenious – just love the creativity! I was in the process of making antennas very similar… so would love if you could share a tutorial for them! So excited butterfly costume won the vote. Thank you for sharing!!
Awwww, thanks so much Jules!!!! And sure! I just finished posting the headband tutorial here: https://makeit-loveit.com/2016/10/flower-antennae-headband-to-match-the-large-wing-butterfly-costume.html
Thank you for sharing such a great costume. I too would like the headband.
Sure! I just finished posting the headband tutorial here: https://makeit-loveit.com/2016/10/flower-antennae-headband-to-match-the-large-wing-butterfly-costume.html
The wings turned out great! I’m going to show my oldest and her friend to see if they would want to make their own. I would love to see the antenna/flower headband tutorial.
That would be fun for them! And I just finished posting the headband tutorial here: https://makeit-loveit.com/2016/10/flower-antennae-headband-to-match-the-large-wing-butterfly-costume.html
My 4 year old granddaughter who lives with us wanted to be a witch for Halloween BUT the second she saw this costume she changed her mind! I am so excited to get started making it for her!! I will be sending her Daddy to the store tonight to get the fabric and dowels so that I can get started right away! Hopefully it will be ready when she gets back from her visit with her mother on Monday night!! Thanks so much for the awesome tutorial and amazing costume idea!!!
A tutorial for the headband would be totally awesome!!! Thanks in advance!
Awwww……..I love it!!! Hope it worked out well for you! And I just finished posting the headband tutorial here: https://makeit-loveit.com/2016/10/flower-antennae-headband-to-match-the-large-wing-butterfly-costume.html
Best of luck! :)
Thank you so much! We have ordered the stuff we need and are just waiting for it to arrive so we can get started!
Please show us how to make the headbands. The costumes turned out so beautiful…it will be a challenge to try to duplicate what you did!
Thanks so much Jill! I just finished posting the headband tutorial here: https://makeit-loveit.com/2016/10/flower-antennae-headband-to-match-the-large-wing-butterfly-costume.html
Also yes for a headband tutorial!
I just finished posting the headband tutorial here: https://makeit-loveit.com/2016/10/flower-antennae-headband-to-match-the-large-wing-butterfly-costume.html
Amazing butterfly costumes!! So colorful, so fun!
Thanks so much Jan!
Again, beautiful work!! I am inspired?
Thanks Sharlyn! :)
Those butterfly wings are absolutely beautiful! You have such a gift for creating wonderful things with such simple designs. This could be adapted to other winged creatures as well, for adults as well as children. And I love the headbands! Tutorial, please…after you all are well again.
Thanks so much Kim….how sweet are you! And I just finished posting the headband tutorial here: https://makeit-loveit.com/2016/10/flower-antennae-headband-to-match-the-large-wing-butterfly-costume.html
OMG! The most beautiful butterflies I have ever seen! Those wings are outstanding and on your beautiful daughters, they are just amazing! Thank you for the tutorial. You never cease to awe me and its a yes from me for the headband tutorial. Thank you again!
Awww, thanks so much Maree! :)
And I just finished posting the headband tutorial here: https://makeit-loveit.com/2016/10/flower-antennae-headband-to-match-the-large-wing-butterfly-costume.html
Wow looks fantastic think I might be able to do this thank you for sharing
Thanks Lisa!
How beautiful and so easy to make! It would be great to see a tutorial for the headband too if its not too much trouble.
I think I’m going to try and convince my 5 year old to be a butterfly this halloween!
Thanks again Ashley!
Oh yay…..I hope it works out well for you! And I just finished posting the headband tutorial here: https://makeit-loveit.com/2016/10/flower-antennae-headband-to-match-the-large-wing-butterfly-costume.html
LOVE the butterflies! I’d like to see a head piece tutorial too.
One quick question. What velcro? It says turn side with velcro face down. Did I miss a step?
Thanks so much for sharing this tutorial my granddaughters are going to love it!
I am sure she meant elastic and not velcro.
Oooops, yes, thanks Robin! I meant elastic! Thanks for mentioning it….I just fixed it! :)
Oh, and I just finished posting the headband tutorial here: https://makeit-loveit.com/2016/10/flower-antennae-headband-to-match-the-large-wing-butterfly-costume.html
Headband tutorial please!
I just finished posting the headband tutorial here: https://makeit-loveit.com/2016/10/flower-antennae-headband-to-match-the-large-wing-butterfly-costume.html
Love these wings! I was looking at some printed wing fabric on Spoonflower, I like these better. Don’t worry about your kids outgrowing dress up, I’m 61 and still love costumes
Oh, wow, I didn’t know they had such a thing! That’s pretty cool! But yeah, creating your own design with paint is pretty fun! And yay…..I still love dressing up too! :)
Beautiful! Might become my 2 1/2 yo goddaughter Xmas present :) Yes to the headband tutorial, please. Thank you for sharing :)
Such a fun idea for Christmas! I just finished posting the headband tutorial here: https://makeit-loveit.com/2016/10/flower-antennae-headband-to-match-the-large-wing-butterfly-costume.html
You never stop impressing me!!! I’d love a tutorial for the headbands if you have time after caring for you sweet babies. I can’t believe how big Chloe has gotten!
Thanks so much Sarah! I just finished posting the headband tutorial here: https://makeit-loveit.com/2016/10/flower-antennae-headband-to-match-the-large-wing-butterfly-costume.html
WHOA, Astonishing! Could you please help me and specify the % of polyester and % of spandex? I am a total beginner…
Ack…..I knew I should have taken a picture of the bolt of fabric. I think it was 80% polyester and 20% spandex……maybe a little less spandex? But just look for a nice and flowy (almost slinky) performance spandex fabric…..one that’s not too thick or heavy! Best of luck!
Oh.my.word. Beautiful!! And so cool! Wow, wow, wow!
Thanks so much Katy!
I would also be interested in the headband tutorial (to use for a ladybug costume). Thanks so much!
Ooooh, great idea for a ladybug too! I just finished posting the headband tutorial here: https://makeit-loveit.com/2016/10/flower-antennae-headband-to-match-the-large-wing-butterfly-costume.html
Yes please to the headband tutorial! Love this. Thanks.
Sure! I just finished posting the headband tutorial here: https://makeit-loveit.com/2016/10/flower-antennae-headband-to-match-the-large-wing-butterfly-costume.html
These turned out so awesome! Lovely, as always. I always get a kick out of what you create for Halloween. I’m trying to figure out a peacock this year….I’m wondering if I can somehow use this idea for my advantage….Hmmm….?
Ooooh, let me know if you figure out something for the peacock…..sounds amazing!
Please explain how you made the headpieces! Love this costume!!
Thanks so much! I just finished posting the headband tutorial here: https://makeit-loveit.com/2016/10/flower-antennae-headband-to-match-the-large-wing-butterfly-costume.html
Those are amazing! Definitely unique, not another glittery wired wings!
I was so hoping for Zootopia, but glad you did this butterfly tutorial too. I already have the costume for Halloween for my girl this year, but still want to make those wings for dress-up play. Thank you so much for the tutorial! Hope you all are doing better and will be able to enjoy Halloween!
I was hoping for Zootopia too…..darn! But you’re right, these would be fun for dress-up too!
Thanks so much Annie!
Those are so cute!! I have to not show my daughter or she would be begging me to make her one and right now all my sewing stuff is boxed up.
Thanks so much Sheena! Maybe save it for Christmas! ;)