For years, my 8-year-old Elli has made a little mocked up version of a mermaid costume from a baby blanket. She wraps it around her waist, secures it with a hair clip and then divides the excess blanket beyond her feet into two sections and wraps runner bands around them. You know, like the 2 flaps of a mermaid fin. She helps Chloe do the same…and then they flop around the floor and couches, pretending to swim through deep waters, collecting treasures from the bottom of the ocean floor. It’s pretty darn cute.
The thing about these 2 little girls of mine, is that they love glitter. And sparkle. And anything shiny and fancy. So, when I decided to come up with an actual mermaid costume to share with you guys (since it was one of the winners of the costume vote), I decided to make shimmery sparkly mermaids. However, it works out for the best, because those little sequins look like shiny scales. So we’ve been drowning in little sequin bits around here…..including between Oliver’s toes. And in the lint trap of the dryer. Ha!
But, it’s all very worth it because now these 2 girls of mine, can ditch the baby blanket mermaid tails, and can flop around on the floor in their new Mermaid Costumes!
The one thing that my girls (mostly Elli) requested, was that the tail be something that would wrap around their legs and bind them together. Like a “REAL” mermaid! ;)
However, I knew it needed to be something they could walk around in if they wore these to school or trick-or-treating…..but still look like they had mermaid tails. While in this “mobile” position, they slip their legs out of the overlapped closure in the back, while still keeping their legs covered in the same “scale-y” fabric.
They have freedom to walk around and go trick-or-treating or attend parties, etc. The tip of the fin has a loop of elastic that slips around a wrist, to keep it up off the ground.
But while at home, they can slip their legs back inside the tail and completely enclose their human legs…..and become MERMAIDS!!!
When trying her costume on for the first time, Elli dropped to the floor and began slithering across the floor to test out the security of her bound legs. Success!
Chloe (who’s 4) tends to like whatever her big sister likes and changes her mind all day long. However, mermaids are something she’s always been fascinated with…and she has several mermaid dolls that I catch her pretending with all the time. So, this costume is one she has legitimately been excited for all on her own!
We decided not to go the seashell-bra route but still wanted something fancy for the top. This little sweetheart neckline gives it a different look, but turned out so cute!
You can’t really see the lake in the background of these photos but the girls really wanted to jump in that water. I might need to tell them that these costumes don’t actually give them magical powers to swim with the dolphins and find old treasure.
But then again, maybe I won’t tell them. Because a whole lot of imagining will be happening in these costumes. And I’m going to enjoy watching every minute of it. :)
Would you like to make your own Mermaid Costume??
SUPPLIES:
***Check out my Sewing Terms 101 post, for additional help.
Okay, time to get started.
But before we do so, SPANDEX IS CRANKY FABRIC. I have sewed many miles of knit fabric and have always used a standard needle. I very rarely use a ballpoint needle like so many people recommend using. However, once I started sewing on this spandex fabric (which I realized I had never before), it was skipping stitches and messing up my top thread. I tried my ballpoint needles….same problem. So, I took apart my machine, cleaned it out, added oil, etc. Nothing helped. Grrrrr….so aggravating. I did a little research and decided to give a STRETCH needle a try. And weird enough, a DENIM needle. Both worked a million times better than the standard or ballpoint needle……SO MAKE SURE AND PURCHASE ONE, OR TWO!!! (Another thing to note — the spandex fabric I used for the tail had these teeny tiny little sequins glued onto the fabric. The adhesive made the issue even worse because when sewing on the silver spandex for the top, I didn’t have the same issue. Anyway, it’s like the needle would stretch with the fabric but then stick from the adhesive…..it wasn’t a great duo. But the the needles helped so much!)
Now, onto the tutorial.
First, have your subject lay down on the ground and point their toes. Then, measure your subject from the waist, down to the tips of the toes. Add about 2 inches to that measurement (for a little growth and room for stretching).
Then, grab a pair of leggings that fits your subject and place down on top of your spandex fabric. (Be sure that if your spandex stretches more one way than the other, that the direction that it stretches more, place that right to left.) Cut along the right side of the leggings, adding an extra 1/2 inch to the side for a seam allowance. Also, begin tapering in at the knee and continue angling inward down to the toes. Cut as long as the measurement you decided the length needed to be up above (remember to add the 2 inches). Also, be sure that the width is wide enough to fit around the calves, ankles, feet, etc.
To be sure that the shape is symmetrical, fold the right side of the fabric in half and cut along the left side, making sure that you include the added seam allowance.
Now, you have the front tail piece cut out.
The back of the tail section overlaps in the back, like an envelop closure. Use the top piece as a template to cut 2 pieces that overlap about about 6 inches.
Since it was hard to see, I flipped the top piece face down, so you could see that the dimension of the top piece was the length that I wanted the top piece to end, plus 1 inch (for a seam allowance).
Now, find the two edges that will be overlapping each other and fold over 1/2 inch, another 1/2 inch, then sew in place with a zig-zag stitch.
Now, place the front tail piece down in front of you, right side facing up. Then place the upper piece for the back on top, right side facing down. Then, place the lower piece on top of that….and line it up with the front tail piece.
Pin the pieces in place, then sew along both outer edges, using a zig-zag stitch (to allow for stretch).
Now, it’s time to make a quick pair of leggings to fit inside the tail. However, you can skip these leggings and just have the legs come out of the tail bare…..but it’s up to you! (Here’s a simple leggings tutorial here.) Also, cut a strip of fabric for the waistband plus a piece of elastic, both of which are the same length as the waist measurement. And the width of the fabric should be 3 1/4 inches wide. (Use this Skirt With Attached Shorts tutorial as a reference.)
Okay, so here’s my problem. I was short on fabric and tried to cut out the leggings just a little bit more narrow than I needed and just figured it would stretch enough to fit. However, it was just way too tight to fit over Elli’s bum.
I didn’t want to buy any more fabric……so I improvised. I cut of the legs of the spandex way-too-tight leggings off and found a pair of existing legging shorts in Elli’s drawer.
Then I attached the purple cut off legs to the bottom edge of the shorts, by turning the shorts inside out, sliding the legs inside, placing right sides together, pinning the raw edges together, and sewing them together.
Now, because the legs ended up being longer than I needed them to be, Elli had the idea to keep them long and turn them into closed-toed tights. Then her feet would be completely covered and seem more like mermaid scales than human skin. SO, I rounded the very bottom edges of each leg, then sewed them closed with a zig-zag stitch. I ended up loving how it looked and meant to do the same with Chloe’s leggings (the blue mermaid) but forgot and cut each legging piece too short. Oh well. Now you can decide what you’d prefer.
Now, if you made your leggings from scratch you will already have a raw upper edge but since I used these old leggings for the top, I cut off the existing elastic waistband. (But let me tell you…..this ended up being faster so I did the same thing with Chloe’s costume and used some old leggings too and just added legs from the spandex fabric. This tutorial is full of unexpected shortcuts! ;) )
Now, slide the leggings inside of the tail…
Then, match up the upper edges and pin in place.
Then, sew the waistband together like the Skirt With Attached Shorts tutorial.
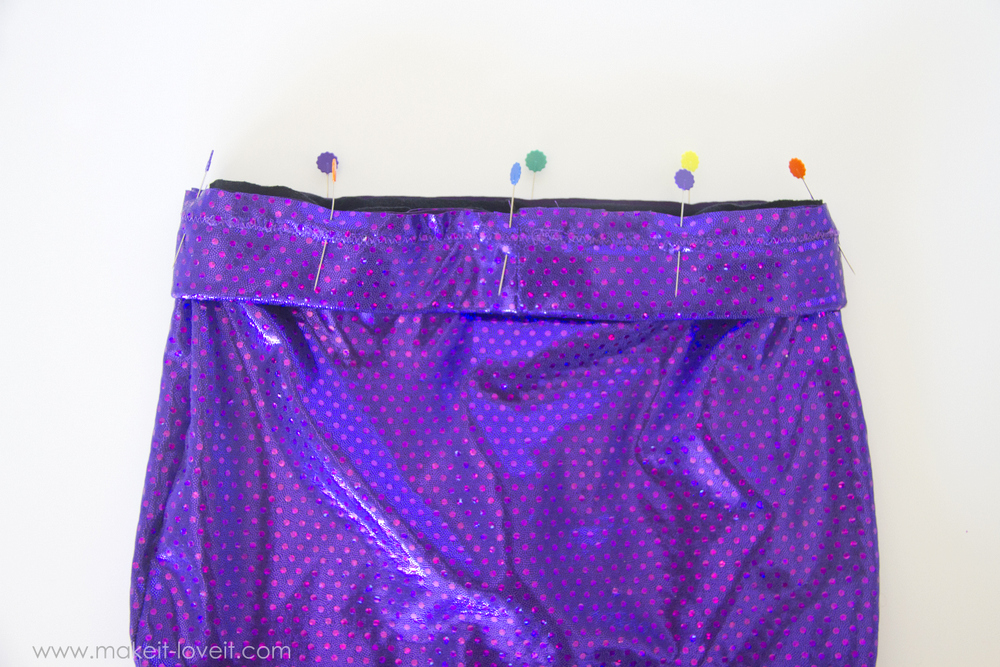
Slide the waistband over the top edge of the tail and match up the raw edges. Pin in place.
Sew in place with a zig-zag stitch, 1/2 inch from the edge.
Flip the waistband up and it should look like this…
Now, time for the fin. I drew a fin shape out of paper first and held it at the bottom of the tail, to decide on the size I wanted. Then, I added a rectangle section to the upper edge that would be used to slide into the end of the tail to be sewn……and then also added an extra 1/4 inch around the edges for a seam allowance. Cut 2 pieces from the sequin fabric and 2 pieces from the felt. (I actually ended up using 3 layers of felt….but it’s up to you how thick you want it.)
Now, place one of the felt layers down, then the two sequin layers (with right sides together), then another felt layer.
Pin all the layers together.
Then sew all the way around the fin, 1/4 inch from the edge…..leaving the top straight edge open. Trim off the pointy corners and make a slit in inward corners to help with turning.
Turn right side out and then press flat with your fingers.
Now, I forgot to add the elastic in before sewing the the fin layers together, so I had to pick open a section to slide in the elastic and then sew in place. However, the second time around, I pinned it in place ahead of time. Just be sure that it’s big enough to easily slide over the wrist.
Now, turn the tail inside out and slide the fin inside and match up the open edge of the fin with the open end of the tail. Match up the side seams, pin in place, then sew in place using a 1/4 inch seam allowance.
Turn it right side out…..and it should look like this! :)
Okay, onto the top portion of the costume…
Use an existing cap sleeve shirt as a guide for your pattern pieces or a fitted Tshirt to use as a guide to create a front and back shirt shape that’s sleeveless…..but has the cap sleeve shape to it, like shown below. Keep it simple….it doesn’t have to be fussy or overly complicated. Just be sure to add an extra 1/4 inch for seam allowances along the sides and at the shoulders.
Then cut a strip of fabric for the neckline and attach it like this shirt tutorial here.
Repeat with the other shirt piece.
Now, cut a piece of the sequin fabric that is the same width and length as the front shirt piece but cut the top as a “sweetheart” neckline.
Pin in place.
Then cut a piece for the back shirt piece, that is cut straight across. Pin them all in place.
Then zig-zag along the upper edge of the sequin fabric, attaching it to the shirt front and the shirt back. Iron flat if needed.
Place the shirt front and back pieces together and sew together at the shoulders, using a 1/4 inch seam allowance. Cut 2 more strips of fabric and finish off the arm openings just like the neckline.
Then, I forgot this last image but match up the sides of the shirt with right sides together, then sew along the both sides with a 1/4 inch seam allowance, using a zig-zag stitch. (Now, the sequins might cause some itchiness on the inside of the shirt. To help this, cut a 1 inch side strip of fabric that’s the same length of the shirt, sandwich it around the excess fabric along the inside seam of the shirt, and sew in place. Repeat with the other inside seam. Now, it the sequin edges won’t irritate the skin.)
Turn right side out…..and it’s ready to go!
***By the way, I ran out of time to finish off Chloe’s neckline and armholes. I’ll finish them eventually but if you don’t want to, that’s a step you could skip and get away with! :)
***Also, the hair clips I put in my girls hair was some bunched up and twisted tulle added to a hair clip. Nothing too complicated.
Enjoy!
-Ashley

Hi, I’m Ashley—the DIY-enthusiast behind this crazy blog!