Home » DIY Tutorials » DIY Sewing » Sewing: Clothing » Baby Clothing » Binky Clip
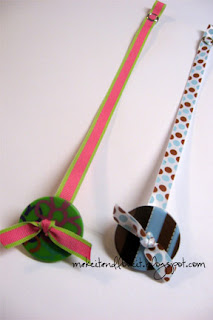
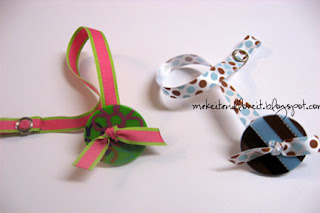
For some reason, it’s really hard to find a good pacifier clip at the store. You know, one that will actually stay on, even if your curious baby is pulling on them with their chubby little fists. I had a friend give us a pacifier clip for our daughter more than a year ago, that we loved……and the little binky was always located at the end of the ribbon. Then when we had our little boy this past summer, another good friend gifted us another one, which we have loved as well. This tutorial is patterned after the one we received for our little chubs this past summer (Thanks Marcie!!!!) and I decided that everyone should be able to make their own. Or gift them to other moms. They really are a necessity if your baby sucks on a binky. Nothing is worse than a screaming baby who needs their binky and you can’t find it. Especially in the car……that’s where we use ours most.
I’m not sure where everyone gets the clip part or if there is some secret type you should be purchasing……but I found some name badge clips at Wal-Mart for cheap. They come in a package of 10 or so for under $2.00. (Just pull the plastic thing off of there.)
Save
Then, you’re going to cut a 11-12 inch piece of ribbon and find a coordinating button, bow, flower, or some other trinket to match your ribbon. Seal the ends of your ribbon with ‘fray check’ or heat seal it and then hot glue one of the ends inside the mouth of the clip……
Save
and then pull the ribbon tight and continue gluing it around the bottom side of the clip. (The bottom for my clip was the side without that itty bitty nail sticking out, so that my button would have a flat surface to be glued to.)
Save
At the other end of the ribbon, pound the outtie part of a snap at the very end and then an inch in from that, pound the innie part of the snap onto the ribbon. This will allow you to make a loop, so that you can loop it through a pacifier handle. You don’t need any fancy snap-maker to attach the snaps. In fact, I hate the snap-maker thingy’s. (Do you know what tool I’m talking about? They’re in the shape of scissors and they squeeze the snap into place? Just don’t like them.) I just use the cheap-o setter that comes with most of the snap packages in the sewing section of your store and a hammer. Looks like this…………
Save
And in case you are wondering what to do if your binky has no handle…… Many of those binky’s (like the MAM brand) come with a rubber holder to slide over the bubble part of the binky and it has a slot to slide a piece of ribbon through. So they work just fine too.
Save
After your snaps are in place, slide a 5 inch piece of ribbon through the holes of your button (if you like the look of this), like this…….
Save
Tie it in a knot, trim, and seal the ends.
Save
Then you’re going to hot glue the button over the ribbon that is covering your clip (the smooth, non-nail side of the clip). And your pacifier holder/clip/fastener is finished……..
Save
****You may have noticed that I threw out binky and pacifier equally and frequently. FYI, both words are symonymous…….in case you have never heard the term ‘binky’. Sorry about that!

Share via:
