Remember how I always host a little Virtual Halloween Parade every year, posting many of the costumes you (or someone you know) made for Halloween?? Well, we can’t skip that…..it’s TRADITION! (Here are the costume parades from 2013, 2012, 2011, 2010, and 2009.) On the 31st, I plan on sharing your Handmade Halloween costumes here on my blog, that you and/or your kiddos are wearing this year. And no, they don’t have to be made by you…….maybe a friend/neighbor/grandma/etc. helped you out. Go on, share it! Anything handmade needs a little extra love. So, I’ll be sharing them here! :)
SO……upload your images to the YOU Made It and LOVE It Flickr account. Then, I will grab them from that account and will share them here on Halloween, which is this coming Friday, in case your kids haven’t reminded you! (The deadline to get the pictures uploaded to flickr is October 30th. So, you may need to take a quick snapshot the day before, if you haven’t already. Deal?? Also, by sharing them in the flickr group, you are agreeing to allow me to post them here on my blog as well. Deal again?)
SO excited to see what you all have made!!!!!!!!
. . . . .
Okay, I mentioned yesterday, I had a few more things to share. Well, I made one more little costume because……I just had to! (And there’s still time……..2 WHOLE DAYS until Halloween! Ha!) This Popcorn Bucket idea is something I have seen in pictures online but never a picture tutorial for it. I just had to try it, to see if it would really work. And it did! And a good friend of mine has a 7-year-old who wasn’t super opinionated about his costume this year…..and was totally up for dressing up as a big bucket of movie theater popcorn! YES!!!
Michael, you’re the coolest! :)
Now, take a closer look…….that popcorn isn’t actually real. (However, maybe you believe that the movie “Cloudy with a Chance of Meatballs” is secretly real….and I somehow had the shipped here. ;) ) But those puffy popped kernels — they’re actually made from insulation foam. And take seconds to make (but several hours to dry). But let me tell you……when my kernels were done drying, I may have shrieked a little, because — it worked!!!
So I covered the top of the bucket with huge over-sized kernels. Because, bigger is better, right?!!
And even attached some to a piece of elastic that he put on his head. (I was originally going to make a white fleece hat, and cover the entire thing with popcorn. But, I ran out of time last night because the sun was setting right as I glued these to the elastic and I needed to hurry and take a few pictures. Ack!! The elastic actually worked great but if you want something warmer, make a quick fleece hat. Or cover a store bought beanie.)
I have seen popcorn bucket costumes online made from cardboard….and that’s always a really great option. But I really wanted to make something that was a little easier to move in and a bit more comfy. So go on, guess what’s giving that felt bucket shape?? Yep, TUBING….just like the hoop skirt tutorial! And it worked great! The top popcorn kernels are actually attached to a separate piece of white felt and comes off separately. The bucket has 2 straps attached to the top that are sitting on Michael’s shoulders to keep the bucket up. Worked great! (Whew…..I always hold my breath until it actually turns out!)
Really, such a fun costume to make. And when you put all of your foam kernels together and see that it actually worked, you’ll just laugh. Because it’s crazy how this foam totally transforms and looks like the real deal (even though my lighting and coloring were terrible for these pictures)!
Michael, you’re one rad kid! Thanks for being so darn excited to be a bucket of America’s favorite movie treat!!!
Want to make one too? Really, it doesn’t take much time at all! (Just make the popcorn the night before.)
SUPPLIES:
Okay, before you start making the costume, make the popcorn pieces. They take several hours to dry…..so it’s best to get them done first.
Place some plastic wrap down on your work space because this stuff sticks and is hard to remove. Then, create an “X” first with your foam. Each line of my “X” is about 3-4 inches long.
Then squirt more of the foam in the middle, creating the center of the popcorn. Make this nice and full (let it mound up high) but if you go too wide, it will overtake the arms of the “X” you just made.
Repeat many times, making them different sizes, just like real popcorn. (If you experiment a bit, let them dry, and then check out how they turned out…you’ll get a feel for what you like.) Now remember, as they dry, they will expand even more and will also smooth out. The shapes below are still wet and haven’t expanded completely.
Now, time to create the bucket.
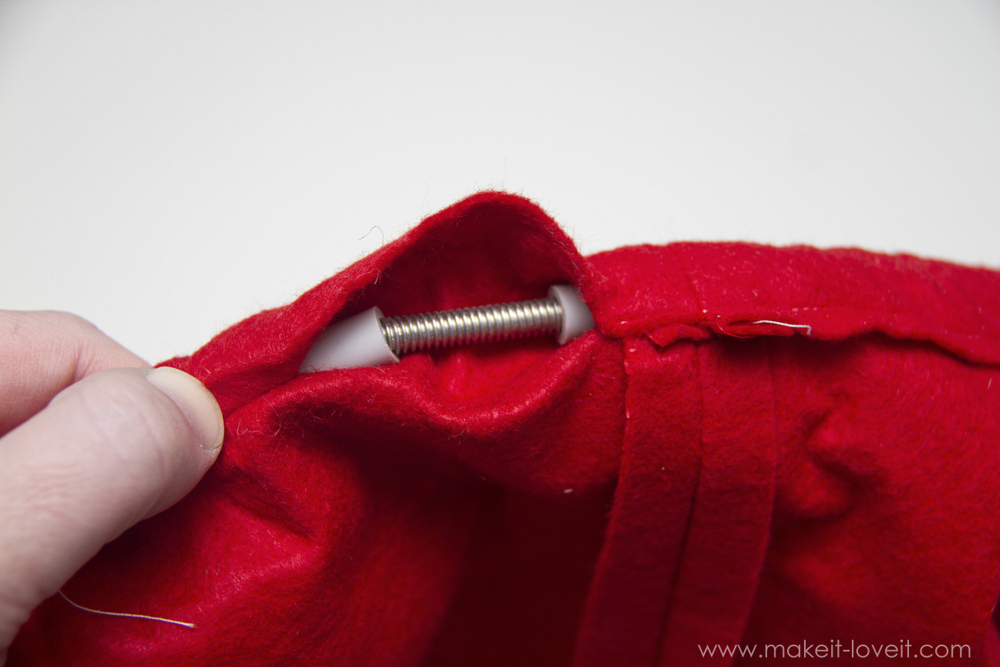
Begin by deciding how big around you want the top of the bucket to be. I grabbed one of my pex pipes, curved it into a circle, and held it around my subject’s shoulders. I decided that a 55 inch circumference looked best. Then decide how long you want the bucket. I decided that 22 inches would be perfect. With those numbers, subtract about 2 inches from the circumference number because you want your felt a little smaller than your top hoop because you want the top hoop to stretch the felt a bit at the top, to create a nice bucket lip that’s wider than the bottom. For the length (from top to bottom) number, add 2 inches to your number to create the casing along the top and bottom of the bucket.
So, I cut a rectangle of fabric that was 53 inches wide by 24 inches tall. Then, I folded it in half width wise, sewed the two edges together with a 1/2 inch seam allowance, creating a tube of fabric. Then iron the seam open and fold over the top and bottom edge, 1 inch each, and sew them in place, sewing about 3/4 inch from the folded edge. Be sure to leave a 2-3 inch opening at the top and bottom casings, so that you can feed your tubing inside. (For more pictures on creating the above steps, check out the Bubble Gum Machine tutorial…….same thing.)
Use the Hoop Skirt tutorial as a reference and thread your tubing through the casing at the top of the bucket. Be sure that it stretches out your felt at the top and creates a nice lip for your bucket. Thread the tubing through the bottom casing the same way but make your tubing several inches smaller so that it brings that bucket in at the bottom just slightly. (My bottom circle was about 8 or so inches smaller in circumference.) You want it to pull in but not create huge gathers. (I didn’t take a picture to show the bottom ring specifically but if you check out the next picture, you can see the bucket upside down and the bottom circle has more of a ripple around the fabric….but not folds in the fabric.)
Now, cut a piece of white felt that is several inches larger than the top hoop, all the way around.
Cut a smaller circle in the exact center that is slightly larger than your subject’s neck and then cut a narrow triangle out of one side. You need the triangle because this felt circle won’t be laying exactly flat and will fall down over the shoulders a bit, so cutting a narrow triangle out will allow the felt circle to close evenly in the back once it’s on.
Now, attach 3 rectangle pieces of your felt to one edge of the opening. Then attach your 1 inch wide velcro to the under side of each tab.
Add corresponding pieces of velcro to the other edge of the opening.
***Now remember, the sides with the tabs goes on the UNDER SIDE of the circle once it’s on. So from the outside, you won’t see the tabs. (And this is because you don’t want to bury the tabs with the popcorn, so placing them on the bottom side, allows you to still open and close the velcro.)
Now, add two pieces of ribbon to the inside of the top of the bucket, so that they will rest on your subject’s shoulders. Attach each end of the ribbon right under the tubing and pull the ribbon straight across (you don’t need any extra slack because the bucket will rest a little lower on its own). Also, cut arm holes along each side of the bucket, right below the tubing at each side. (Make them plenty big so that your subject has more arm movement.)
Oh, and just a little side note…..I sewed my ribbon pieces down while the tubes were still in place but that was really tricky. So, before sewing your casings shut, mark where you want your ribbons, take the tubes back out and then sew the ribbons in place.
Now, put your tubes back in and hot glue pieces of your 1/2 velcro (the scratchy side) around the top edge of the bucket. The felt circle will stick to these scratchy pieces and keep it in place.
Now, cut 1 inch wide strips of white felt and hot glue them all the way around the bucket. (I made sure to leave extra length at the bottom and glued the ends all the way under the bottom of the bucket, so you couldn’t see the ends. The top is trickier because I didn’t want to cover any of the velcro pieces but just go as high as you can.)
Then cut out a oval piece from your white felt and then you “POPCORN” pieces from black felt. (I printed letters from the computer and cut around them.) Then glue the letters onto the white oval and then glue the entire thing onto the bucket.
I’m not sure where my head was, but I forgot to take pictures of the next step. But place the bucket on your subject and then place the white circle around his neck with the opening in the back. (Be sure the velcro tabs are on the underneath side of the circle.) Trim down the circle so that it only overhangs about 1/2 – 1 inch around all the edges. (Your bucket will most likely turn into more of an oval shape because the ribbons will pull it in once you rest it on the shoulders. And that’s okay. Trim the edges down accordingly.)
Then, hot glue the popcorn piece right to the white felt, letting the pieces overhang around the outer edge of the circle, all the way around (this will help hide the edge of the bucket). Continue adding the popcorn to cover the felt as best you can.
Then glue a few pieces of the popcorn to a piece of elastic, tie the ends closed, and place around the head.
And that’s it. A popcorn bucket, ready to wear!!!!
Enjoy!
-Ashley

Hi, I’m Ashley—the DIY-enthusiast behind this crazy blog!