However, I love dressing up my little Mister too……it’s just not as easy as throwing on a ruffle and calling it good though. I have to stretch my brain a bit.
So my mind has been thinking about boys Tshirts.
And ones easy enough for anyone to try.
So, go on and turn that old Tshirt….into a new one.
All with the help of some knit scraps from your stash.
(You don’t have a scrap stash yet? Better get started on that…..)
Who needs a plain ‘ol Tee?
Go on and give it some character……
Don’t worry, they can still play like boys in them.
The inspiration?
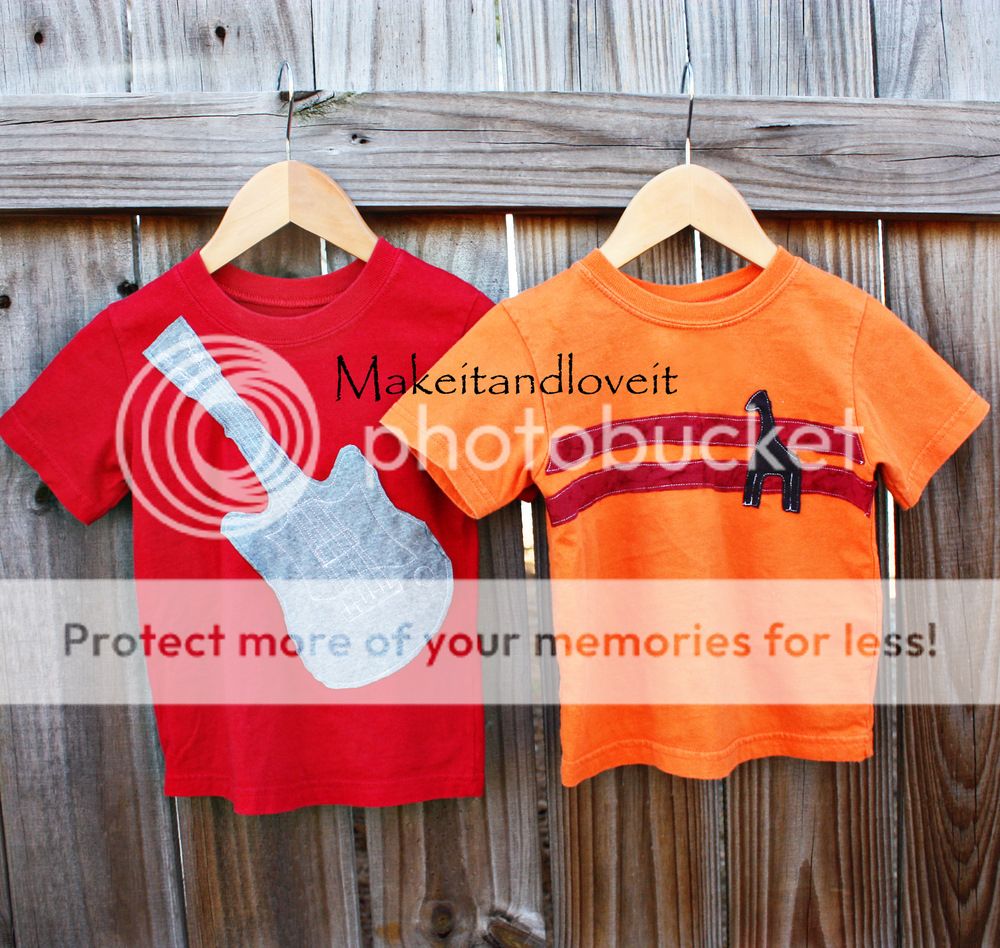
Ha ha. This Old Navy tee here.
I know, I didn’t change much or use much creativity with this one. But hat’s because once I saw it, I had to have it. (but not pay for it…..)
My husband has a similar electric guitar and totally wanted our little guy to sport his own.
(And if you ask him, there is so much more detail I could have added….)
So I found a guitar to copy here.
Then I drew it on paper, cut it out, traced it onto some knit, and then cut that out. Then I pinned it to the Tshirt and then sewed around the entire guitar. Then I used chalk to draw some of the details on the guitar and then sewed over top of them….being sure to back-stitch at the beginning and end of each line.
That was it.
I did the same thing here…..but just cut strips for the stripes and sewed them on first. Then I cut a little giraffe (no, not a dinosaur) and sewed him on next.
I didn’t use interfacing at all. I figured there was enough stitching on both to really hold them in place.
Tip: If you’re using a large piece of knit (like the guitar)….make sure to use lots of stitching all over for your detail. This will help keep the knit in place. Otherwise, you may want to use interfacing.
Easy and simple……..just like that.
Perfect.
A few new Tshirts for those rascally boys.
(and okay, this works great for girls too.)
Yes, there will be a couple more styles tomorrow. Stay tuned……..
**Edited to Add: Part II of the Tshirt project can be found here.
I am featuring this idea on my blog i used the first photo with a link to your blog!
what a great idea!
Hey Angie, I sewed everything by opening up the shirt from the bottom. I didn't un-pick the shirt at all. Just pin your shapes in place and then open up the shirt from the bottom and then situate your needle where you need it to sew. Make sure to flatten the material out in the section that you're sewing. Hope that helps! :)
Ashley, how did you sew the giraffe shirt from underarm to underarm without taking it apart? It looks like it would be tricky to sew in that direction.
I am so excited to try this for my boys! I love all the girl stuff but only have boys to dress. Thanks for the cute boy things to make.
Just for the record, I totally knew that was a giraffe when I saw it. :)
Who won the Baby Blvd. giveaway?
Can't wait to try some on my little guy!
Love it! Just stumbled across your blog yesterday and have to admit that I have been stalking your blog since then! *LOL* I am SUCH a newbie to sewing but want to try so badly! I already started on making a little shirt for my princess after seeing this post! So excited to see how it turns out! Thanks for the inspiration!
you are such an inspiration to me! and my kids love looking at your blog as well. thanks for all the great ideas…
olivia @ the orsborn family
https://theorsbornfamily.blogspot.com
THANK YOU for posting a boy idea. My sweet toddler's a boy, and it's so much harder to find cute ideas to make for him. I generally don't like sewing with knits, but I'm definitely going to give this a try.
The t shirts are so cute! I might try and make some girly versions for presents. :D Your blog is full of great ideas, I love checking it for new posts!
Awesome idea!! Question, was it difficult to sew the t-shirts without taking them apart? Do you have any tips that you used to keep both knits in place while sewing? I love your blog and check it almost daily! Thanks for having this. It's so very fun.
Love these shirts – so cute! I've got two boys and am always looking for cute clothing ideas. I've got two black t-shirts that have a purpose now. Thanks!
yay! something to make for my boys! Thanks!!!
Yay! Thanks SOOOO much for doing some boy stuff! I have two boys, and it just kills me to see all the cute girl projects when I have no little girls to wear them! Nice to have some inspiration for little boy clothes. Keep it coming!
I can't believe how much we think a like, I too have been working on boys shirts since I have 3 boys and only 1 girl. I have been trying to make a guitar shirt, I will be posting it when i am done, check out my blog if you ever have time.
beckyscraftcloset.blogspot.com
Thanks for the BOY idea! I have a son and it gets hard to be creative with his clothes! (This would also be a great way to cover stained shirts-and we have LOTS of those!)
Yay! A boy tutorial! That makes me so happy!
Clever, clever, CLEVER! and adorable! Thanks for the great post, as usual!
Great idea! Love the shirts!
These turned out great! Thank you for sharing. I've been wanting to do something like this, so maybe I'll try soon!
Thanks,
Christie
alemonsqueezyhome.blogspot.com
I just found some t-shirts stuck in a basket, so I needed an idea for them. Thanks!!
Liz
https://lovingthismomstuff.blogspot.com/
Love these. Great idea and your model is SO cute, I mean HANDSOME.
Those are adorable!! Thanks for the great ideas. Time to start stocking up on plain short sleeve tshirts for summer and changing them up a bit. Thanks for sharing.
Love it! I have been hanging on to a couple of my son's favorite shirts that he outgrew. Now I know what to do… cut out the pictures & sew them onto a bigger shirt! They'll be even cooler than the original shirts! Thanks for the great idea!
Love it! hmmm,… what to make first…that's the only problem.
Yeah Andrea, I know what you mean. And nope, no interfacing. Good luck if you try this yourself!
Thanks for a post about boy refashion. It's harder to do those, I think. Not only because of the lack of ideas out on the blog but also because boy clothing fashion has to be more subtle. (aka…harder to pull off)
I can't wait to try this. Did you use interfacing or anything under it?