UPDATE: Oliver’s costume is done and you can find the Toothless Costume Tutorial HERE.
And if you’re looking for other inspiration, you can find all sorts of DIY Halloween Costume Ideas HERE.
. . . . .
This is the first year that my kiddos haven’t all dressed up as one theme and I’m not gonna lie, I was secretly a little bummed about that. But once they started getting excited about their costume ideas and what they wanted to include, I couldn’t help but get excited right along with them! (And okay, since Oliver is only 1 and has no opinion, I’m totally making him something that goes right along with Connor’s costume. Any guesses??? I’ll share next week.)
But this costume ended up being REALLY FUN for me to make! It was very different from what I normally make and I had to keep my brain focused on leather and metal and studs and—–TOUGHER stuff! I wasn’t really sure exactly what I was going to do until I sat down and started cutting my stack of faux leather. And then it just started coming together. But the most fun part for me, was to watch Connor try on components of the costume as I would complete them and get SO EXCITED to see them come together. He felt like one cool kid and just kept telling me “thank you mommy, I love this, I love this I love this!” Ha….sweet kid!
But finally, Connor’s Hiccup costume is complete —
We took these pictures of Connor in his costume over by a park in our neighborhood and while we were there, there were 2 little boys at the park who were following Connor around, asking if they could pet Toothless and had all sorts of questions for Connor about his costume and his “really cool sword”.
I was gathering up a few things and was several feet away at this point, when I overheard him proudly say, “My dad made me this sword with his special tools in his garage and then my mom painted it All. By. Herself!! Pretty cool, huh? Do you want to hold it?” I about died.
Sweet boy was so proud and it made every bit of effort worth it. (But I also secretly wanted to go home and make those boys their own swords too. Okay, I know where they live….maybe I will. Because you know, I did paint them All. By. Myself! Haha! ;) )
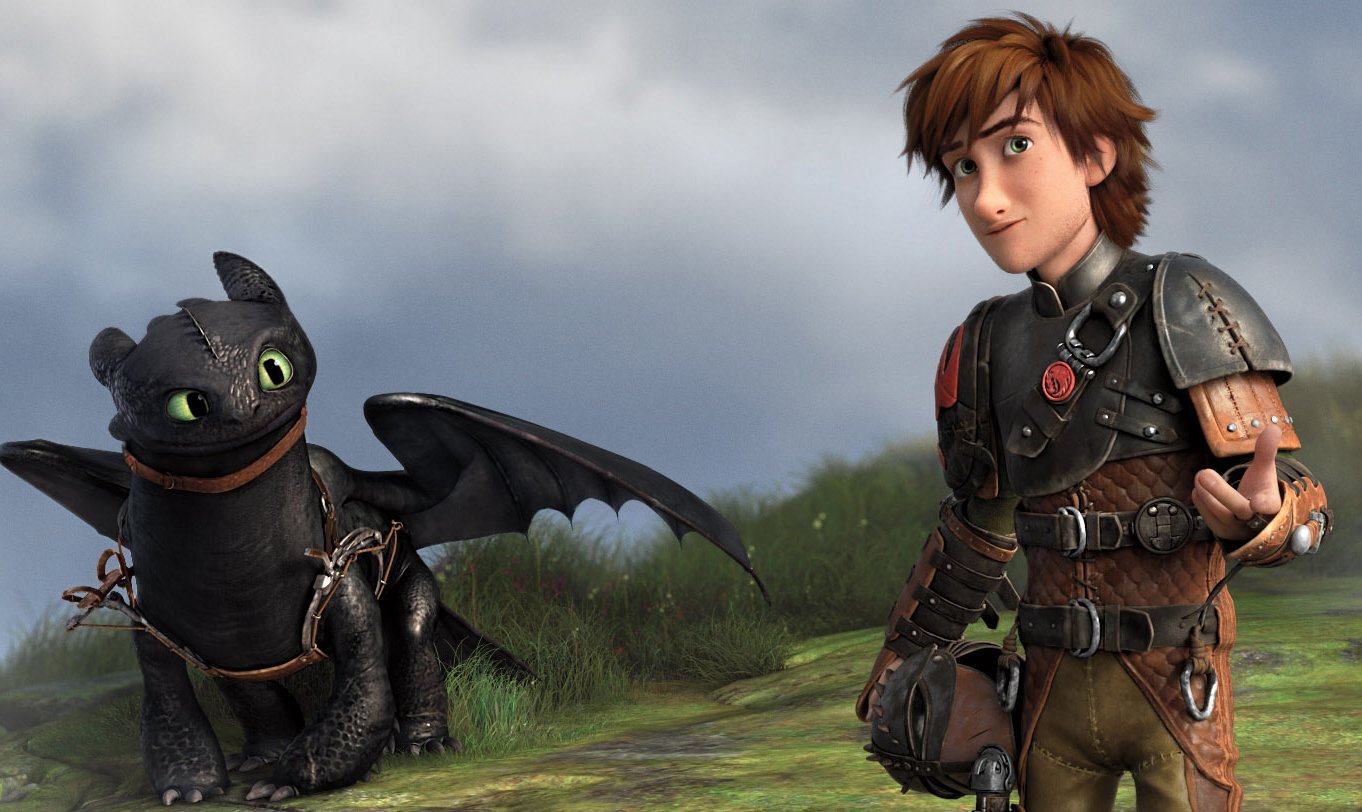
Connor’s favorite character in the “How To Train Your Dragon” movies is, of course, Hiccup. And maybe that’s because he starts out as a young kid and gets to experience some pretty cool things. I mean, riding a dragon, using a flaming sword, and sleeping in caves…..I mean, come on, what could be cooler than that??? ;)
But the 2nd movie is when Hiccup’s costume really becomes cool. And no, I didn’t add every single component….but still included enough to make Connor one very happy kid!
Most of the costume is made with vinyl (or faux leather) and it works great to give things shape. The top portion is an armor that Hiccup wears over a shirt and pants, which I just made out of some green knit fabric.
None of the buckles are actually functioning because, well, that would be a lot more work just to get in and out of this thing. Well, except for the belts….those buckles are functioning. But everything else is secured with velcro…..which makes this great for kids!
The dragon emblem is Hiccup’s signature and so even though I skipped some details, we couldn’t leave those out.
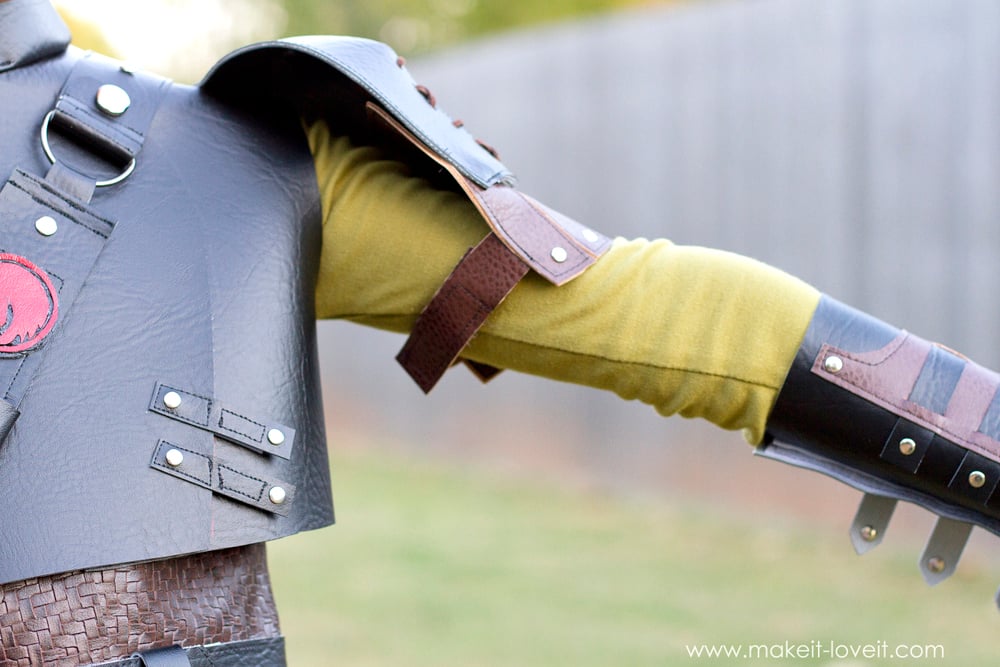
The shoulder pieces are made from 2 layers of the vinyl and don’t have any sort of stabilizer or batting or anything. They hold their shape really well because of how they’re cut and sewn…..but the process is actually pretty easy, so don’t let any of this scare you. But isn’t that leather lacing along that seam RAD??!! Hiccup has it on his costume….and I don’t know why, but that little detail is one of my favorites! :)
The shoulder armor is secured to the arms with little velcro straps, so they don’t flop around. Whew!
Oh, and if you’ve never attached little metal rivets before, it’s time you gave it a try. It’s also really simple to do and they really make this costume look so COOL!!
This forearm armor had me stumped for a bit because I was trying to make the shape too literal to the original….but then I changed plans, kept it a little more simple and then these forearm covers actually turned out better than I thought. And even look pretty tough!
And yep, all of those straps and rivets are just for looks….because they are secured with velcro.
Oh, and I was first thinking I would create some sort of boots that he could wear over any shoe type, but at the last minute, I realized he had black snow boots…..so I just covered the upper section of them with pieces of the faux leather, which kinda resembles what Hiccup wears in the movies. I don’t love them all that much and if I had time I would make them a little more contoured but there comes a point when I just have to tell my brain NO!….haha!
And yeah, I figured making an actual full-size “Toothless” dragon for Connor to ride would be a little more work than I wanted to tackle. ;) Ha! So, he’ll just have to continue imagining while playing with his little mini version. If only you could hear him talking when he’s in “pretend” mode. This kid chatters and creates sound effects and impersonates and on and on and on….
Once Connor put every part of his costume on for the first time and told me ‘thank you’ about a trillion times (I love that about him!), I realized my years of creating Prince Charming and Peter Pan costumes for this kid are over. He is 7 now and has a whole set of interests, separate from the ones that my girls have.
And that’s okay. Because I kinda love hearing about the crazy stories of bravery and dragon battles and ‘good vs. evil’ that this kid has going on in his head. And hey, now his stories feel a little more complete now that he’s completely “in costume”.
Love you buddy……and for the trillionth time, you are SO WELCOME! ;)
Okay, now it’s your turn.
Ready to make your own Hiccup costume?!!
Let’s do this!
SUPPLIES:
Hiccup has many little components and lots of details….but they’re all do-able. You just have to break it all down and construct one at a time. I think it’s really helpful to have a picture of Hiccup handy, if you’re trying to keep it similar to the original. But just remember, you don’t have to have every single little detail and sometimes you have to improvise and change the look of something, but maybe still shoot for the same effect. Or, you can skip some details all together.
But I decided to start with the brown woven-looking vest he wears under the outer armor. I used an existing shirt of Connor’s as a sizing guide and created my back and two front vest pieces. (Check out the Flynn Rider costume tutorial as a guide, I did the same thing there.) And before cutting the vinyl, I actually created a mock-up out of some scrap cotton fabric first, to test out the shape first and I HIGHLY recommend doing that so you don’t waste vinyl. Just be sure that the vest stays pretty close to the body (so there isn’t a lot of excess bulky fabric) and also that the front two pieces overlap by about an inch, comfortably.
Sew the vest together at the shoulders and along the two sides, with RIGHT sides together. (The Flynn Rider costume has lining pieces…..you won’t need those since vinyl doesn’t fray and can stand on its own.)
Next, I opened up the seams and sewed a zig-zag stitch down the middle of the seam to help it lay flat and open but it also gives it a nice effect.
Just be sure that the seam allowances from the inside are laying flat. (This worked great to help the seams lay flat for this vinyl but my black vinyl was thicker and I had to sew another straight seam along each seam allowance flap, to help it stay open and flat.)
Okay, the base vest is done.
Now, let’s make the outer armor. And let’s start with the bodice. This section only comes down a little less than halfway down Hiccup’s torso. So, measure your subject and determine how long you want it and cut your 3 vest pieces (referencing the Flynn tutorial above if needed). HOWEVER, notice that the front vest pieces are different. The right piece is normal and is exactly half of the back piece…..but the left one is wider and curves along the inner edge.
If you place it on the back piece, you’ll see that it’s wider than half.
Next, cut a little collar piece, just like the FLynn Rider costume….but you may have to play with the shape just a bit. I found that curving it slightly helped it to stand up correctly.
Then attach the vest pieces together, just like the base vest above….and then add your collar, just like the FLynn Rider Costume tutorial.
Now, because this is vinyl you’re working with and can be a little stiff, I tacked down the collar with a few stitches at the front, to keep it from folding back down. You may need to do the same.
On to the closure for the vest. Now, here is where you can take some shortcuts. You don’t actually need functioning straps and buckles, etc. You just want it to look like it really works. But the easiest thing to use with children…is VELCRO. This strap goes up and over the shoulder to the back but comes down the front and holds the front of the vest closed but we’re going to just make this strap section look like it really works but it will all be sewn into place…..with a little velcro on the back.
I think there are all these itty bitty little steps that I didn’t photograph but hopefully seeing them all separate, you’ll get the idea of how they were put together.
I decided to make this strap section 1 1/2 inches wide. So I cut the section that goes right across the chest (with the mini red circle dragon emblem) about 4 inches long (your length will vary), cut the end off like a rounded triangle, cut a strip for effect like a belt loop (that you’ll glue on later), added a small strip of vinyl to my 1 1/2 inch wide D-Ring and sewed it in place, etc. The only section that might be confusing (and I didn’t take any better pictures, sorry), is that long piece that will go over the shoulder and partway down the back. It’s facing down in the image below but the one end has some black facing up. I just cut an additional piece that was 2 inches long (and curved one end) and attached it to the end of the long strip, facing up. You’ll see why in the next step.
When it passes through the D-Ring and folds over, you want black to show, not the white side of the vinyl. So, it’s just a little trick to make it look like this “leather” is the same on both sides. Oh, and those rivets are attached by using a leather hole punch (I linked to a similar one in my supply list) through the vinyl, then used the rivet tool to hammer in the rivets (also linked above).
Then, I added more rivets to the long section of the strap that goes over the shoulder and to the back.
On the back side of the shorter section, I added some velcro.
Then, I glued the belt loop to the back side of the strap, so that it would look like the strap was held in place by the loop.
This is how I made the emblem. I cut a black circle, an outer red ring and then cut a smaller red circle and drew a dragon shape onto it. Then I cut out the dragon and then stacked them all together and glued them in place with epoxy glue. Also, the red vinyl I was using was more maroon, so I dabbed some red acrylic paint to it and it really brightened it up. Then, I just used epoxy glue to attach the emblem to the short strap.
Then, I positioned the strap so that it layed flat across the chest and then up and over the shoulder. Then I sewed the strap in place from the shoulder all the way to the back. The front you’ll leave open.
Decide where the velcro on the front needs to be and sew it on to the vinyl.
Then, I cut out two more little rectangle piece and added a rivet to each end. Then, I attached them at a diagonal to the lower edge of the vest flap and added more velcro to each piece and to the vest.
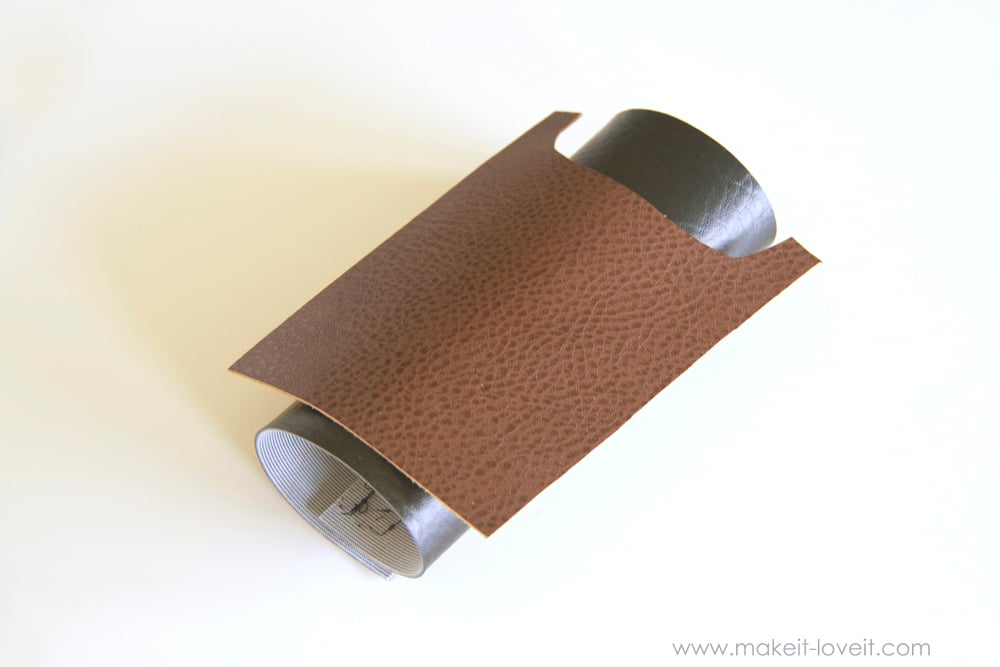
Okay, now onto the shoulders pieces of the armor. If you look at Hiccup, you’ll see these shoulder pieces are rounded and look like metal. I didn’t just want to cut out some rounded pieces and attach them flat, I really wanted them to have a rounded concave shape. So, I played around with some scrap orange vinyl I had and came up with this solution. (You can play around the same way with regular woven fabric….you don’t have to waste vinyl for this.) But, you’ll need a kind of half-oval shape angles outward at both sides, not straight down. Then, if you cut some slits, we can curve it back inward. But, if you cut the slits at an angle, then the seams will be more vertical in the next step.
Overlap the flaps of vinyl until you have a nice curved piece that will fit over the shoulder. And see how those diagonal cuts are now vertical in the center and symmetrical on both sides?? (If you would have cut them exactly vertical in the last step, they would be overlap more an angle here…and I just didn’t want that.)
Then, sew the center seam first (you’ll have to let the two sides go) and then reposition each side and sew those too.
Now, cut an additional 2nd piece, exactly like the first, sew it the same way, but curved out the other way.
Then, place the two pieces together with WRONG sides together….
Then, sew along the curved outer edges the best you can, about 1/8 of an inch from the edges. Most likely it won’t line up perfectly, but that’s okay, just trim off the excess.
Then, trim off the bottom edge into a straight line…
Then sew it closed too.
Now, hiccup’s armor on his right shoulder has some leather cording holding the “metal” pieces together…..so to give it this look, I punched some holes along both sides of the left seam.
Then, I threaded some leather cording through the holes, similar to lacing a shoe. Knot it in the back and cut off the ends. Cool looking, right?
Okay, Hiccup’s left shoulder is different. It’s similar to the right but it’s rounded along the bottom too. So, the orange piece below is the template I used for the right shoulder. The left shoulder is pretty much exactly double in size. I used the same angle for the slits and continued the cut down through the bottom.
Here are the lines that I actually cut.
Then, I overlapped the sections in the same way, creating the concave shape but more rounded at the bottom. Just be sure to adjust the flaps a little here and there so that the shape is pretty even and symmetrical. However, it doesn’t have to be perfect. Then create a second piece, but curved out the other way.
Plae them together with WRONG sides together and then sew them together along the sides and tops to hold them in place….then trim off the bottom edge so that it’s curved like the top edge.
Then, sew along the bottom edge too, to hold it all in place.
Now, cut a dragon shape from your red vinyl and use the shoulder armor as a guide to see how big to make it, etc.
Then use epoxy glue to attach it to the shoulder piece. I also added some acrylic red paint to my maroon vinyl to brighten it up.
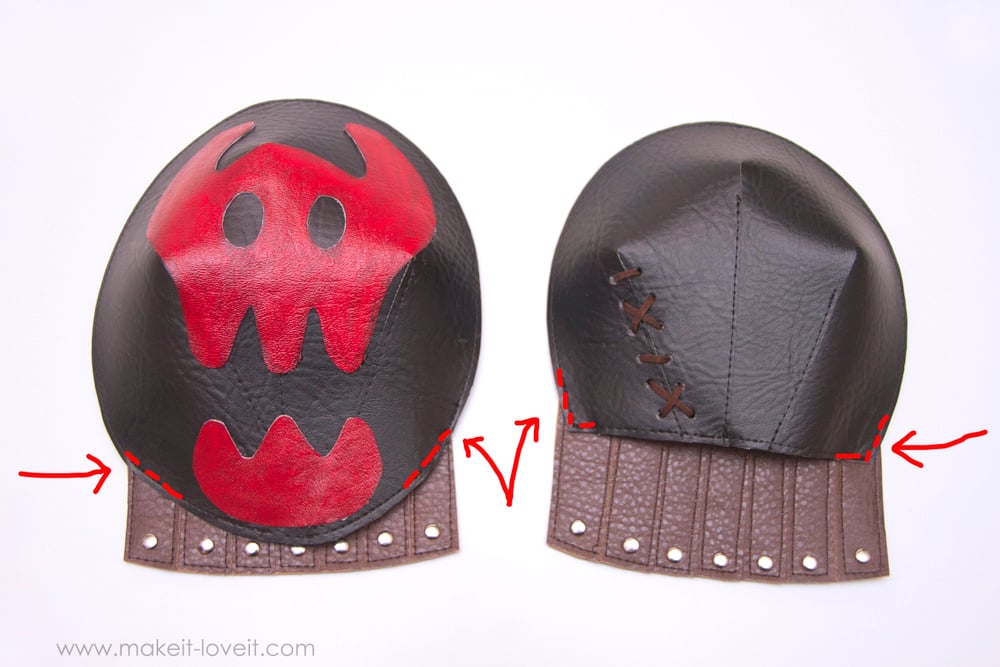
Next, Hiccup has these brown leather pieces that fall below each shoulder armor piece. To create them, I cut a rectangle piece that was about as wide as the base of the right shoulder piece. Then I cut some vertical slits about 2/3 of the way up from the bottom.
I cut another piece of brown vinyl the same size and placed it on the back side and then sewed them together, sewing around each slit that you cut on the front piece…..just for effect. (I didn’t cut slits in the back piece of vinyl…..just the front, for effect) Then I added a rivet to the bottom of each sewn section.
Then I made a second one the same size…..so that both should pieces would have one. Then, I overlapped them so that the entire section would attach to the shoulder of the vest we created above but would end about an inch above Connor’s elbow. Attach the brown pieces to the shoulder armor pieces by tacking it with a few stitches at both bottom bottom corners.
Then to help the base of the brown flaps curve more around the arm, I added some strips near the bottom edge and added velcro to secure around the arm.
Now, position each of the shoulder pieces onto the vest and attach with a few stitches at the shoulders.
I also forgot to show you that I cut a triangle cut in the back and added 2 rivets back there as well. You can see it in this image that I used up above…..and it’s pretty self explanatory.
Okay, that’s it. The top armor is done!
Now, let’s make the 2 belts that Hiccup wears around his waist. I cut 1 1/4 inch wide strips that were long enough to fit around Connor’s waist while wearing the vest, plus about 4 extra inches.
On one end, loop the 2 D-Rings through, fold the vinyl to the back and stitch in place.
On the other end, cut a strip that’s about 6-7 inches long and then curve the ends of both pieces to look like the end of a belt.
Then place these two pieces together with wrong sides together and stitch together around the outer edges. The reason for doing this is so that it looks like the belt is black on both sides, without actually using all that vinyl. (However, you could actually make a strip that’s exact length of the belt and sew them together. Either way.)
Then, I cut a belt loop that I glued along the back side. This will help the flap of the belt stay in place later on.
You may need to position the belt to see exactly where to position the belt loop before gluing it down, but in the end, it will look like this when it’s all done.
Now, add some rivets to the belt just for looks and then make an identical 2nd belt.
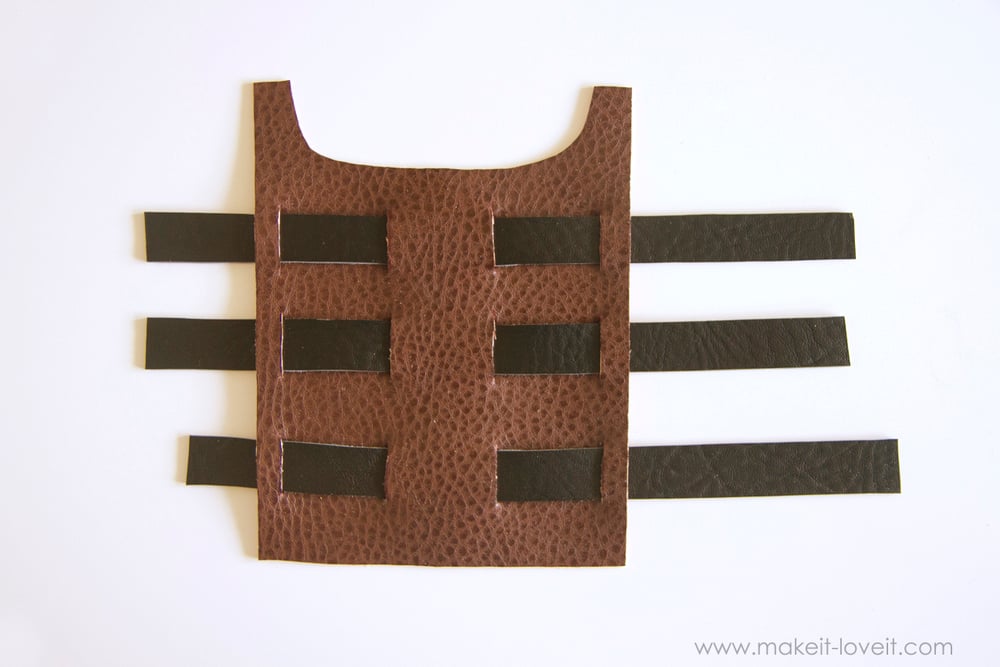
Okay, now it’s time for the forearm armor. Cut a rectangle piece of black vinyl that rests right below the elbow…down to the wrist. And make it wide enough to wrap around the forearm nice and snug, and overlap by 1 inch. Attach velcro to both ends.
Then adhere the velcro so that the forearm armor takes shape. Then cut a rectangle piece of brown vinyl that’s similar to the shape below.
Now, cut some slits into the brown vinyl and then cut 3 black strips of vinyl that fit through those slits….
…..and then weave them through.
Place on the black vinyl and adjust the strips so that it’s similar to what it looks like below. Then sew around the edges of the brown vinyl…..letting the ends of the strips hang freely. Add some rivets for detail. Also, trim down the ends of the strips to a more curved triangular shape.
When this armor piece takes shape, it looks more like this…
Now, we just need a small piece that covers the hand. Cut 2 half oval shapes that are wide enough to cover the hand.
Sew the two half oval shapes together with WRONG sides together and then attach them to the bottom edge of the armor piece. That’s it…..cool, right??
Now, Hiccup needs some under-clothing to wear. His shirt and pants are mostly covered but you can see they are green. I just made a very simple shirt (similar to this Women’s shirt tutorial) with a large neck opening that I didn’t even bother finishing. I didn’t even hem anything….it’s not really necessary.
For the pants, I just made a very simple pair of leggings (using this Simple Legging Tutorial) and used his older sister’s leggings as a template but made the legs a little wider, so that they weren’t so snug. Instead, they were a little looser like knit legging jammies you can buy for boys. Then I cut two strips of the brown vinyl to extend down the length of his leg…..and attached them with a seam at the top of the legs, that will be hidden when he’s wearing the brown vest.
I made the strips a little wider at the top and then tapered it down a bit. Also, they need to be long enough to reach his boots so you can attach the boot covers.
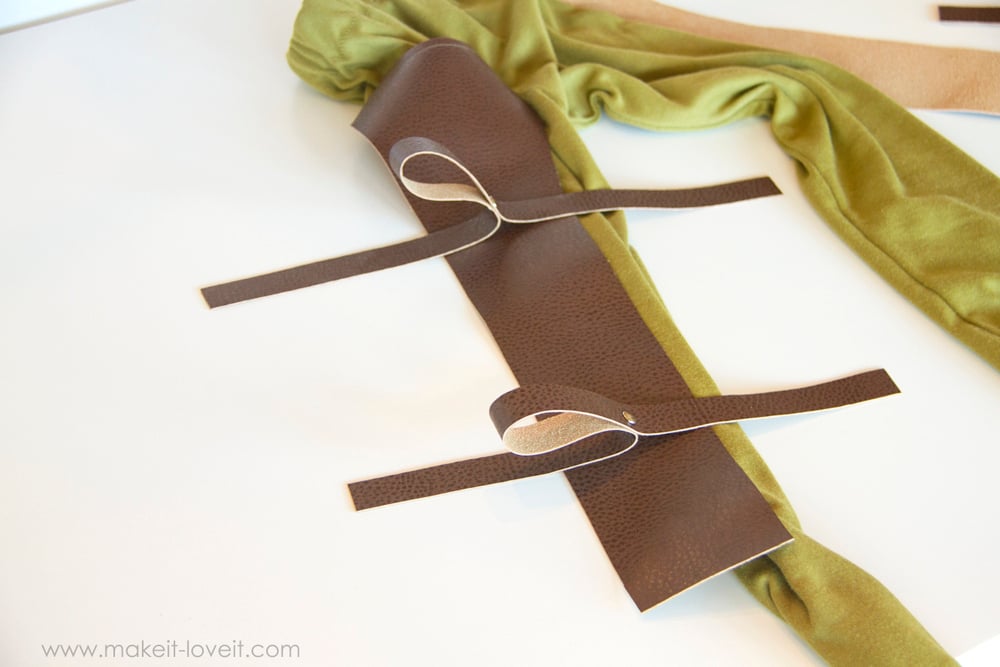
But first, let’s add the leather straps to the legs like Hiccup has. To do this, I cut 2 1/2 inch wide strips of brown vinyl for each leg that were long enough to have a loop but also wrap around the leg and overlap with velcro on the inner leg. One of them will attach right above his knee and then the other to attach above his boot. I folded each in half and then added a rivet about an inch and a half away from the fold.
Then, open up each strip and place it on the long piece that goes down the side of the leg.
Then attach it by sewing it in place with a few seams and then add velcro to each end. Repeat with the other piece. And then make two more strips the same way and attach them to the other leg.
Now, Connor has some black snow boots that work perfectly for this costume. But I didn’t like the top of the boots showing. So, I just cut a large rectangle of brown vinyl that snugly fits around the upper portion of his bot and added velcro to each end. Then I attached the center of it to the bottom of the strip that runs down his leg.
Then, you can wrap it around the boot and velcro in place.
Oh, and by the way……Steve made the sword for Connor from a piece of scrap wood he had in the garage. I just painted the sword portion with yellow acrylic paing and then added some orange acrylic paint to the flames and tried to blend them together a bit. Then I painted the handle portion with silver and then wrapped some of the scrap faux leather around it and glued it in place with some epoxy. That’s it!
And now the costume is complete!!!!! Hiccup is officially ready to hop on his dragon Toothless……and take flight!
Good luck making your own…..and enjoy!
-Ashley

Hi, I’m Ashley—the DIY-enthusiast behind this crazy blog!